
English Русский
Български
Беларускі
Український
Српски
Hrvatski
Română
Polski
Slovenský
Magyar
  |  Articles  |  Sitemap  |  Contacts  |    |
Car maintenance Ford Car maintenance Hyundai Car maintenance Chevrolet Car maintenance BMW Car maintenance Audi Car maintenance Opel Car maintenance AvtoVAZ
VWmanual.ru


Main   Passat   Golf   Polo   Touareg   Tiguan   Sharan   Transporter   Others  
LT 28 (1975-1991) LT 2D (1996-2003) Beetle (1960-1986) Caddy 3 (2003-2010)

Removal and installation the timing belt (with the engine support mounted remotely) (VW Caddy 3)

  • Main
  • Volkswagen
  • Caddy 3
  • General information
  • Maintenance
  • Removal and installation the timing belt (with the engine support mounted remotely)
            0


Contents: Removal ↓ Installation ↓

Removal


Caution: Risk of fuel leakage! The fuel in the fuel system is under pressure. Before disconnecting the system elements, the connection point must be wrapped with a rag. Then, by carefully loosening the connection, you need to release the pressure.


Please note: the timing belt adjustment should only be performed on a cold engine, as the tensioner adjustment position changes depending on the temperature.


1. Remove the engine cover. To do this, sharply pull the front engine cover (arrow A) up from the rear mount and then forward (arrow B).
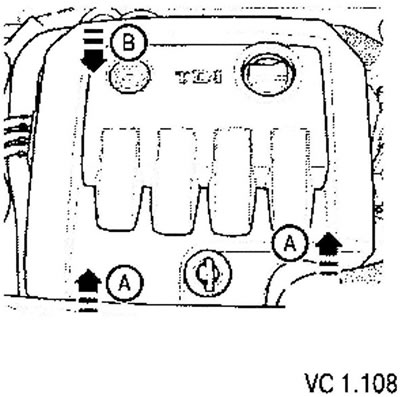
1. Remove the engine cover. To do this, sharply pull the front engine cover (arrow A) up from the…


2. Disconnect the fuel injection hose (2), fuel return hose (1), and coolant hose (3).
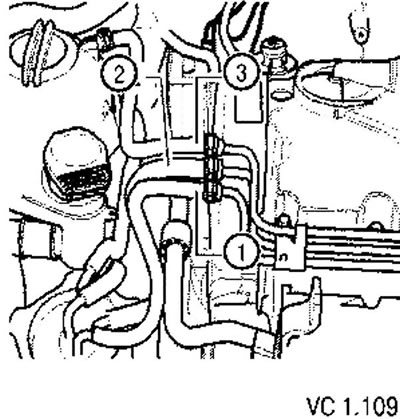
2. Disconnect the fuel injection hose (2), fuel return hose (1), and coolant hose (3).


3. Remove the connecting pipe between the charge air cooler and the exhaust pipe by slightly lifting the clamps (arrows).
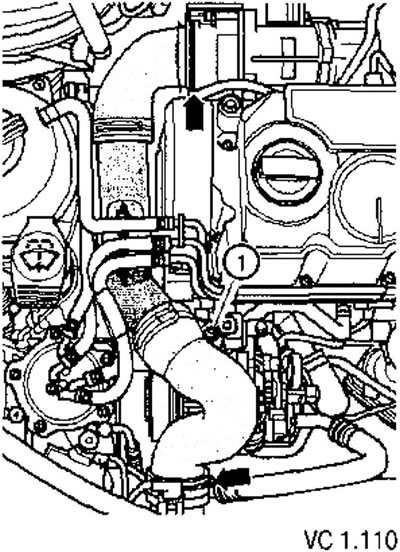


3. Remove the connecting pipe between the charge air cooler and the exhaust pipe by slightly…


4. After pulling out the clamps, disconnect the pressure (3) and return (2) fuel lines.
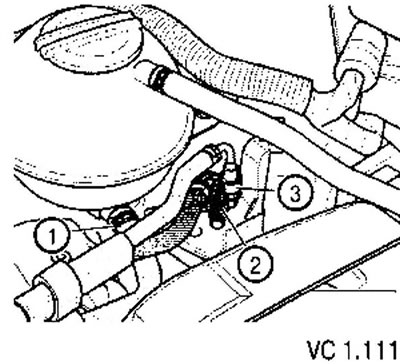
4. After pulling out the clamps, disconnect the pressure (3) and return (2) fuel lines.


5. Remove the fuel filter (arrow) from the bracket.

6. Unscrew the bolt on the neck (1) of the washer reservoir.

7. Unscrew the fuel filter bracket (3).
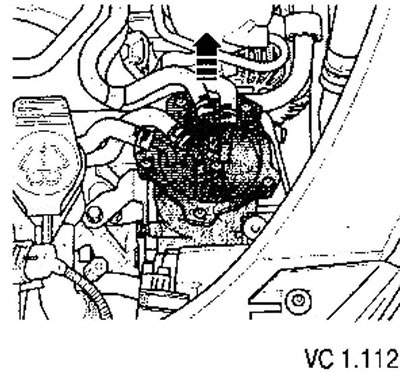
7. Unscrew the fuel filter bracket (3).


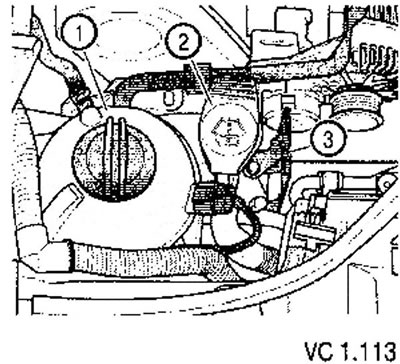
8. Disconnect the electrical connector on the coolant expansion tank (1),


9. Unscrew the expansion tank (do not disconnect the hoses that go with it) and take him aside.

10. Remove the poly V-belt.

11. Remove the poly V-belt tensioner.

12. Remove the upper timing belt cover.

13. Remove the front right wheel arch liner.

The information is available on the website: www.VWmanual.ru

14. Remove the crankshaft pulley.

15. Remove the lower and middle timing belt covers.

16. Bring the crankshaft to the TDC position of the first cylinder.
16. Bring the crankshaft to the TDC position of the first cylinder.


17. Turn the crankshaft until the mark on its toothed pulley and the toothed segment of the camshaft pulley are in the upper position. In this case, the mark on the camshaft pulley should coincide with the mark on the timing belt cover behind the pulley (arrow).

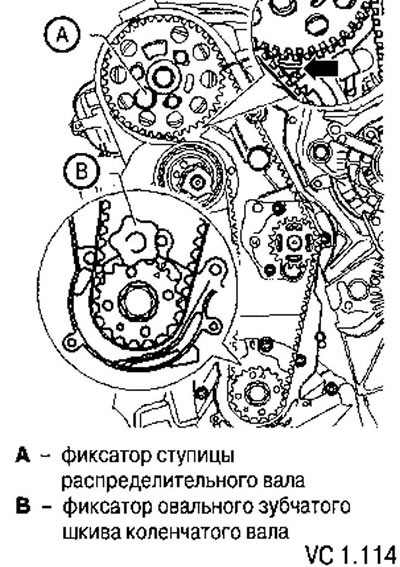
18. Secure the hub with the locking device. To do this, insert the retainer into the hole in the cylinder head through the free concentric groove on the left side of the camshaft toothed pulley.

19. Fix the crankshaft toothed pulley. The marks on the crankshaft timing pulley and on the crankshaft locking pin must match. In this case, the retainer pin should enter the hole in the front cover of the cylinder block.

20. Mark the direction of movement of the toothed belt.
20. Mark the direction of movement of the toothed belt.


21. Loosen the mounting screws (1) of the camshaft pulley so that it can rotate in the concentric grooves.
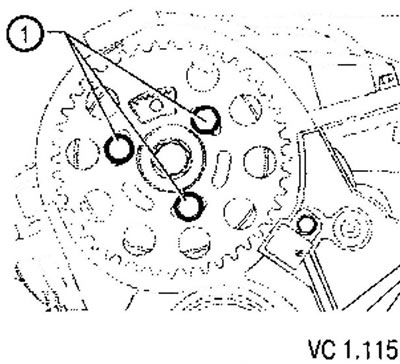
21. Loosen the mounting screws (1) of the camshaft pulley so that it can rotate in the concentric…


22. Loosen the nut (1) securing the tension roller.

23. Rotate the tension roller eccentric counterclockwise (arrow) using a socket wrench until the tension roller can be secured with the locking pin.
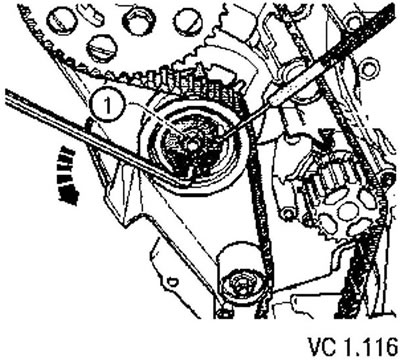
23. Rotate the tension roller eccentric counterclockwise (arrow) using a socket wrench until the…


24. Turn the tension roller eccentric clockwise (arrow) until it stops and tighten the fastening nut (1) by hand.

25. Remove the toothed belt first from the coolant pump pulley, and then from the other toothed pulleys.
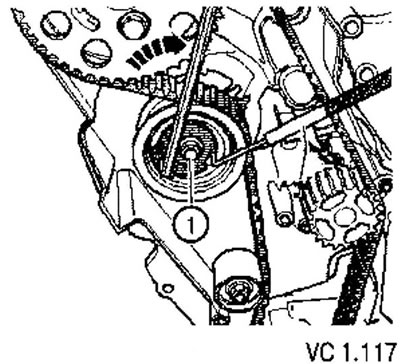
25. Remove the toothed belt first from the coolant pump pulley, and then from the other toothed…


Installation


1. Fix the camshaft using the locking device (1).

2. Fix the crankshaft using the crankshaft locking tool.

3. Fix the tension roller with a clamp and secure it with a nut in the extreme right position.

4. Turn the camshaft pulley so that it occupies the middle position in the concentric grooves (arrows).

5. Pass the timing belt between the engine mount and the engine.

6. Install the timing belt on the crankshaft pulley, tension roller, camshaft pulley and idler roller.

7. Lastly, the belt is installed on the coolant pump pulley.
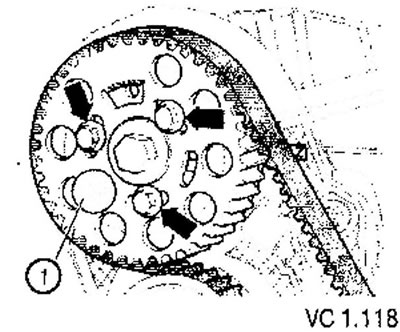
7. Lastly, the belt is installed on the coolant pump pulley.


8. Ensure the proper position of the tension roller in the rear timing belt housing (arrow).
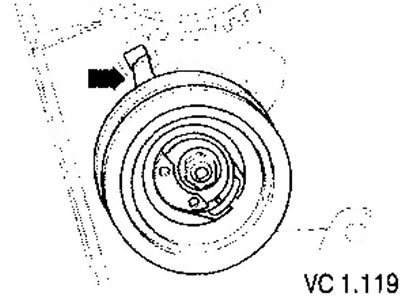
8. Ensure the proper position of the tension roller in the rear timing belt housing (arrow).


9. Remove the retainer from the tension roller.

10. Loosen the tension roller fastening nut (1).

11. Turn the tension roller eccentric clockwise (arrow) using a socket wrench until the pointer (2) is in the middle of the hole in the base. The fastening nut should not rotate.
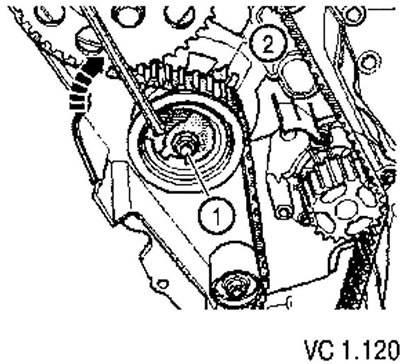
11. Turn the tension roller eccentric clockwise (arrow) using a socket wrench until the pointer (2)…


12. While holding the tension roller in this position, tighten the fastening nut as follows: 20 Nm and turn further by 1/8 of a turn (45°).

13. Install the camshaft timing pulley retainer with pins as shown in the figure.

14. Apply force to the retainer in the direction indicated by the arrow to hold the toothed pulley.

15. Tighten the camshaft pulley mounting screws (1) in this position to a torque of 25 Nm.

16. Remove the camshaft hub locking pin and crankshaft locking pin (T10050 or T10100).

17. Secure the camshaft hub with a locking device.

18. Check whether the crankshaft can be fixed in this position using a locking device (T10050 or 710100). If the crankshaft cannot be fixed, then the following steps must be performed..
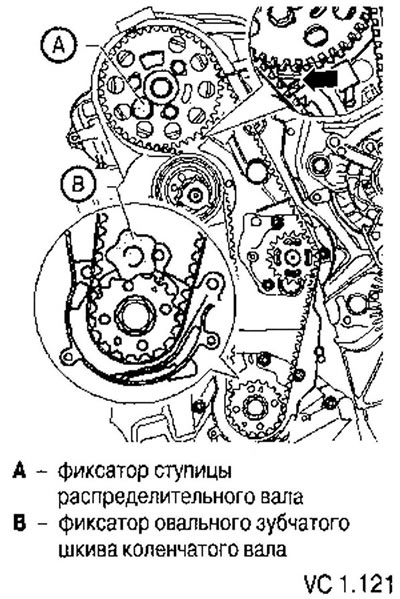
18. Check whether the crankshaft can be fixed in this position using a locking device (T10050 or…

  • Loosen the camshaft pulley mounting screws (1).
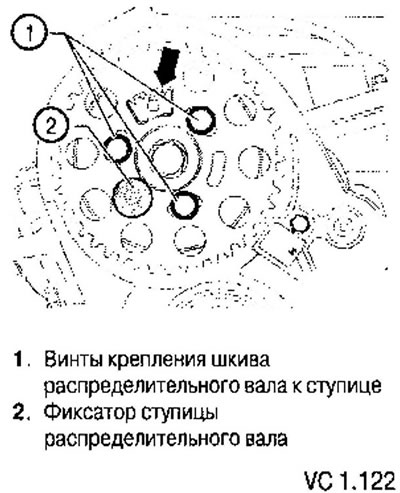
Loosen the camshaft pulley mounting screws (1).

  • Turn the crankshaft slightly in the opposite direction until the locking pin is almost at the corresponding hole in the crankshaft cover (arrow).
  • Rotate the crankshaft in the working direction so that the locking pin enters the hole during rotation.
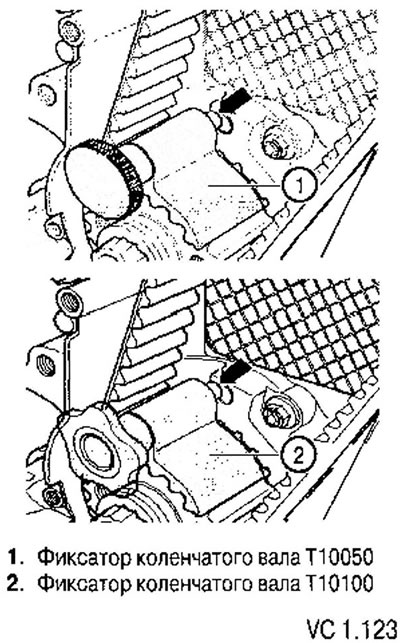
Rotate the crankshaft in the working direction so that the locking pin enters the hole during…


19. Install the camshaft timing pulley retainer (2) with pins (3) as shown in the figure.

20. Apply force to the retainer in the direction indicated by the arrow to hold the toothed pulley.

21. Tighten the camshaft pulley mounting screws (1) in this position to a torque of 25 Nm.

22. Remove the camshaft hub locking pin (4) and the crankshaft locking pin (T10050 or T10100).
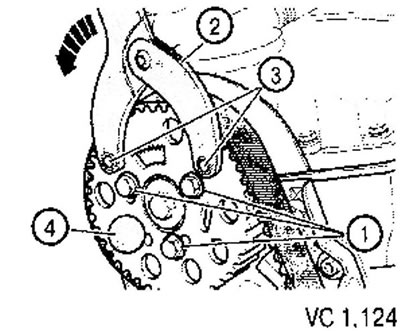
22. Remove the camshaft hub locking pin (4) and the crankshaft locking pin (T10050 or T10100).


23. Turn the crankshaft two revolutions in the direction of engine rotation so that the piston of the 1st cylinder takes a position close to TDC.

24. Repeat the check and adjust if necessary.

25. Install the middle and lower timing belt covers.

26. Install the vibration damper/pulley. Tightening torque: 10 Nm + 90° (1/4 turn).

27. Install the poly V-belt.

28. Install the upper timing belt guard.

29. Install the right front fender liner.

30. Install the expansion tank of the cooling system.

31. Screw the fuel filter bracket to the engine mount with a torque of 8 Nm (arrows).

32. Fix the fuel filter in the bracket.

33. Screw on the washer reservoir neck.

34. Install the engine cover.
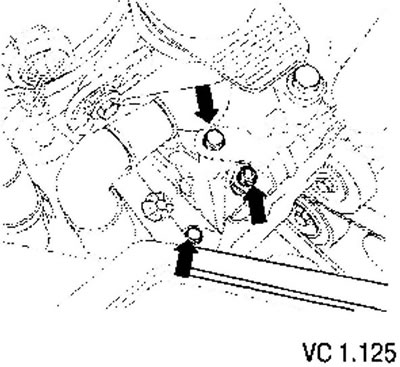
34. Install the engine cover.

This article is available at russian, bulgarian, belarusian, ukrainian, serbian, croatian, romanian, polish, slovak, hungarian
The text has been checked: Kolesnikov Artem

Share information:

Previous articles
Replacing the timing belt in TDI and SDI diesel engines
Replacing the timing belt of 1.6L BGU, VSE and BCF petrol engines
Replacing the timing belt of 1.4L BCA and BUD petrol engines
Checking the camshaft timing belt (SDI and TDI diesel engines)
Checking the timing belt (4-cylinder petrol engines)
Replacing the air filter element
Next articles
Replacing spark plugs
Oil and filter change in the 6-speed dual-clutch transmission 02E
Checking headlight adjustment


Similar articles from other manuals for VW cars:
Removal and installation the timing belt / adjusting the engine… Passat B3 (1988-1993)
Timing Belt (Camshaft Drive Belt) Golf 1 (1974-1984, petrol)
Removal and installation the timing belt (PD-TDI engine) Polo 4 (2001-2009)
Removal and installation a poly V-belt (4.2L petrol engine) Touareg 1 (2002-2006)
Removal, installation and tensioning the timing belt Tiguan 1 (2007-2015)
Adjusting the tension of the drive belt of engine units Sharan 1 (1995-2000)
Removal and installation the timing belt (5-cylinder diesel) Transporter T4 (1990-2003)
Link to this page in different formats


Visitor comments


No comments yet


How much will 50 + 36 =


Caddy 3 
  • General information
  • User manual
  • Daily care
  • Maintenance
  • Petrol engines 1.4 l
  • Engine repair
  • Cooling and lubrication system
  • Power and exhaust system
  • Petrol engines 1.6 l
  • Engine repair
  • Cooling and lubrication system
  • Power and exhaust system
  • Diesel engines
  • Engine repair
  • Cooling and lubrication system
  • Power and exhaust system
  • Transmission
  • Mechanical gearbox 0AH
  • Mechanical gearbox 0A4
  • Drive shafts
  • Chassis
  • Car suspension
  • Steering
  • Brake system
  • Body and wiring diagrams
  • Interior and exterior
  • Electrical circuits
Beetle 
  • General information
  • Maintenance
  • Power unit
  • Engine repair
  • Cooling and lubrication system
  • Supply system
  • Exhaust system
  • Transmission
  • Clutch
  • Car gearbox
  • Chassis
  • Front suspension
  • Rear suspension
  • Steering
  • Brake system
  • Wheels and tires
  • Body
  • Exterior
  • Electrical equipment
  • Equipment and devices
  • Power devices
  • Electrical circuits
LT 2D 
  • General information
  • User manual
  • Maintenance
  • Power unit
  • Petrol engines 2.3 l
  • Diesel engines 2.5 l
  • Diesel engines 2.8 l
  • Injection system (diesel 2.8 l)
  • Transmission
  • Clutch
  • Manual gearbox
  • Differential
  • Chassis
  • Car suspension
  • Steering system
  • Brake system
  • Body
  • Body elements
  • Heating system
  • Electrical equipment
  • Equipment and devices
  • Electrical circuits
LT 28 
  • General information
  • Maintenance
  • Power unit
  • Petrol engines 2.0L
  • Petrol engines 2.4L
  • Diesel engines
  • Cooling and heating
  • Fuel and exhaust system
  • Ignition system
  • Transmission
  • Clutch
  • Car gearbox
  • Cardan shaft
  • Rear axle
  • Chassis
  • Brake system
  • Car suspension
  • Steering system
  • Body
  • Body elements
  • Doors, locks and windows
  • Electrical equipment
  • Power devices
  • Equipment and devices
  • Electrical circuits
VWmanual.ru © 2016-2026 | Mobile version | News and articles | Sitemap: EN BG BY UA RS HR RO PL SK HU | Write message | Site search
Passat B2 • Passat B3 • Passat B4 • Passat B5 • Passat B6 • Golf 1, diesel • Golf 1, petrol • Golf 2, petrol • Golf 2 • Golf 3 • Golf 4 • Golf 5 • Polo 3 • Polo 4 • Touareg 1 • Tiguan 1 • Sharan 1 • Transporter T3 • Transporter T4 • LT 28 • LT 2D • Beetle • Caddy 3 •
Our website uses cookies to ensure functionality and convenience.