
English Русский
Български
Беларускі
Український
Српски
Hrvatski
Română
Polski
Slovenský
Magyar
  |  Articles  |  Sitemap  |  Contacts  |    |
Car maintenance Ford Car maintenance Hyundai Car maintenance Chevrolet Car maintenance BMW Car maintenance Audi Car maintenance Opel Car maintenance AvtoVAZ
VWmanual.ru


Main   Passat   Golf   Polo   Touareg   Tiguan   Sharan   Transporter   Others  
LT 28 (1975-1991) LT 2D (1996-2003) Beetle (1960-1986) Caddy 3 (2003-2010)

Checking headlight adjustment (VW Caddy 3)

  • Main
  • Volkswagen
  • Caddy 3
  • General information
  • Maintenance
  • Checking headlight adjustment
            0


Contents: Checking the main headlights ↓ Fog lights ↓ Adjusting headlights with halogen…↓ Adjusting fog lights installed in…↓
Conditions for checking and adjustment:
  • The tire pressure is correct.
  • Diffusers must not be dirty or damaged.
  • The reflectors and headlight bulbs must be in good working order.
  • The vehicle must be loaded. Load: One passenger or 75 kg per driver's seat in an unladen vehicle (curb weight).

The curb weight is the weight of a vehicle ready for operation with a fully filled fuel tank (at least 90% fuel), equipped with all the necessary operating equipment and devices (for example, a spare tire, a tool kit, a jack, a fire extinguisher, etc.).

If the fuel tank is not at least 90% full, then the load must be performed as follows.

Determine the weight of the additional load using the table, depending on the fuel level indicator in the tank. Additional cargo must be placed in the luggage compartment.

Table for determining ballast mass


Fuel level indicator readingsBallast weight, kg
Full0
1/430
1/220
3/410

It is best to use water canisters as ballast (A 5-liter canister of water weighs approximately 5 kg).

In order for the body to settle at a level corresponding to the weight, it is necessary to roll the car for several meters or rock it up and down several times from the front and rear.

The vehicle and the headlight alignment tester must be installed on the same horizontal surface.

The vehicle and the headlight alignment tester must be aligned with each other.


The headlight aiming angle must be set to the nominal value.

The nominal tilt angle value is indicated as a percentage on the plate above the headlight. The headlight inclination must be adjusted according to this value.

The specified headlight inclination (in %) is determined by the ratio of the headlight inclination value to the base distance at which this value is measured (the base distance is 10 m).

Conversion example: 1.0% equals 10 cm.

The headlight range control must be set to the "O" position.

Checking the main headlights


The following is checked. With the low beam on, does the horizontal border of light and shadow touch the dividing strip (1) of the measuring screen and is the inflection point (2) between the left horizontal part and the right rising part of the border of light and shadow on the perpendicular drawn through the central mark (3).

The area of most intense illumination should be located to the right of the central vertical line.
  • To make it easier to find the inflection point (1), you should alternately close and open the left one several times (in the direction of movement) half of the headlight. After this, check the low beam headlights again.
  • The center of the high beam light beam of a headlight with a correctly adjusted low beam must coincide with the center mark (3).
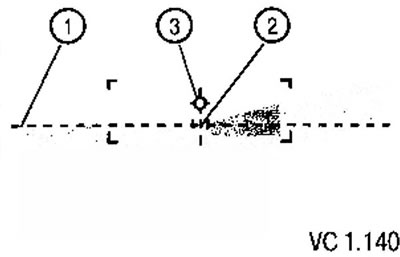
The center of the high beam light beam of a headlight with a correctly adjusted low beam must…

  • Adjusting the headlights using a screen with a line inclined at 15° is carried out in the same way as adjusting using a new-style screen.

To avoid adjustment errors, do not use the 15° line as a guide.
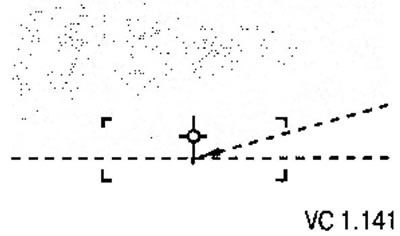

To avoid adjustment errors, do not use the 15° line as a guide.


Fog lights


When checking, you should make sure that the upper border of light and shadow touches the adjustment line and runs horizontally across the entire width of the screen.
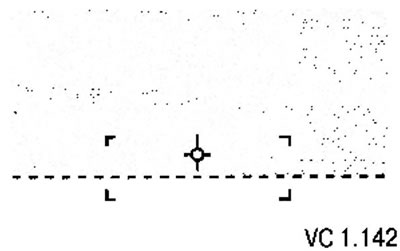
When checking, you should make sure that the upper border of light and shadow touches the…


Adjusting headlights with halogen lamps


Left headlight adjustment


The adjustment screws for the right headlight are arranged in a mirror image.
  • Vertical adjustment screw (1).
  • Screw (2) for vertical and horizontal adjustment.
  • Vertical adjustment is achieved by simultaneously rotating screws (1) and (2) by the same number of turns.
  • Horizontal adjustment is made by turning the screw (2) only.
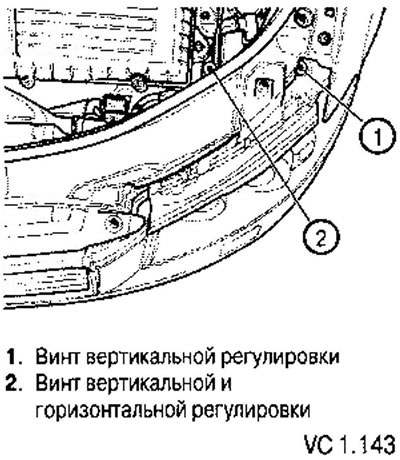
Horizontal adjustment is made by turning the screw (2) only.


Adjusting fog lights installed in headlight assemblies


Correct adjustment of the fog lights installed in the headlight unit is achieved automatically together with the adjustment of the main headlights.

Fog light in the bumper, right


The left fog light adjustment screw is located in a mirror image.

Nominal value of fog lamp inclination: 20 cm.

Release the tabs (arrows) from the clips and remove the trim at the bottom of the bumper.
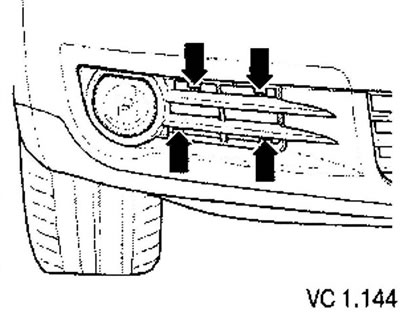
Release the tabs (arrows) from the clips and remove the trim at the bottom of the bumper.


To adjust the lighting range, rotate the adjusting screw (arrow).

Horizontal adjustment is not provided.
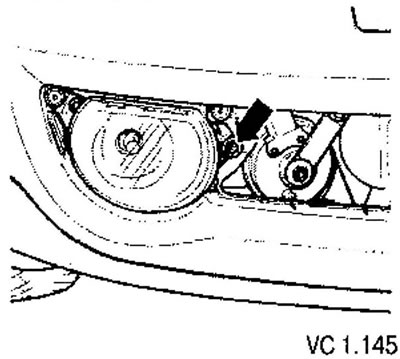
Horizontal adjustment is not provided.

This article is available at russian, bulgarian, belarusian, ukrainian, serbian, croatian, romanian, polish, slovak, hungarian
The text has been checked: Kolesnikov Artem

Share information:

Previous articles
Oil and filter change in the 6-speed dual-clutch transmission 02E
Replacing spark plugs
Removal and installation the timing belt (with the engine support mounted remotely)
Replacing the timing belt in TDI and SDI diesel engines
Replacing the timing belt of 1.6L BGU, VSE and BCF petrol engines
Replacing the timing belt of 1.4L BCA and BUD petrol engines
Next articles


Similar articles from other manuals for VW cars:
Checking headlight adjustment Passat B6 (2005-2010)
Headlight beam adjustment Golf 2 (1984-1993, petrol)
Headlight adjustment Polo 3 (1995-2003)
Headlight position adjustment Touareg 1 (2002-2006)
Checking the operation of the intake manifold flap Tiguan 1 (2007-2015)
Headlight adjustment Sharan 1 (1995-2000)
Headlight adjustment system Transporter T4 (1990-2003)
Link to this page in different formats


Visitor comments


No comments yet


How much will 32 + 42 =


Caddy 3 
  • General information
  • User manual
  • Daily care
  • Maintenance
  • Petrol engines 1.4 l
  • Engine repair
  • Cooling and lubrication system
  • Power and exhaust system
  • Petrol engines 1.6 l
  • Engine repair
  • Cooling and lubrication system
  • Power and exhaust system
  • Diesel engines
  • Engine repair
  • Cooling and lubrication system
  • Power and exhaust system
  • Transmission
  • Mechanical gearbox 0AH
  • Mechanical gearbox 0A4
  • Drive shafts
  • Chassis
  • Car suspension
  • Steering
  • Brake system
  • Body and wiring diagrams
  • Interior and exterior
  • Electrical circuits
Beetle 
  • General information
  • Maintenance
  • Power unit
  • Engine repair
  • Cooling and lubrication system
  • Supply system
  • Exhaust system
  • Transmission
  • Clutch
  • Car gearbox
  • Chassis
  • Front suspension
  • Rear suspension
  • Steering
  • Brake system
  • Wheels and tires
  • Body
  • Exterior
  • Electrical equipment
  • Equipment and devices
  • Power devices
  • Electrical circuits
LT 2D 
  • General information
  • User manual
  • Maintenance
  • Power unit
  • Petrol engines 2.3 l
  • Diesel engines 2.5 l
  • Diesel engines 2.8 l
  • Injection system (diesel 2.8 l)
  • Transmission
  • Clutch
  • Manual gearbox
  • Differential
  • Chassis
  • Car suspension
  • Steering system
  • Brake system
  • Body
  • Body elements
  • Heating system
  • Electrical equipment
  • Equipment and devices
  • Electrical circuits
LT 28 
  • General information
  • Maintenance
  • Power unit
  • Petrol engines 2.0L
  • Petrol engines 2.4L
  • Diesel engines
  • Cooling and heating
  • Fuel and exhaust system
  • Ignition system
  • Transmission
  • Clutch
  • Car gearbox
  • Cardan shaft
  • Rear axle
  • Chassis
  • Brake system
  • Car suspension
  • Steering system
  • Body
  • Body elements
  • Doors, locks and windows
  • Electrical equipment
  • Power devices
  • Equipment and devices
  • Electrical circuits
VWmanual.ru © 2016-2026 | Mobile version | News and articles | Sitemap: EN BG BY UA RS HR RO PL SK HU | Write message | Site search
Passat B2 • Passat B3 • Passat B4 • Passat B5 • Passat B6 • Golf 1, diesel • Golf 1, petrol • Golf 2, petrol • Golf 2 • Golf 3 • Golf 4 • Golf 5 • Polo 3 • Polo 4 • Touareg 1 • Tiguan 1 • Sharan 1 • Transporter T3 • Transporter T4 • LT 28 • LT 2D • Beetle • Caddy 3 •
Our website uses cookies to ensure functionality and convenience.