
English Русский
Български
Беларускі
Український
Српски
Hrvatski
Română
Polski
Slovenský
Magyar
  |  Articles  |  Sitemap  |  Contacts  |    |
Car maintenance Ford Car maintenance Hyundai Car maintenance Chevrolet Car maintenance BMW Car maintenance Audi Car maintenance Opel Car maintenance AvtoVAZ
VWmanual.ru


Main   Passat   Golf   Polo   Touareg   Tiguan   Sharan   Transporter   Others  
Passat B2 (1981-1988) Passat B3 (1988-1993) Passat B4 (1988-1996) Passat B5 (1996-2005) Passat B6 (2005-2010)

Replacing a gas discharge lamp (VW Passat B6)

  • Main
  • Passat
  • Passat B6
  • Electrical equipment
  • Lighting and appliances
  • Replacing a gas discharge lamp
            0


Contents: Removal ↓ Installation ↓
Note: The left and right gas discharge lamps can be checked using the diagnostics of the actuator of the on-board power supply control unit.


Note: The illustrations show the replacement of the gas discharge lamp on the right headlight.


Note: The left and right gas discharge lamps are replaced in the same way.


Removal


Turn off the ignition and all electrical consumers and turn the key to position 0 (preliminary stop).

Remove the headlight.
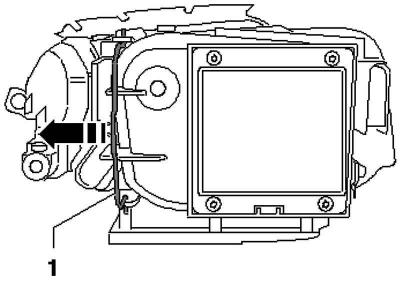
Fig. 7.73. Wire staple

Fig. 7.73. Wire staple


Press the wire clip 1 in the direction of the arrow to the side (Fig. 7.73).
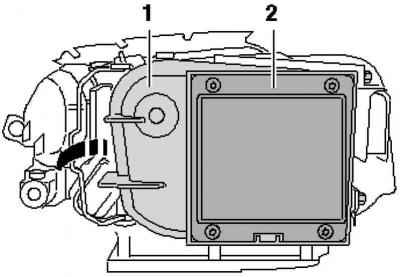
Fig. 7.74. Headlight power module cover

Fig. 7.74. Headlight power module cover


Remove cover 1 with headlight power module 2 in the direction of the arrow from the headlight as far as the length of the wires allows (Fig. 7.74).


Note: It is not necessary to unscrew the headlight power module 2 from the cover 1.
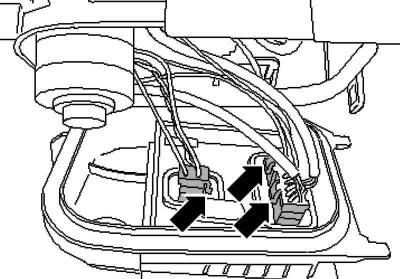

Fig. 7.75. Plug connectors

Fig. 7.75. Plug connectors


Unlock the plug connectors and remove the plugs (Fig. 7.75).

Note: The pressure inside the gas discharge lamp is from 7 (cold) to 100 bar (heated). The temperature around the heated gas discharge lamp reaches 700°C.


Caution: The gas discharge lamp may explode, so there is a risk of burns.


Caution: Be sure to wear safety glasses and gloves when removing and installing the lamp.
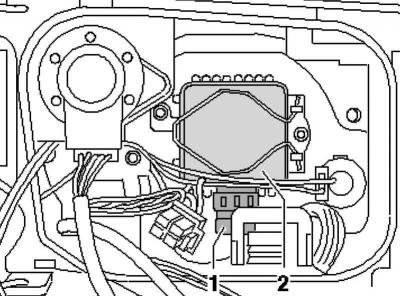

Fig. 7.76. Gas discharge lamp plug

Fig. 7.76. Gas discharge lamp plug


Disconnect plug 1 from gas discharge lamp 2 (Fig. 7.76).

Unlock the wire clip 1 and fold it aside.
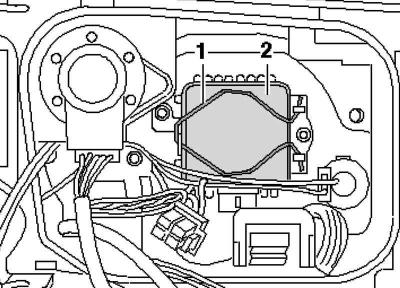
Fig. 7.77. Fastening a gas discharge lamp

Fig. 7.77. Fastening a gas discharge lamp


Carefully remove gas discharge lamp 2 from the mount (Fig. 7.77).

Installation


Installation is carried out in the reverse order, taking into account the following.

Note: When installing a gas discharge lamp, do not touch its glass bulb. Fingers leave greasy marks on the glass of the lamp, which evaporate after turning on the headlights, and the light of the lamp may dim.


Note: Never subject the glass bulb of the gas discharge lamp to mechanical impact. The glass bulb is very sensitive and, in addition, is under high pressure.


Note: Avoid looking directly into the focused light beam as the UV radiation from a discharge lamp is approximately 2.5 times greater than that of a conventional halogen light.


When installing the holder with the headlight power module, pay attention to the correct seating of the seal. Water getting inside the headlight will destroy it.

If a headlight with an automatic corrector has been removed, then after installation it is necessary to perform a basic adjustment of the headlights.

Insert the gas discharge lamp so that the locking tabs fit into the grooves on the reflector.

Check the operation of the headlight, including all its functions.

Check the headlight settings and adjust if necessary.

This article is available at russian, bulgarian, belarusian, ukrainian, serbian, croatian, romanian, polish, slovak, hungarian
The text has been checked: Orlov Dmitry

Share information:

Previous articles
Main turning lights with gas discharge lamps
Adjusting the main headlights with halogen lamps
Adjustment of main headlights with gas discharge lamps
Checking headlight adjustment using a calibration screen without a 15° adjustment line
Checking headlight adjustment
Removal and installation the headlight corrector servo drive (manufacturer Valeo)
Next articles
Removal and installation front turn signal lights
Removal and installation lighting in the side mirror to facilitate boarding
Removal and installation the rear light in the side of the body
Removal and installation license plate light (sedan)
Removal and installation license plate light, station wagon (Variant)
Removal and installation the hood contact switch


Similar articles from other manuals for VW cars:
Replacing the registration plate (number) lighting lamp Golf 2 (1984-1993, petrol)
Replacing incandescent lamps Polo 3 (1995-2003)
Replacing the crankshaft oil seal on the vibration damper side Touareg 1 (2002-2006)
Replacing a gas discharge lamp Tiguan 1 (2007-2015)
Checking the engine oil level and replacing it Sharan 1 (1995-2000)
Replacing rubber wiper blades Transporter T4 (1990-2003)
Replacing brake fluid Caddy 3 (2003-2010)
Link to this page in different formats


Visitor comments


No comments yet


How much will 24 + 12 =


Passat B6 
  • General information
  • User manual
  • Maintenance
  • Petrol engine 1.6L
  • Engine repair
  • Cooling and lubrication system
  • Fuel injection system
  • Petrol engine 2.0L
  • Engine repair
  • Lubrication system
  • Cooling system
  • Fuel and exhaust systems
  • Diesel engine 2.0L
  • Engine repair
  • Cooling and lubrication system
  • Fuel and exhaust systems
  • Transmission
  • Clutch
  • Mechanical gearbox
  • Automatic gearbox
  • Drive shafts
  • Chassis
  • Wheels and tires
  • Car suspension
  • Steering
  • Brake system
  • Body
  • Exterior (external elements)
  • Electrical equipment
  • Power devices
  • Lighting and appliances
  • Electrical circuits
Passat B5 
  • General information
  • User manual
  • Weekly checks
  • Maintenance
  • Power unit
  • Engine repair
  • Cooling system
  • Fuel system (petrol)
  • Fuel system (diesel)
  • Engine management
  • Exhaust system
  • Transmission
  • Clutch
  • Car gearbox
  • Drive shafts
  • Chassis
  • Car suspension
  • Wheels and tires
  • Steering
  • Brake system
  • Body
  • Exterior (external elements)
  • Interior (internal elements)
  • Doors and covers
  • Ventilation and heating
  • Electrical equipment
  • Power devices
  • Lighting and appliances
  • Electrical circuits
Passat B4 
  • General information
  • User manual
  • Maintenance
  • Technical data
  • 8-valve engine
  • Engine repair
  • Cooling and lubrication system
  • Supply system
  • Ignition system
  • Fuel injection «Mono-Jetronic»
  • Control system «Mono-Motronic»
  • Control system «Digifant»
  • Control system «Simos»
  • 16-valve engine
  • Engine repair
  • Cooling and lubrication system
  • Fuel injection «K-Jetronic»
  • Control system «KE-Motronic»
  • Control system «Digifant»
  • Diesel engine
  • Engine repair
  • Cooling and lubrication system
  • Power and control system
  • Turbocharging system
  • Digital control system
  • Transmission
  • Clutch
  • Manual gearbox
  • Hydromechanical gearbox
  • Front wheel drive
  • Chassis
  • Car suspension
  • Steering
  • Brake system
  • Body
  • Body elements
  • Electrical equipment
  • Power devices
  • Lighting and appliances
  • Electrical circuits
Passat B3 
  • General information
  • User manual
  • Driving Tips
  • Maintenance instructions
  • Technical data
  • Power unit
  • Engine repair
  • Ignition system
  • Lubrication system
  • Cooling system
  • Supply system
  • Petrol injection system
  • Diesel engine
  • Exhaust system
  • Transmission
  • Clutch
  • Car gearbox
  • Chassis
  • Suspension
  • Steering
  • Brake system
  • Wheels and tires
  • Body
  • Exterior
  • Interior
  • Heating system
  • Electrical equipment
  • Power devices
  • Lighting system
  • Equipment and devices
  • Wiper system
  • Electrical circuits
Passat B2 
  • General information
  • Introduction to instructions
  • User manual
  • Power unit
  • Engines 4-cylinder FZ
  • Engines 4-cylinder
  • Engines 5-cylinder
  • Transmission
  • Clutch
  • Four-speed gearbox
  • Five-speed gearbox
  • Hydromechanical gearbox
  • Front wheel drive
  • Chassis
  • Front suspension
  • Rear suspension
  • Steering
  • Brake system
  • Body
  • Body elements
  • Electrical equipment
  • Equipment and devices
  • Electrical circuits
VWmanual.ru © 2016-2026 | Mobile version | News and articles | Sitemap: EN BG BY UA RS HR RO PL SK HU | Write message | Site search
Passat B2 • Passat B3 • Passat B4 • Passat B5 • Passat B6 • Golf 1, diesel • Golf 1, petrol • Golf 2, petrol • Golf 2 • Golf 3 • Golf 4 • Golf 5 • Polo 3 • Polo 4 • Touareg 1 • Tiguan 1 • Sharan 1 • Transporter T3 • Transporter T4 • LT 28 • LT 2D • Beetle • Caddy 3 •
Our website uses cookies to ensure functionality and convenience.