
Turbochargers for vehicles with AHF and ALH engines
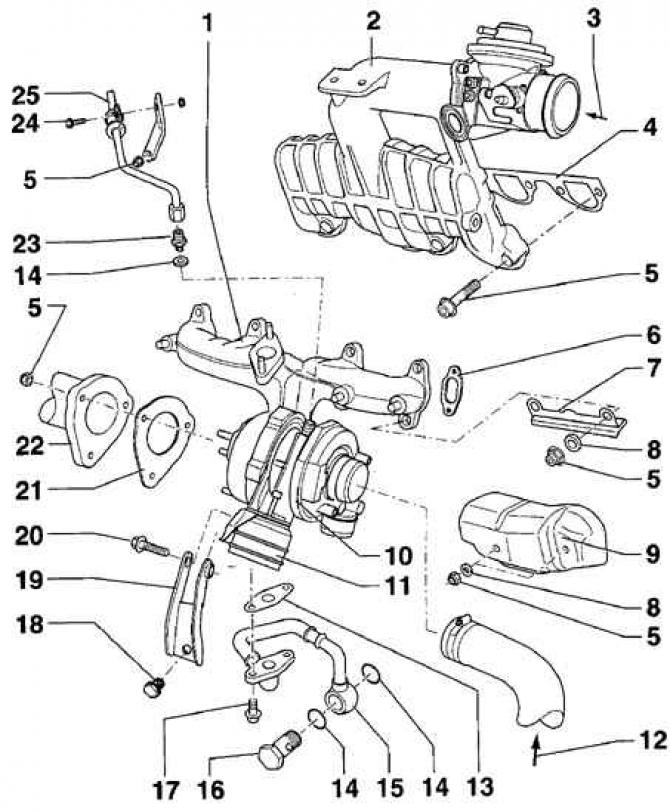
- 1 - exhaust manifold;
- 2 - intake manifold;
- 3 - from the air cooler;
- 4 - seal. When installing, a new seal must be used;
- 5 - bolt; 25 Nm;
- 6 - seal. Observe the installation position of the seal;
- 7 - bracket;
- 8 - washer;
- 9 - screen;
- 10 - turbocharger. When removing the turbocharger, the right drive shaft must first be removed;
- 11 - pressure box;
- 12 - from the air filter;
- 13 - seal. When installing, a new seal must be used;
- 14 - sealing ring. At installation it is necessary to use a new sealing ring;
- 15 - oil supply pipeline;
- 16 - hollow bolt, 40 Nm;
- 17 - bolt, 15 Nm;
- 18 - bolt, 40 Nm;
- 19 - bracket;
- 20 - bolt, 25 Nm;
- 21 - seal. When installing, a new seal must be used;
- 22 - receiving exhaust pipe;
- 23 - connecting fittings;
- 24 - bolt, 10 Nm;
- 25 - oil outlet pipe
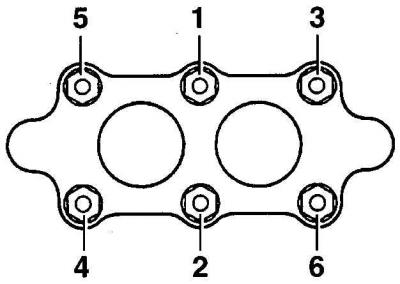
Sequence of tightening the exhaust pipe-to-exhaust manifold bolts on an engine without a turbocharger
Removing
The exhaust system can be removed both as an assembly and in separate sections.
1. Raise the car and secure it on stands. Remove the lower mudguard of the engine compartment.
2. Coat the nuts and bolts holding the exhaust system with a rust destroying agent. Wait a while until the rust is completely destroyed.
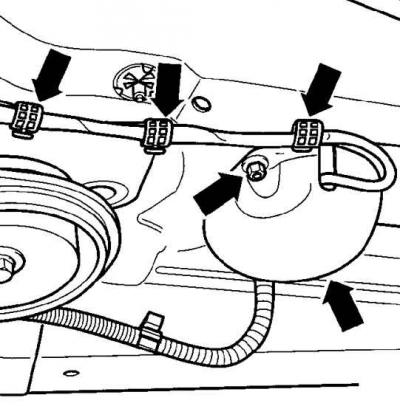
3. Unscrew the casing covering the electrical connector of the lambda sensor (two bottom arrows).
4. Release the lambda sensor wire from the clips on the heat shield (top arrows).
5. Disconnect the lambda sensor electrical connector.
6. On all-wheel drive and 1.6-I models with automatic transmission, the lambda sensor is installed in the exhaust manifold and it is not necessary to disconnect the lambda sensor electrical connector.
7. On models with 1.4-I engines, the lambda sensor is installed in front near the exhaust pipe flange seal.
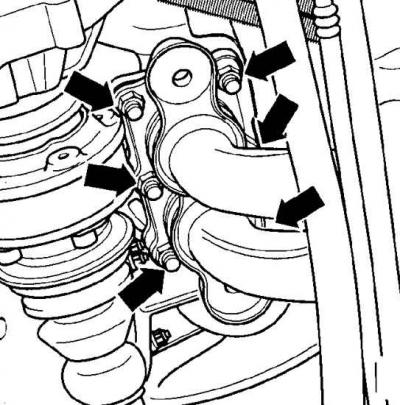
8. Unscrew the exhaust pipe from the bottom of the exhaust manifold (fastening nuts are indicated by arrows).
9. Support the exhaust system by tying it to the bottom of the car with wire.
10. Unscrew the front of the exhaust system from the front cross member.
11. Loosen the clamping clamps and remove the exhaust system.
Installation
1. To facilitate the subsequent unscrewing of the nuts and bolts securing the exhaust system, lubricate them with Liqui Moly LM-508-ASC high-temperature paste.
2. Before reconnecting the exhaust system components, clean their connections with sandpaper to remove sealant residue and rust.
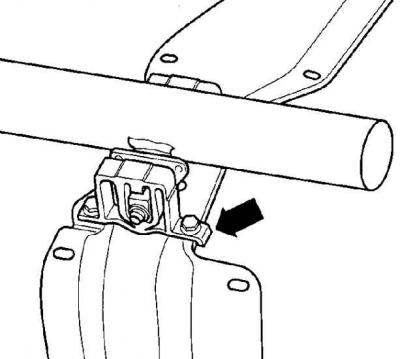
3. Attach the exhaust brackets to the front cross member so that the beveled side (shown by arrow) was directed towards the front of the vehicle.
4. Install the exhaust system elements in rubber cushions.
5. Tighten the bolts securing the exhaust system holders to the front beam to 25 Nm.
Engines without turbocharger
6. Connect a reception exhaust pipe with a new lining to a final collector and tighten bolts of fastening in the sequence shown in fig. The sequence of tightening the bolts for fastening the exhaust pipe to the exhaust manifold on an engine without a turbocharger, to a torque of 40 Nm.
Turbocharged engines
7. Connect the exhaust pipe with a new gasket to the turbocharger and cross-tighten the mounting bolts to 40 Nm.
8. If necessary, rotate the sections of the exhaust system so that the entire exhaust system is at the same distance from the body.
9. Finally tighten all nuts and bolts securing the exhaust system.
10. Install the lower engine compartment mudguard.
11. Secure the lambda sensor wire with spring clips. Connect the electrical connector of the lambda sensor and close it with a casing.
12. Start the engine and check the exhaust system for leaks.
Tightening torques
| Exhaust manifold to cylinder head | 25 Nm |
| Clamps securing the exhaust pipe connections | 40 Nm |
| Exhaust pipe to manifold | 40 Nm |
| Mounting the exhaust pipes on the branching of the exhaust system | 25 Nm |
| Lambda sensor to catalytic converter | 50 Nm |
Visitor comments