
English Русский
Български
Беларускі
Український
Српски
Hrvatski
Română
Polski
Slovenský
Magyar
  |  Articles  |  Sitemap  |  Contacts  |    |
Car maintenance Ford Car maintenance Hyundai Car maintenance Chevrolet Car maintenance BMW Car maintenance Audi Car maintenance Opel Car maintenance AvtoVAZ
VWmanual.ru


Main   Passat   Golf   Polo   Touareg   Tiguan   Sharan   Transporter   Others  
Golf 1 (1974-1984, diesel) Golf 1 (1974-1984, petrol) Golf 2 (1984-1993, petrol) Golf 2 (1984-1993) Golf 3 (1991-1997) Golf 4 (1997-2004) Golf 5 (2003-2008)

Installation of fog lights (VW Golf 1)

  • Main
  • Golf
  • Golf 1
  • Electrical equipment
  • Lighting system
  • Installation of fog lights
            0


Fog lights should be mounted as low as possible so that they can illuminate the fog from below, which, as a rule, does not lie very low near the road. In the radiator grille (for example, in the Golf LX model), fog lights are placed relatively high, next to the main headlights. It is better to place them under the bumper.

When installing under the bumper, make sure that the headlights you buy are designed as "hanging" lights. Otherwise, the drainage holes are on the wrong side and water can get in through them.
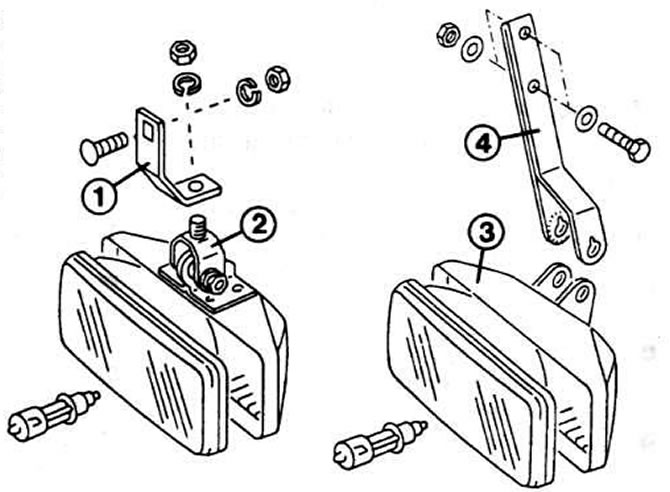
There are suitable holders for mounting the fog light under the bumper: 1 - Lamp holder used for…

There are suitable holders for mounting the fog light under the bumper: 1 - Lamp holder used for installation on metal bumper produced before July 1978.; 2 - fog lamp with threaded connection on top; 3 - fog lamp with mounting eyes and holder (4) for bumper in plastic casing.


You need to buy the following spare parts:
  • fog light switch (models with factory-fitted rear fog light already have the switch);
  • relay; if the release was before July 1982, then you also need the appropriate adapter;
  • holders and fasteners for installation; holders may be different for bumpers in metal or plastic casing.

Disconnect the negative battery cable.


Install the fog light.

The electrical connection of the fog lamp is shown on the diagram.

Remove the blind cover in the instrument panel (see chapter "Devices"); insert switch.

The relay for fog lights manufactured before July 1982 together with the adapter must be secured at the top in the central part of the electrical equipment.

Relay for fog lights produced after August 1982 insert into panel 8 (drawing).

Reconnect the wire to the battery and check the operation.

With the ignition and lights on, the fog lights should come on after pressing the switch. When switching to high beam, the fog lights do not go out.

Adjust the light beam - fog lamp.

At a distance of five metres from the regulating wall, the widely scattered beams of the headlights must fall 100 m below the corresponding midpoint of the headlight.

View the original on this resource: www.VWMANUAL.ru

This article is available at russian, bulgarian, belarusian, ukrainian, serbian, croatian, romanian, polish, slovak, hungarian
The text has been checked: Medvedeva Elena

Share information:

Previous articles
Replacing interior lighting bulbs
Door contact switch
Interior lamp
Rear number plate light
Reverse light switch
Replacing the bulbs in the rear lights
Next articles
Checking the hazard warning lights and direction indicators
Checking brake lights
Checking the sound and light signal


Similar articles from other manuals for VW cars:
Control lights Passat B3 (1988-1993)
Signal lights Polo 3 (1995-2003)
Main turning lights with gas discharge lamps Tiguan 1 (2007-2015)
Checking the operation of brake lights Sharan 1 (1995-2000)
Instrument cluster: speedometer, turn signal and brake lights Transporter T4 (1990-2003)
Instrument cluster indicator lights Caddy 3 (2003-2010)
Link to this page in different formats


Visitor comments


No comments yet


How much will 32 + 16 =


Golf 5 
  • General information
  • User manual
  • Maintenance
  • Troubleshooting
  • Power unit
  • Engine repair
  • Cooling and ventilation system
  • Fuel system
  • Ignition system
  • Transmission
  • Clutch
  • Mechanical gearbox
  • Automatic gearbox
  • Chassis
  • Brake system
  • Car suspension
  • Steering
  • Body
  • Interior (internal elements)
  • Exterior (external elements)
  • Doors and covers
  • Electrical equipment
  • Power devices
  • Washers and wipers
  • Lighting and appliances
  • Electrical circuits
Golf 4 
  • General information
  • User manual
  • Weekly checks
  • Maintenance
  • Power unit
  • Petrol engines
  • Diesel engines
  • Cooling system
  • Fuel system (petrol)
  • Control system (petrol)
  • Fuel system (diesel)
  • Exhaust system
  • Transmission
  • Clutch
  • Car gearbox
  • Drive shafts
  • Chassis
  • Car suspension
  • Steering
  • Wheels and tires
  • Brake system
  • Body
  • Exterior (external elements)
  • Interior (internal elements)
  • Ventilation and heating
  • Car doors and sunroof
  • Washers and glass cleaners
  • Electrical equipment
  • Power devices
  • Lighting and appliances
  • Electrical circuits
Golf 3 
  • Petrol engine
  • Engine repair
  • Lubrication system
  • Cooling system
  • Ignition system
  • Diesel engine
  • Engine repair
  • Diesel injection system
  • Pre-glow system
  • Transmission
  • Clutch
  • Gearbox and drive shafts
  • Chassis
  • Steering
  • Wheels and suspension
  • Brake system
  • Electrical equipment
  • Lighting and appliances
  • Electrical circuits
Golf 2 
  • General information
  • Introduction to guide
  • User manual
  • Petrol engines 1.3 l
  • Engine repair
  • Lubrication system
  • Cooling system
  • Carburetors
  • Supply system
  • Ignition system
  • Petrol engines 1.6/1.8 l
  • Engine repair
  • Supply system
  • Ignition system
  • Diesel engines
  • Engine repair
  • Lubrication system
  • Cooling system
  • Power and exhaust system
  • Transmission
  • Clutch
  • 4-speed gearbox 084
  • 5-speed gearbox 085
  • 4-speed gearbox 020/4R
  • 5-speed gearbox 020/4T
  • Automatic gearbox
  • Drive shafts
  • Chassis
  • Steering
  • Car suspension
  • Brake system
  • Body
  • Body elements
  • Doors, locks and windows
  • Electrical equipment
  • Equipment and devices
  • Power devices
Golf 2 (petrol) 
  • General information
  • Characteristics
  • Car care
  • Maintenance
  • Power unit
  • Engine repair
  • Engine 1.05/1.30
  • Engine 1.60/1.80
  • Cooling and lubrication system
  • Power and exhaust system
  • Transmission
  • Clutch
  • Car gearbox
  • Drive shafts
  • Chassis
  • Brake system
  • Steering
  • Suspension
  • Body
  • Body and equipment
  • Electrical equipment
  • Lighting and appliances
  • Electrical circuits
Golf 1 (petrol) 
  • General information
  • Characteristics
  • User manual
  • Maintenance
  • Power unit
  • Engine adjustment
  • Engine 1.1/1.3
  • Engine 1.5/1.6/1.8
  • Engine electrical equipment
  • Cooling system
  • Fuel system
  • Transmission
  • Clutch and manual gearbox
  • Automatic gearbox
  • Chassis
  • Steering
  • Front suspension
  • Rear suspension
  • Brake system
  • Electrical equipment
  • Lighting and appliances
  • Electrical circuits
  • Body
  • Body and equipment
  • Optional equipment
Golf 1 (diesel) 
  • General information
  • Specifications
  • Maintenance
  • Power unit
  • Engine repair
  • Exhaust and turbocharger
  • Cooling system
  • Fuel system
  • Fuel injection system
  • Transmission
  • Clutch and drive shafts
  • Car gearbox
  • Chassis
  • Suspension and wheels
  • Steering
  • Brake system
  • Wheels and tires
  • Body
  • Heating and ventilation
  • Exterior (external elements)
  • Interior (internal elements)
  • Doors and windows
  • Electrical equipment
  • Equipment and devices
  • Lighting system
  • Power devices
  • Electrical circuits
VWmanual.ru © 2016-2026 | Mobile version | News and articles | Sitemap: EN BG BY UA RS HR RO PL SK HU | Write message | Site search
Passat B2 • Passat B3 • Passat B4 • Passat B5 • Passat B6 • Golf 1, diesel • Golf 1, petrol • Golf 2, petrol • Golf 2 • Golf 3 • Golf 4 • Golf 5 • Polo 3 • Polo 4 • Touareg 1 • Tiguan 1 • Sharan 1 • Transporter T3 • Transporter T4 • LT 28 • LT 2D • Beetle • Caddy 3 •
Our website uses cookies to ensure functionality and convenience.