
4-cylinder petrol engine
The engine is removed downwards without a gearbox. An engine jack or factory machine jack is required to remove the engine.
A machine jack and four jack stands are required to support the machine.
Depending on the year of construction and equipment, the wires, vacuum hoses or coolant hoses may have a different arrangement. Therefore, it is recommended to mark the relevant pipelines with adhesive tape before removal. All cable connections that are removed or cut after installation of the motor must be secured in the same place.
Removing
1. Disconnect wire "masses" (-) from the battery.
Attention! Before disconnecting the wire "masses" battery, make sure the ignition is off!
Attention! Remember that when you turn off "masses" the code of the anti-theft device and the fixed settings of the radio receiver are erased from the memory!
2. Put the car on stands (see subsection 1.18).
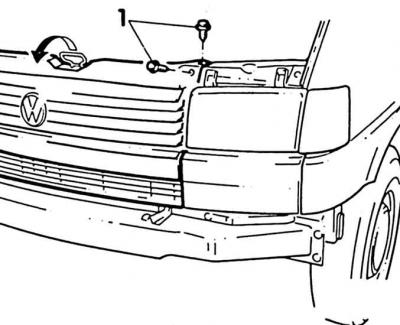
3. Pull out the radiator. To do this, unscrew the fastening screws (1) left and right.
4. Tilt radiator and lock support forward.
5. Remove the lower engine compartment mudguard.
6. Disconnect the exhaust system between the exhaust manifold and the front exhaust pipe (see subsection 2.19.1).
7. Drain coolant (see subsection 2.16.3).
8. Disconnect the upper radiator hose on the coolant fitting from the engine, the lower hose on the oil cooler, the hose on the coolant thermostat housing, the lower coolant pipe of the water pump, the two hoses of the expansion tank and the heat exchanger on the coolant pipe, after squeezing the clamps with tongs and sliding them back.
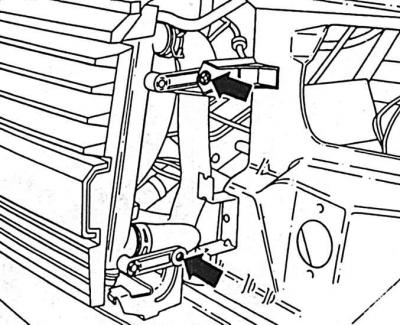
9. Take out the pins (indicated by arrows) from the spacer clips on the right and left and remove the spacer clips from the radiator brackets.
10. Remove radiator (see subsection 2.16.2.1).
11. Disconnect all electrical wiring from the engine:
- CO potentiometer plug;
- throttle potentiometer plug;
- plug for multi-pin connection of injection valves;
- idle speed stabilization valve plug;
- Hall sensor plug on the ignition distributor;
- plug-in connection for the lambda probe, from the bottom of the machine, on the bracket for attachments on the right;
- power steering pressure sensor connector (if available);
- two plugs from coolant temperature sensors;
- plugs from the oil pressure sensor on top of the oil cooler and on the left end side of the cylinder head;
- the wire "masses" from the cylinder head cover;
- disconnect the thick wire on the generator (IN) and thin blue wire (R).
12. Remove the wiring harness from the engine, marking the previous position of the cable clamps with felt-tip pens. Clamps open or cut.
13. Remove the ignition distributor cap, remove all spark plug wires and set them all aside.
14. Remove the drive cable from the throttle and from the stop (see subsection 2.17.5).
15. Remove the air hose at the connection between the air filter and the throttle body, unscrew and remove the idle air stabilization valve together with the bracket, remove the crankcase ventilation hose, remove the idle air stabilization hose from the air filter housing and remove the air hose together with the idle air stabilization valve.
16. Remove all vacuum hoses from the engine:
- on the throttle valve for heating the intake air;
- on the magnetic valve of the activated carbon tank;
- Digifant control device;
- on the brake booster check valve.
17. Remove the fuel supply line (black), to the cold start valve and distributor, and bypass pipe (blue) from the fuel distributor by loosening the clamps. Before removing, place a rag to collect escaping fuel. Seal fuel lines with suitable plugs. The hoses can be plugged, for example, with clean screws of the appropriate diameter.
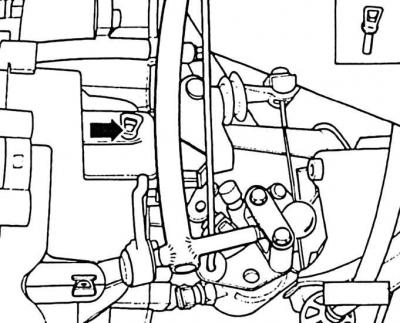
18. Remove the rubber plug from the hole in the gearbox housing (arrow) and fix the clutch release lever with a mounting pin or M8x22 mm screw.
19. For vehicles with power steering, unscrew the pump together with the bracket and hang it on a wire to the body. The hoses may not be removed.
Attention! The hoses must not be bent. If hydraulic lines are to be opened, air must be bled from the system after assembly.
For a car with air conditioning
20. Loosen and remove compressor V-belt (see subsection 2.12.1).
21. Unscrew the compressor together with the bracket and hang it together with the pipelines to the side of the body.
Attention! The refrigerant circuit must not be opened. The refrigerant can cause frostbite if it comes into contact with the skin.
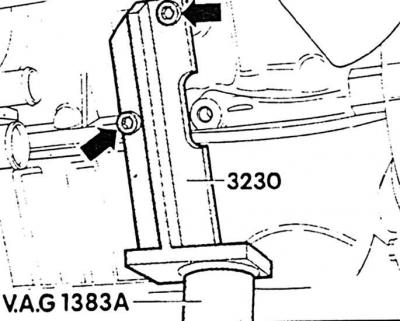
22. Screw to the cylinder block from the front under the oil filter bracket (arrows) mounting tool VW 3230. Tighten the bolts to 20 Nm.
23. Unscrew all bolts securing the engine to the gearbox from below.
24. Remove rear engine mounts.
Visitor comments