
The vehicle must be cold and must not be moved during the test.
The air temperature in the room should be 10-30°C, while the temperature difference should be minimal.
The vehicle must be on level ground.
Start the engine.
Use the front display and operating unit J523 to set the vehicle level to high and then to normal.
Turn off the engine.
Remove the plug from the ride height control control unit J197 in order to disable the ride height control.
Measure the height of the car at all four wheels (pic. 4.38).
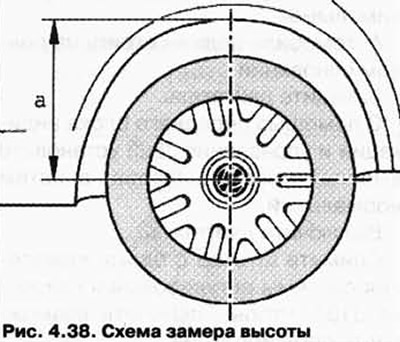
After 2 hours, measure the height again and compare the dimension a with the result of the first measurement.
If the car is not level, it means that there is an air leak in the suspension of the wheel where there is a maximum difference between the first and second measurements.
Using a conventional leak detection spray, check the appropriate pneumatic element and air line in the following sequence.
If after 2 hours it is not possible to establish the difference, then repeat the test after 24 hours. After 24 hours, a difference of up to 4 mm is allowed.
Check:
- air line connections:
- residual pressure valve:
- front pneumatic elements (without dismantling), rear pneumatic elements (with dismantling).
With faulty shock absorbers, oil from them can enter the pneumatic system. In order for the pneumatic system to function flawlessly after the problem has been eliminated, it must be cleaned or other components replaced.
Unscrew the appropriate air line from the pneumatic element and the solenoid valve block.
Blow out the pipeline several times with compressed air, to do this, apply compressed air through the end of the pipeline, which is connected to the solenoid valve block.
Check to see if oil from the shock absorber has entered the solenoid valve block.
If shock absorber oil gets into the solenoid valve block, the block will have to be replaced.
Check internal air line between compressor and valve block.
If oil gets into the internal air line, the compressor will have to be replaced.
Table 4.7. Troubleshooting the elastic pneumatic element and the clearance control system
| signs | Fault detection | Possible reasons | Trouble-shooting |
| Pneumatic element leak | Repair of the front rear elastic pneumatic element | ||
| «gradual» loss of pressureAfter a considerable period of time, the car is uneven | Vehicle height monitoring for a long period, leak detection with conventional leak spray | Air leakage from air ducts | Air duct repair |
| Air leakage through the residual pressure valve | Replacing the front rear elastic pneumatic element | ||
| Vehicle is not level Leak excluded | Carry out > Gefuehrte Fehlersuche/Guided fault finding with tester - VAS 5051 | Body level sensor defective | Body level sensor replace front rear |
| Lever or body level sensor mount bent | |||
| The car is too high and it is impossible to lower it | 1.) Check if the ground clearance is sufficient | Automobile «sat down» on the bottom | |
| 2.) Checking air ducts and their laying | Air line clogged, kinked or frozen | Repairing kinked air lines, Blowing out frozen or clogged air lines with compressed air | |
| 3.) Carry out > Gefuehrte Fehlersuche/Guided fault finding with tester - VAS 5051 | Drain valve or valves of elastic pneumatic elements do not work | ||
| 4.) Follow steps 1-3, if the malfunction could not be found, then «sticks» residual pressure valve | It doesn't let out air (the valve is stuck) | Replacing the front rear residual pressure valve | |
| The vehicle is too low and either does not rise or rises very slowly | 5.) Carry out > Gefuehrte Fehlersuche/Guided fault finding with tester - VAS 5051 | Check relays, plug contacts, wiring harness and on-board fuses | |
| 6.) Finding Air Leaks on an Air Accumulator Using a Conventional Leak Detection Aerosol | Air accumulator defective/leaky | Replacing the pneumatic accumulator | |
| Air line or air accumulator connections defective/leaky | Air duct repair | ||
| 7.) Carry out > Gefuehrte Fehlersuche/Guided fault finding with tester - VAS 5051 | Drain valve defective/leaky/open | Compressor replacement | |
| 8.) Finding an Air Leak on a Compressor Using a Regular Leak Spray | Compressor leaking | Compressor repair | |
| 9.) First check according to points 5-8, if no fault is found, it means that the compressor is faulty | Compressor defective | Compressor replacement | |
| «Fast» pressure loss | The level of the body is unevenly adjusted, when you try to change the level, you can hear how air comes out of a faulty pneumatic element | Pneumatic element failure | Repair of the front rear elastic pneumatic element |
| Air duct break | Air duct repair | ||
| Insufficient cushioning | Test drive, while driving, change the level of damping. Depreciation should change noticeably when moving over bumps in the road, while paying attention to «noises» | Damping level change valve defective | Repair of the front rear elastic pneumatic element |
| Shock absorber wear | Repair of the front rear elastic pneumatic element Cleaning the air duct system |
Visitor comments