



Contents: Removal ↓ Installation ↓
Removal
Mark the direction of rotation of the tire with an arrow. Loosen the wheel bolts. Raise the car so that the front axle is unloaded.
Unscrew the nut with a stamped rim "10" at the cardan joint tailpiece using a 19 mm external Allen key; or, using a 36 mm socket head with a 12-sided internal socket, unscrew the 12-sided nut "11", see figure S40-0204.
Remove the wheel.
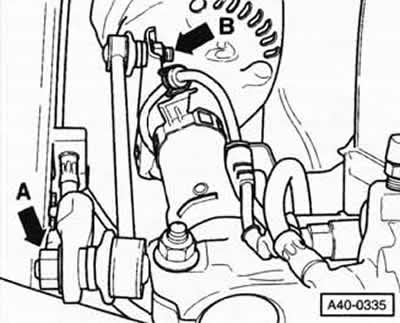
Unscrew the upper nut "arrow B" securing the connecting rod to the shock absorber strut. Arrow A is the lower nut securing the connecting rod.
Disconnect the electrical wire of the speed sensor from the shock absorber strut.
Remove the tie rod end.
Raise the steering rod and tie it to the body.
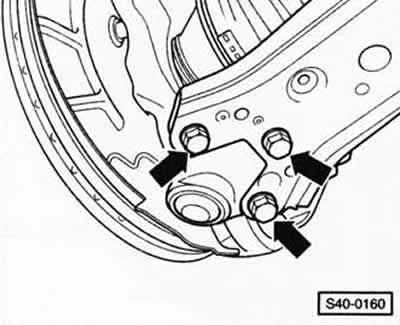
Use a scriber to mark the mounting position of the "arrow" bolts relative to the transverse arm and unscrew the bolts.
Remove the steering knuckle together with the ball joint from the transverse arm.
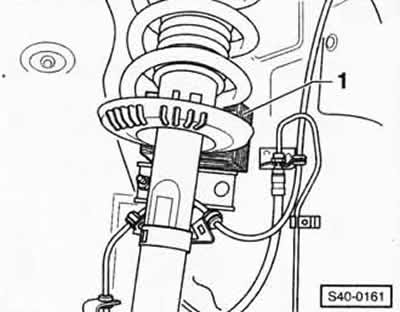
Tilt the shock absorber outward and support it, for example, with a wooden block "1".
Remove the propeller shaft from the steering knuckle and, lifting it, tie it to the body, see chapter "Removal and installation the propeller shaft".
Caution: The cardan shaft must not sag downwards.
Re-bolt the ball joint to the wishbone using the removed bolts and the removed sheet metal bending plate.
Place a suitable jack under the steering knuckle.
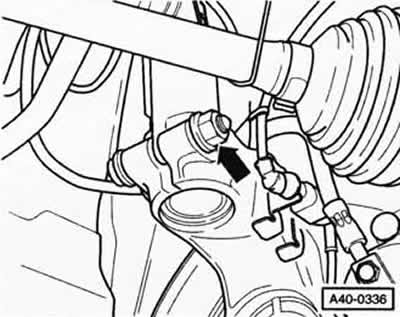
Loosen the nut "arrow" securing the shock absorber strut to the steering knuckle and remove the bolt.
Note: When installing, replace the bolt with a new one.
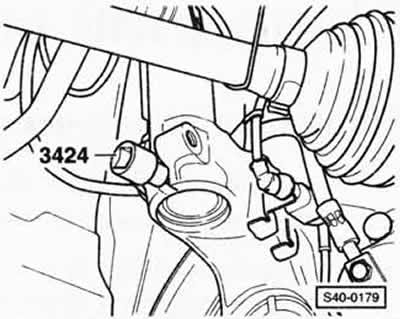
Insert a suitable expansion tool, such as the VW-3424, into the slot in the steering knuckle and turn the ratchet wrench 90°. Leave the expansion tool in the slot and remove the ratchet wrench.
Press the brake disc in the direction of the shock absorber strut. The shock absorber tube may become slightly tilted relative to the axis of the hole in the steering knuckle.
Using a downward movement, remove the steering knuckle from the shock absorber pipe, while lowering the jack until the shock absorber pipe hangs freely.
Securely attach the steering knuckle to the front axle beam.
Remove the jack.
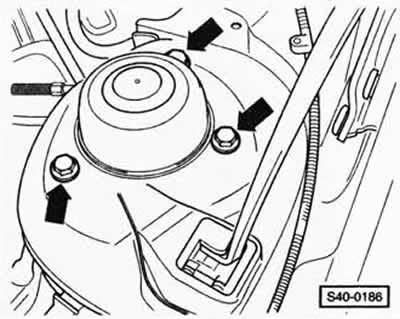
Loosen the bolts securing the shock absorber strut "arrow" to the wheel arch support cup.
Remove the shock absorber strut.
Installation
Insert the shock absorber strut and screw it to the wheel arch support cup with new bolts.
Note: First install the bolts from the inside of the vehicle. Tighten the bolts to 15 Nm, then turn them 90° in the tightening direction with the locked key.
Place a jack under the steering knuckle.
Insert the shock absorber strut into the steering knuckle.
Disconnect the steering knuckle from the front axle beam.
Raise the steering knuckle with a jack so that a new shock absorber strut-to-steering knuckle mounting bolt can be inserted.
Caution: Never press the jack on the ball joint.
When lifting, press the brake disc against the shock absorber strut. Make sure that the shock absorber pipe in the hole of the steering knuckle does not warp.
Remove the expansion tool.
Screw a new nut onto the new bolt securing the shock absorber strut to the steering knuckle and tighten it.
Tighten the fastening nut to a torque of 60 Nm, then turn it further in the tightening direction by 90°.
Remove the 3 ball joint mounting bolts and detach the steering knuckle together with the ball joint from the wishbone.
Insert the cardan shaft into the wheel hub. Make sure that the cardan joint bellows is not damaged or twisted.
Bolt the ball joint to the wishbone using new bolts and a new bending washer. Align the ball joint so that the mounting bolts occupy the positions marked before removal. Tighten the bolts to 20 Nm, then turn them further in the tightening direction by 90°.
Install the tie rod end.
Attach the electrical wire of the speed sensor to the shock absorber strut.
Tighten the connecting rod to the shock absorber strut to a torque of 40 Nm.
Note: Remove any traces of corrosion, grease and sealant residue from the threads and splines of the outer universal joint tailpiece, as well as from the wheel hub splines.
Apply Loctite 601 to the splines of the universal joint tailstock.
Apply Polyharnstoff G052142A2 grease to the threads of the universal joint tailpiece.
When installing a stamped rim nut: be sure to use a new nut and tighten it to a torque of 30 Nm.
When installing the 12-point nut: Do not lubricate the threads on the end of the universal joint shank. Be sure to use a new nut and tighten it to 50 Nm, then turn it further in the tightening direction by 45°.
Keeping the tire in the same direction of rotation, tighten the wheel with bolts and lower the car. Only then tighten the wheel bolts crosswise to 120 Nm.
Attention: Strictly follow the instructions given in the chapter "Removal and installation a wheel".
Visitor comments