
English Русский
Български
Беларускі
Український
Српски
Hrvatski
Română
Polski
Slovenský
Magyar
  |  Articles  |  Sitemap  |  Contacts  |    |
Car maintenance Ford Car maintenance Hyundai Car maintenance Chevrolet Car maintenance BMW Car maintenance Audi Car maintenance Opel Car maintenance AvtoVAZ
VWmanual.ru


Main   Passat   Golf   Polo   Touareg   Tiguan   Sharan   Transporter   Others  
Polo 3 (1995-2003) Polo 4 (2001-2009)

Removal and installation the propeller shaft (VW Polo 4)

  • Main
  • Polo
  • Polo 4
  • Chassis
  • Front suspension
  • Removal and installation the propeller shaft
            0


Contents: Removal ↓ Installation ↓
Note: When the driveshaft is removed, the vehicle must not rest its full weight on the wheels, since the lack of axial compression will damage the hub bearing. Since the driveshaft tailpiece is pressed into the wheel hub, a suitable puller is required to remove it.


Removal


Mark the direction of rotation of the tire with an arrow. Loosen the wheel bolts. Raise the car so that the front axle is unloaded and the wheels still touch the floor.

Loosen the nut securing the driveshaft end to the wheel hub, see chapter "Removal and installation the shock absorber strut".

Remove the lower engine compartment cover.

Loosen the bolts securing the cardan shaft to the gearbox shaft flange. This requires a replacement socket head with external splines, such as HAZET 990 Lg-10 or HAZET 2751. If necessary, remove the heat shield under the inner cardan joint.

Remove the front wheel.

Mark the mounting position of the three bolts relative to the wishbone with a scriber and remove the bolts, see chapter "Removal and installation the shock absorber strut".
Mark the mounting position of the three bolts relative to the wishbone with a scriber and remove…


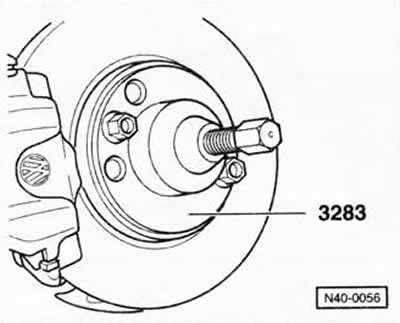
Press out the propeller shaft using a suitable puller, such as VW-3283, and a steel cylinder.


Remove the cardan shaft.

Installation


Note: Remove any traces of corrosion, grease and sealant residue from the threads and splines of the outer universal joint tailpiece, as well as from the wheel hub splines.


Note: Depending on the chassis version, lubricate the splines of the universal joint tailpiece, see chapter "Removing and installing the shock absorber strut".


Insert the universal joint tail into the wheel hub splines.

Pre-tighten the new propeller shaft mounting bolts to a torque of 10 Nm.

Screw a new nut with a stamped rim or, respectively, a 12-sided nut onto the thread of the universal joint tailpiece and tighten it to the specified torque, see the chapter "Removing and installing the shock absorber strut".

Caution: When replacing a stamped rim nut with a 12-point nut, be sure to replace the nuts on both sides.


Screw the cardan shaft to the gearbox shaft flange. Tightening torque: for M8 bolts - 40 Nm, for M10 bolts - 70 Nm.

Bolt the ball joint to the wishbone using new bolts and a new washer, see chapter "Removal and installation the shock absorber strut".

If necessary, install a heat shield under the inner universal joint.

Install the lower engine compartment cover.

Ensure the previous direction of rotation of the tires, tighten the wheels with bolts, lower the car and only then tighten the wheel bolts in a crosswise manner with a torque of 120 Nm.

Attention: Strictly follow the instructions given in the chapter "Removal and installation a wheel".

This article is available at russian, bulgarian, belarusian, ukrainian, serbian, croatian, romanian, polish, slovak, hungarian
The text has been checked: Semenova Anna

Share information:

Previous articles
Checking/removing and installing the ball joint
Disassembling the shock absorber/shock absorber/removing and installing the coil spring
Shock absorber/ shock absorber/ coil spring
Removal and installation the shock absorber strut
Front wheel suspension
General information
Next articles
Cardan shaft/cardan shaft bellows/constant velocity joints
Disassembling the cardan shaft


Similar articles from other manuals for VW cars:
Removal and installation the propeller shaft Passat B3 (1988-1993)
Auxiliary shaft seal Golf 1 (1974-1984, petrol)
Replacing the PTO/Front Propeller Shaft Flange Seal (Transfer… Touareg 1 (2002-2006)
Removal and installation the propeller shaft Tiguan 1 (2007-2015)
Intermediate shaft — removal and installation Sharan 1 (1995-2000)
Speedometer shaft — removal and installation Transporter T4 (1990-2003)
Propeller shaft — removal and installation (models with 2.4l… LT 28 (1975-1991)
Link to this page in different formats


Visitor comments


No comments yet


How much will 46 + 17 =


Polo 4 
  • General information
  • User manual
  • Maintenance
  • Power unit
  • Engine repair
  • Cooling and lubrication system
  • Control system
  • Injection system (diesel)
  • Supply system
  • Exhaust system
  • Chassis
  • Front suspension
  • Rear suspension
  • Steering
  • Wheels and tires
  • Brake system
  • Body
  • Interior
  • Exterior
  • Electrical equipment
  • Equipment and devices
  • Wiper system
  • Lighting system
  • Electrical circuits
Polo 3 
  • General information
  • User manual
  • Maintenance
  • Power unit
  • Petrol engines 1.4 and 1.6
  • Petrol engines 1.4 (V16)
  • Petrol engines 1.6 and 1.8
  • Diesel engines 1.7 and 1.9
  • Diesel engines 1.9 D and TD
  • Transmission
  • Mechanical gearbox 085
  • Mechanical gearbox 020/02K
  • Chassis
  • Front suspension
  • Rear suspension
  • Steering
  • Brake system
  • Body
  • Exterior
  • Interior
  • Electrical equipment
  • Equipment and instruments (until 2000)
  • Equipment and instruments (after 2000)
  • Electrical circuits
  • Wiring diagrams (petrol)
  • Wiring diagrams (diesel)
VWmanual.ru © 2016-2026 | Mobile version | News and articles | Sitemap: EN BG BY UA RS HR RO PL SK HU | Write message | Site search
Passat B2 • Passat B3 • Passat B4 • Passat B5 • Passat B6 • Golf 1, diesel • Golf 1, petrol • Golf 2, petrol • Golf 2 • Golf 3 • Golf 4 • Golf 5 • Polo 3 • Polo 4 • Touareg 1 • Tiguan 1 • Sharan 1 • Transporter T3 • Transporter T4 • LT 28 • LT 2D • Beetle • Caddy 3 •
Our website uses cookies to ensure functionality and convenience.