
English Русский
Български
Беларускі
Український
Српски
Hrvatski
Română
Polski
Slovenský
Magyar
  |  Articles  |  Sitemap  |  Contacts  |    |
Car maintenance Ford Car maintenance Hyundai Car maintenance Chevrolet Car maintenance BMW Car maintenance Audi Car maintenance Opel Car maintenance AvtoVAZ
VWmanual.ru


Main   Passat   Golf   Polo   Touareg   Tiguan   Sharan   Transporter   Others  
Transporter T3 (1979-1992) Transporter T4 (1990-2003)

Speedometer shaft — removal and installation (VW Transporter T4)

  • Main
  • Transporter
  • Transporter T4
  • Electrical equipment
  • Equipment and devices
  • Speedometer shaft — removal and installation
            0


Contents: Removal ↓ Installation ↓
Caution! Incorrect positioning of the speedometer roller will result in noise in the speedometer area, side-to-side oscillation of the speedometer needle, and breakage of the roller.


Removal


1. Place your hand under the instrument cluster. Disconnect the plastic coupling of the speedometer shaft on the instrument cluster (compress the side ribs) and remove the roller from the instrument panel.
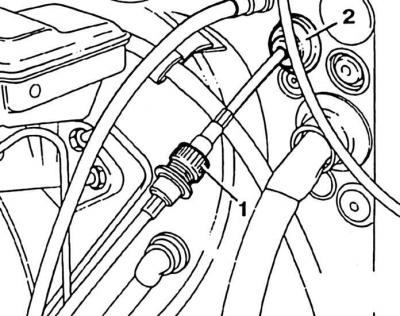
1. Place your hand under the instrument cluster. Disconnect the plastic coupling of the speedometer…


2. Unscrew the clutch (1) of the speedometer shaft in the hood, near the brake fluid expansion tank, and remove the shaft together with the rubber seal (2) from the cross wall.

3. The speedometer shaft is divided into two parts. Unscrew the lower part of the shaft on the gearbox from the drive housing of the right half-shaft to the engine.

4. Note the location of the speedometer shaft in the hood.

5. Release the speedometer shaft in the hood from the clips, if necessary, cut the cable clamps.

Installation


1. Insert the speedometer shaft towards the interior, press the rubber seal into the hole.

2. Insert the roller into the speedometer and lock it.

Attention! The roller must be locked. Check the reliability of the roller fastening by pulling it.


3. Screw the parts of the roller together in the hood. Check the correct position of the roller in the hood.

4. Screw the shaft to the gearbox.

This article is available at russian, bulgarian, belarusian, ukrainian, serbian, croatian, romanian, polish, slovak, hungarian
The text has been checked: Orlov Dmitry

Share information:

Previous articles
Control devices — removal and installation
Voltage stabilizer — removal, testing and installation
Testing LEDs
Control lamps — removal and installation
Replacing fuses
Rear Window Heated — Description and Testing
Next articles
Instrument cluster — design description
Instrument visor (dashboard) on the instrument panel
Steering Wheel Combination Switch — Design Description
Removal and installation the steering wheel combination switch
Connections on the combination steering wheel switch and steering lock
Digital clock backlight lamp


Similar articles from other manuals for VW cars:
Removal and installation the propeller shaft Passat B3 (1988-1993)
Removal the flexible shaft of the speedometer drive Golf 1 (1974-1984, diesel)
Speedometer, multi-function indicator switch (since 12.1997) Polo 3 (1995-2003)
Replacing the generator drive shaft seal Touareg 1 (2002-2006)
Balance shaft drive chain Tiguan 1 (2007-2015)
Intermediate shaft — removal and installation Sharan 1 (1995-2000)
Removal and installation of the primary shaft, secondary shaft,… Caddy 3 (2003-2010)
Link to this page in different formats


Visitor comments


No comments yet


How much will 24 + 50 =


Transporter T4 
  • General information
  • User manual
  • Maintenance
  • Power unit
  • Engine repair
  • Ignition system
  • Lubrication system
  • Cooling system
  • Fuel system (petrol)
  • Fuel system (diesel)
  • Injection system (petrol)
  • Exhaust system
  • Transmission
  • Clutch
  • Car gearbox
  • Chassis
  • Car suspension
  • Steering
  • Brake system
  • Wheels and tires
  • Body
  • Exterior
  • Interior
  • Doors and windows
  • Heating system
  • Electrical equipment
  • Equipment and devices
  • Lighting and signaling
  • Power devices
  • Electrical circuits
Transporter T3 
  • General information
  • Maintenance
  • Petrol engines
  • Engine repair
  • Lubrication system
  • Cooling system
  • Power and exhaust system
  • Carburetor 34 PICT
  • Carburetors 2E3 and 2E4
  • Fuel injection system
  • Ignition system
  • Diesel engines
  • Engine repair
  • Lubrication system
  • Cooling system
  • Power and exhaust system
  • Transmission
  • Clutch
  • Car gearbox
  • Chassis
  • Front suspension
  • Rear suspension
  • Steering
  • Brake system
  • Body
  • Body and interior elements
  • Doors, locks and windows
  • Electrical equipment
  • Lighting system
  • Equipment and devices
  • Power devices (diesel)
  • Power devices (petrol)
  • Wiring diagrams (diesel)
  • Wiring diagrams (petrol)
VWmanual.ru © 2016-2026 | Mobile version | News and articles | Sitemap: EN BG BY UA RS HR RO PL SK HU | Write message | Site search
Passat B2 • Passat B3 • Passat B4 • Passat B5 • Passat B6 • Golf 1, diesel • Golf 1, petrol • Golf 2, petrol • Golf 2 • Golf 3 • Golf 4 • Golf 5 • Polo 3 • Polo 4 • Touareg 1 • Tiguan 1 • Sharan 1 • Transporter T3 • Transporter T4 • LT 28 • LT 2D • Beetle • Caddy 3 •
Our website uses cookies to ensure functionality and convenience.