
English Русский
Български
Беларускі
Український
Српски
Hrvatski
Română
Polski
Slovenský
Magyar
  |  Articles  |  Sitemap  |  Contacts  |    |
Car maintenance Ford Car maintenance Hyundai Car maintenance Chevrolet Car maintenance BMW Car maintenance Audi Car maintenance Opel Car maintenance AvtoVAZ
VWmanual.ru


Main   Passat   Golf   Polo   Touareg   Tiguan   Sharan   Transporter   Others  
Passat B2 (1981-1988) Passat B3 (1988-1993) Passat B4 (1988-1996) Passat B5 (1996-2005) Passat B6 (2005-2010)

Removal and installation the thermostat (VW Passat B5)

  • Main
  • Passat
  • Passat B5
  • Power unit
  • Cooling system
  • Removal and installation the thermostat
            0


Contents: Removal ↓ Checking the functionality of the…↓ Installation ↓ Installation ↓

Removal


Four-cylinder engine

The thermostat is located in the water pump housing. On 1.6-I engines with the AHL code, the thermostat is attached to the cooling system pipe, on the side of the engine cylinder block.

Drain the coolant from the cooling system.

Engines other than 1.6-I AHL engine

Thermostat location on four-cylinder engines, except for the 1.6-I AHL engine
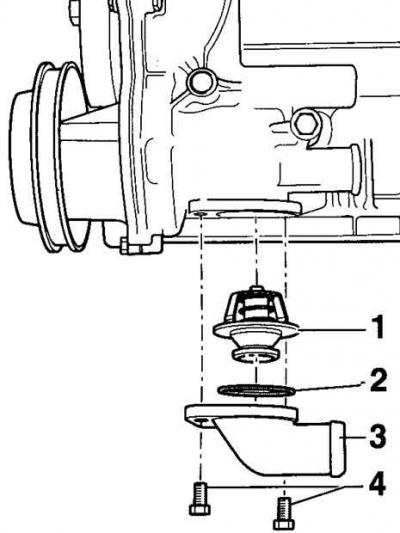


Thermostat location on four-cylinder engines, except for the 1.6-I AHL engine

  • 1 - thermostat,
  • 2 - sealing ring,
  • 3 - branch pipe,
  • 4 - bolts

1. Remove the two bolts securing the coolant pipe to the bottom of the water pump and drain the coolant into a suitable container. Move the coolant pipe with the hose connected to it to the side, see Fig. Location of the thermostat on four-cylinder engines, except for the 1.6-I AHL engine.

2. Remove the thermostat and O-ring. A new O-ring must be used when installing the thermostat.

Engines 1.6-I AHL

Thermostat for 1.6-I AHL engines
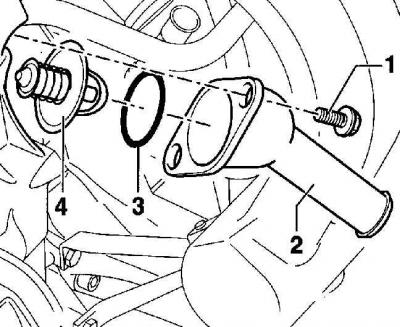


Thermostat for 1.6-I AHL engines

  • 1 - bolt,
  • 2 - branch pipe,
  • 3 - sealing ring,
  • 4 - thermostat

1. Unscrew the two bolts and remove the connecting pipe from the engine cylinder block.


2. Remove the thermostat together with the sealing ring. When installing, it is necessary to use a new sealing ring, see Fig. Thermostat of 1.6-I AHL engines.

Checking the functionality of the thermostat


Operating positions of the thermostat
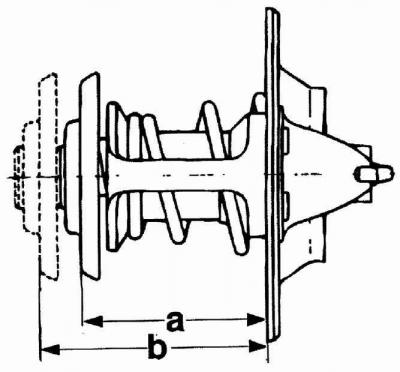


Operating positions of the thermostat

  • a - thermostat is closed,
  • b - thermostat open

Checking the functionality of the thermostat by heating it in a vessel with water
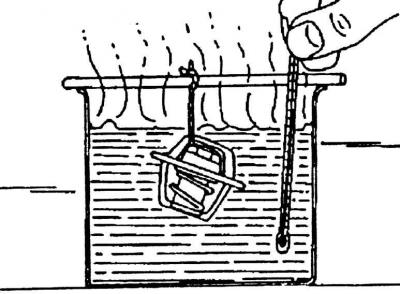


Checking the functionality of the thermostat by heating it in a vessel with water


1. Measure the length (a) of the closed thermostat, see Fig. Operating positions of the thermostat.

2. A rough test of the thermostat's functionality can be done by hanging it on a thread in a glass vessel filled with water and heating the water to boiling point (see fig. Checking the functionality of the thermostat by heating it in a vessel with water). When the water boils, the thermostat should open. If not, replace it.


The thermostat opening temperature is indicated on the thermostat housing.

When heating the thermostat to the boiling point of water, the length of the open thermostat (b) should be 7 mm longer than the length of the closed thermostat (a) (see fig. Thermostat operating positions).

A thermostat that does not close when the water cools also needs to be replaced.

Installation


1. Install the thermostat with a new sealing ring. Install the coolant hose and secure it with bolts, tightening them to 10 Nm.

2. Fill the cooling system with coolant.

3. Start the engine and check the cooling system for leaks.

Five-cylinder engine

The thermostat is located in a separate housing, which is attached to the front side of the cylinder head (see Fig. Cylinder head assembly for 2.3-I-VR5 engine).

The thermostat must be installed so that the air vent duct is directed upwards.

Thermostat Performance Test Data

Thermostat opening temperature +87°C.

Full thermostat opening temperature +105°C.

The stroke length of the thermostat valve is not less than 7 mm.

Six-cylinder engine

Removal the cooling system connecting pipe from the front of the cylinder head
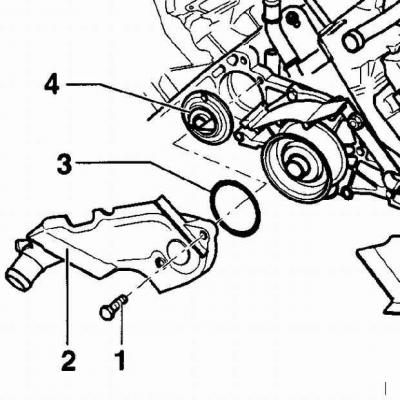


Removal the cooling system connecting pipe from the front of the cylinder head

  • 1 - bolt,
  • 2 - connecting pipe,
  • 3 - sealing ring,
  • 4 - thermostat

The thermostat is located in the connecting pipe mounted on the engine cylinder block.

1. Drain the coolant from the cooling system.

2. Remove the poly V-belt.

3. Loosen the timing belt tension and remove the timing belt from the camshaft pulley.

Warning: To protect the timing belt from coolant, cover the timing belt with polyethylene.


4. Unscrew the two bolts and remove the cooling system connecting pipe from the front of the cylinder head, see Fig. Removing the cooling system connecting pipe from the front of the cylinder head.

5. Remove the sealing ring and thermostat from the cylinder head.

6. Check the functionality of the thermostat.

Installation


Correct location of thermostat on six-cylinder engines
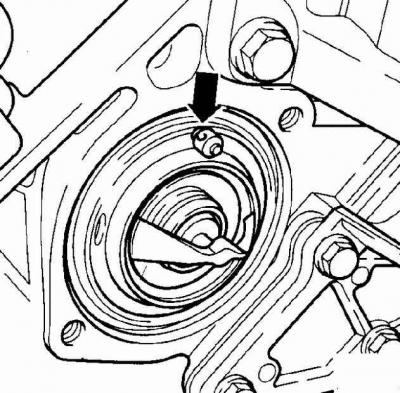


Correct location of thermostat on six-cylinder engines


The arrow indicates the air bleed valve.

1. Install the thermostat into the cylinder head so that the air bleed valve is located at the top, see Fig. Correct location of thermostat on six-cylinder engines.

2. Install the cooling system connecting pipe with a new sealing ring and screw on the bolts, tightening them to a torque of 10 Nm.

3. Install the timing belt onto the camshaft pulley.

4. Fill the cooling system with coolant.

5. Start the engine and check the cooling system for leaks.

This article is available at russian, bulgarian, belarusian, ukrainian, serbian, croatian, romanian, polish, slovak, hungarian
The text has been checked: Tarasov Ivan

Share information:

Previous articles
Replacing the coolant
Coolant mixture composition
Topping up the coolant
Engine cooling system device
Next articles
Removal and installation the radiator
Water pump (1.8-I and 1.6-I ADP engines)
Cooling system hoses
Cooling system malfunctions


Similar articles from other manuals for VW cars:
Checking and replacing the thermostat Golf 1 (1974-1984, petrol)
Removal and installation the thermostat Polo 4 (2001-2009)
Coolant pump and thermostat Tiguan 1 (2007-2015)
Thermostat 2.0 liter engine Sharan 1 (1995-2000)
Coolant Thermostat — Removal, Checking and Installation Transporter T4 (1990-2003)
Parts and components of the thermostat, radiator and expansion… Caddy 3 (2003-2010)
Link to this page in different formats


Visitor comments


No comments yet


How much will 40 + 47 =


Passat B6 
  • General information
  • User manual
  • Maintenance
  • Petrol engine 1.6L
  • Engine repair
  • Cooling and lubrication system
  • Fuel injection system
  • Petrol engine 2.0L
  • Engine repair
  • Lubrication system
  • Cooling system
  • Fuel and exhaust systems
  • Diesel engine 2.0L
  • Engine repair
  • Cooling and lubrication system
  • Fuel and exhaust systems
  • Transmission
  • Clutch
  • Mechanical gearbox
  • Automatic gearbox
  • Drive shafts
  • Chassis
  • Wheels and tires
  • Car suspension
  • Steering
  • Brake system
  • Body
  • Exterior (external elements)
  • Electrical equipment
  • Power devices
  • Lighting and appliances
  • Electrical circuits
Passat B5 
  • General information
  • User manual
  • Weekly checks
  • Maintenance
  • Power unit
  • Engine repair
  • Cooling system
  • Fuel system (petrol)
  • Fuel system (diesel)
  • Engine management
  • Exhaust system
  • Transmission
  • Clutch
  • Car gearbox
  • Drive shafts
  • Chassis
  • Car suspension
  • Wheels and tires
  • Steering
  • Brake system
  • Body
  • Exterior (external elements)
  • Interior (internal elements)
  • Doors and covers
  • Ventilation and heating
  • Electrical equipment
  • Power devices
  • Lighting and appliances
  • Electrical circuits
Passat B4 
  • General information
  • User manual
  • Maintenance
  • Technical data
  • 8-valve engine
  • Engine repair
  • Cooling and lubrication system
  • Supply system
  • Ignition system
  • Fuel injection «Mono-Jetronic»
  • Control system «Mono-Motronic»
  • Control system «Digifant»
  • Control system «Simos»
  • 16-valve engine
  • Engine repair
  • Cooling and lubrication system
  • Fuel injection «K-Jetronic»
  • Control system «KE-Motronic»
  • Control system «Digifant»
  • Diesel engine
  • Engine repair
  • Cooling and lubrication system
  • Power and control system
  • Turbocharging system
  • Digital control system
  • Transmission
  • Clutch
  • Manual gearbox
  • Hydromechanical gearbox
  • Front wheel drive
  • Chassis
  • Car suspension
  • Steering
  • Brake system
  • Body
  • Body elements
  • Electrical equipment
  • Power devices
  • Lighting and appliances
  • Electrical circuits
Passat B3 
  • General information
  • User manual
  • Driving Tips
  • Maintenance instructions
  • Technical data
  • Power unit
  • Engine repair
  • Ignition system
  • Lubrication system
  • Cooling system
  • Supply system
  • Petrol injection system
  • Diesel engine
  • Exhaust system
  • Transmission
  • Clutch
  • Car gearbox
  • Chassis
  • Suspension
  • Steering
  • Brake system
  • Wheels and tires
  • Body
  • Exterior
  • Interior
  • Heating system
  • Electrical equipment
  • Power devices
  • Lighting system
  • Equipment and devices
  • Wiper system
  • Electrical circuits
Passat B2 
  • General information
  • Introduction to instructions
  • User manual
  • Power unit
  • Engines 4-cylinder FZ
  • Engines 4-cylinder
  • Engines 5-cylinder
  • Transmission
  • Clutch
  • Four-speed gearbox
  • Five-speed gearbox
  • Hydromechanical gearbox
  • Front wheel drive
  • Chassis
  • Front suspension
  • Rear suspension
  • Steering
  • Brake system
  • Body
  • Body elements
  • Electrical equipment
  • Equipment and devices
  • Electrical circuits
VWmanual.ru © 2016-2026 | Mobile version | News and articles | Sitemap: EN BG BY UA RS HR RO PL SK HU | Write message | Site search
Passat B2 • Passat B3 • Passat B4 • Passat B5 • Passat B6 • Golf 1, diesel • Golf 1, petrol • Golf 2, petrol • Golf 2 • Golf 3 • Golf 4 • Golf 5 • Polo 3 • Polo 4 • Touareg 1 • Tiguan 1 • Sharan 1 • Transporter T3 • Transporter T4 • LT 28 • LT 2D • Beetle • Caddy 3 •
Our website uses cookies to ensure functionality and convenience.