
Touran cars
Attention! Xenon bulbs are under pressure. When replacing them, it is recommended to wear protective goggles and gloves.
1. Switch off the ignition and switch off the relevant consumer/headlight.
2. Open the hood.
3. Disconnect the battery.
4. Press the retaining bracket 1 on the back of the headlight to the side (see arrow A in the illustration) and remove the protective cover 2 from the dipped beam headlight.
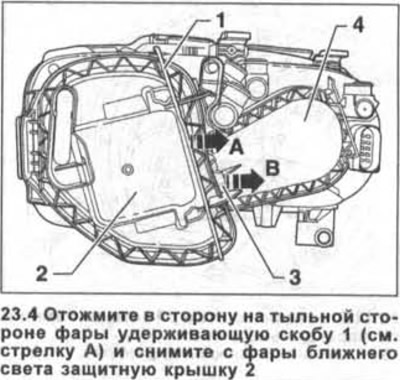
5. Press the leash 3 in the direction of arrow B in illustration 23.4 and remove the protective cover from the high beam headlight, parking lights and direction indicator.
When installing caps 2 and 4, make sure they are firmly seated to prevent water from entering the headlight housing.
6. Check the performance of the new light bulb. If necessary, contact a workshop to adjust the headlight beam throw.
Low beam headlights with halogen bulbs
Removing
7. Remove the protective cover from the back of the headlight.
8. Turn bulb socket 1 counterclockwise (see arrow in illustration) and remove it together with the bulb from the reflector.

9. Remove the bulb from the socket.
Installation
10. Fix the new bulb in the socket so that the protrusion on the base of the bulb fits into the recess on the socket (see illustration 22.9).
11. Install the socket and bulb into the reflector, and then turn the socket clockwise until it locks into place.
12. Replace the protective cover of the headlight 2 and secure it with the retaining bracket 1 (see illustration 23.4)
High beam headlights
Removing
13. Remove the protective cover.
Attention! Depending on the model of the car, the headlight bulb of the distant matchmaker can be attached with a wire bracket or installed in a cartridge that is fixed in the reflector.
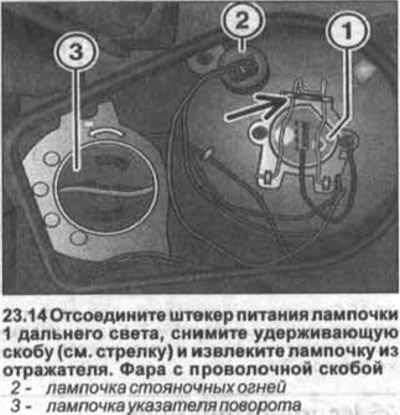
14. Headlight with wire bracket. Disconnect the high beam bulb power plug 1, remove the retaining bracket (see arrow in illustration) and remove the bulb from the reflector.
15. Headlight with cartridge. Turn bulb socket 1 counterclockwise (see arrow A in the illustration) and remove it together with the bulb from the reflector.
Installation
16. Headlight with wire bracket. Attach the new light bulb to the socket so that the tabs on the base of the light bulb fit into the recess on the socket.
Clamp the bulb with a bracket and connect the power plug of the high beam bulb.
17. Headlight with cartridge. Attach the new light bulb to the socket so that the tab on the base of the light bulb fits into the recess on the socket.
18. Headlight with cartridge. Insert the bulb socket into the reflector and turn it clockwise to lock it.
19. Replace the protective cover 4 on the back of the headlight (see illustration 23.4).
Parking light/turn signal bulbs
Removing
20. Remove the protective cover on the back of the headlight.
21. Parking light. Remove socket 2 together with the bulb from the reflector, and then remove the bulb from the socket (see illustrations 22.14 and 22.15).
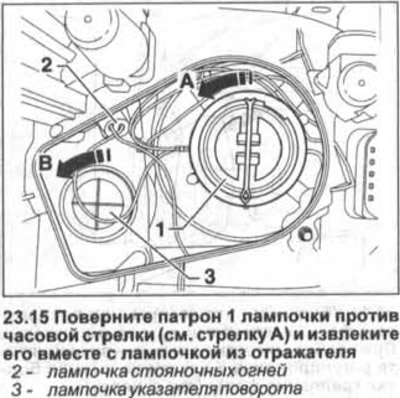
22. Turn signal. Turn the 3 light bulb socket counterclockwise (see arrow in illustrations 23.14 and 23.15) and remove it together with the bulb from the reflector.
Press the light bulb into the socket and at the same time turn it counterclockwise in the socket, and then remove it from the socket.
The bulb is installed in the reverse order of removal.
To secure the indicator bulb in the socket, press it in and simultaneously turn it clockwise in the socket.
Xenon low beam headlights
23. Remove a headlight, the corresponding chapter see.
24. Squeeze aside the retaining bracket 1 on the back of the headlight (see arrow A in illustration 23.4) and remove the protective cover 2 from the dipped beam headlight.
The subsequent removal and installation steps are carried out in the same sequence as as in Golf cars.
Visitor comments