
English Русский
Български
Беларускі
Український
Српски
Hrvatski
Română
Polski
Slovenský
Magyar
  |  Articles  |  Sitemap  |  Contacts  |    |
Car maintenance Ford Car maintenance Hyundai Car maintenance Chevrolet Car maintenance BMW Car maintenance Audi Car maintenance Opel Car maintenance AvtoVAZ
VWmanual.ru


Main   Passat   Golf   Polo   Touareg   Tiguan   Sharan   Transporter   Others  
Golf 1 (1974-1984, diesel) Golf 1 (1974-1984, petrol) Golf 2 (1984-1993, petrol) Golf 2 (1984-1993) Golf 3 (1991-1997) Golf 4 (1997-2004) Golf 5 (2003-2008)

Rear headlight — removal and installation (Golf) (VW Golf 5)

  • Main
  • Golf
  • Golf 5
  • Electrical equipment
  • Lighting and appliances
  • Rear headlight — removal and installation (Golf)
            0


Contents: Headlight on the rear wing ↓ Replacing a light bulb ↓ Tailgate Light ↓ Replacing a light bulb ↓ Jetta cars ↓
The rear headlight unit consists of two parts. One segment of the headlight is mounted on the rear wing, and the second is built into the rear hatch.

Attention! Removal and installation of the rear headlights on Jetta vehicles is the same as on Golf vehicles. The headlight segment on the rear wing is equipped with LEDs. If the LED fails, the rear light should be replaced as a set.


Headlight on the rear wing


Removal


1. Turn off the ignition and taillights.

2. Disconnect the battery.

3. Open the tailgate and remove the side trim of the trunk near the taillight using the corresponding cut in the trim.

4. Use a screwdriver to disconnect the retainer 1 and disconnect the rear light power supply plug 2 (see illustration).
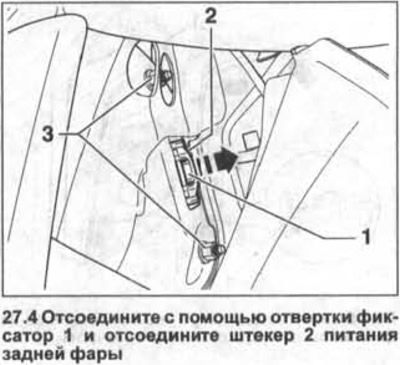
4. Use a screwdriver to disconnect the retainer 1 and disconnect the rear light power supply plug 2…


5. Unscrew the two nuts 3 and remove the side part of the headlight (see illustration 27.4).

Installation


Installation of the side part of the rear light is carried out in the reverse order of removal.

6. Connect and secure the power plug.


7. Tighten the headlight mounting nuts to 4 Nm.

8. Make sure that the gaps between the headlight housing and adjacent body parts are equal and parallel.

Replacing a light bulb


9. Remove the headlight and place it on a suitable support.

10. Press three leashes 1,3 and 4 outwards (see arrows in the illustration) and remove board 2 with bulbs. Be careful not to break the leads.
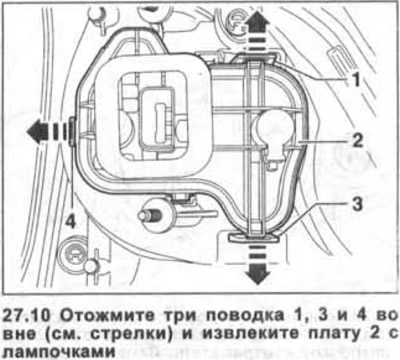
10. Press three leashes 1,3 and 4 outwards (see arrows in the illustration) and remove board 2 with…


11. Press down on the bulb, turn it counterclockwise and remove it from the board.

12. Insert the new bulb into the board and turn it clockwise to secure it.

13. Install the board with bulbs into the headlight and secure it.

14. Check the operation of the new bulb.

Tailgate Light


Removal


15. Turn off the ignition and taillights.

16. Disconnect the battery.

17. Open the tailgate and detach the bottom of the door trim, see the relevant chapter.

18. Unscrew the two nuts 1 and remove the rear light from the door (see illustration).
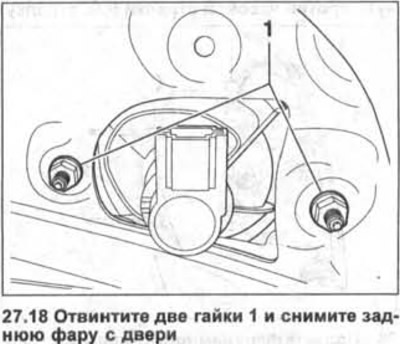
18. Unscrew the two nuts 1 and remove the rear light from the door (see illustration).


Installation


Caution: Before securing the headlight, apply a drop of glue to the washers of the mounting bolts to prevent them from falling during installation.


The sequence of installing the headlight is the reverse of removing it. The tightening torque of the headlight mounting nuts is 4 Nm.

19. Make sure that the gaps between the headlight and the body parts are parallel and correspond to the nominal ones.

Replacing a light bulb


20. Open the rear hatch.

21. Use a plastic wedge, such as HAZET 1965-20, to pry the cover off the upholstery.

22. Disconnect the headlight power connectors.

23. Turn the bulb holder 1 on the back of the headlight and remove it together with the bulb from the reflector.

The rear fog light bulb should be turned counterclockwise (see arrow in illustration), and the reversing light bulb - clockwise.
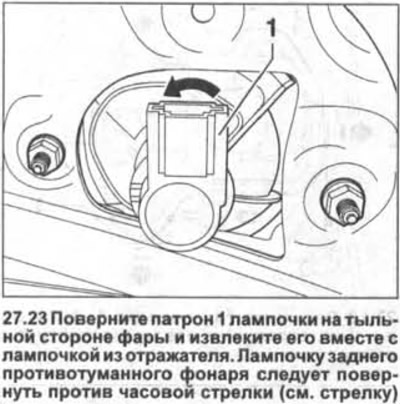
The rear fog light bulb should be turned counterclockwise (see arrow in illustration), and the…


24. Press the bulb into the socket, turn it counterclockwise and remove it from the socket.

Installing a new light bulb is done in the reverse order of removal.

25. Check the operation of the new bulb.

Jetta cars


26. Press the two leashes outward and remove the bulb holder from the headlight reflector on the trunk lid.

This article is available at russian, bulgarian, belarusian, ukrainian, serbian, croatian, romanian, polish, slovak, hungarian
The text has been checked: Kolesnikov Artem

Share information:

Previous articles
Fog lights — removal and installation
Executive electric motor of the tilt controller of the optical axis of the headlights (Golf)
Headlight — removal and installation
Headlight bulbs — replacement (Touran)
Headlight Bulbs — Replacement (Golf)
Lighting fixtures — general provisions
Next articles
Rear headlight — removal and installation (Touran)
Side turn signal repeater — removal and installation
Door Light — Removal and Installation
License Plate Light — Removal and Installation
Additional brake light — removal and installation
Interior Lights — Bulb Replacement (Golf)


Similar articles from other manuals for VW cars:
Rear seats of a car Passat B3 (1988-1993)
Rear seats Polo 3 (1995-2003)
Rear center armrest Touareg 1 (2002-2006)
Carved versions of the rear toothed belt guard Tiguan 1 (2007-2015)
Rear suspension — design description Sharan 1 (1995-2000)
Headlight washer, wiper and rear window washer Transporter T3 (1979-1992)
Adjusting headlight washer nozzles Caddy 3 (2003-2010)
Link to this page in different formats


Visitor comments


No comments yet


How much will 26 + 21 =


Golf 5 
  • General information
  • User manual
  • Maintenance
  • Troubleshooting
  • Power unit
  • Engine repair
  • Cooling and ventilation system
  • Fuel system
  • Ignition system
  • Transmission
  • Clutch
  • Mechanical gearbox
  • Automatic gearbox
  • Chassis
  • Brake system
  • Car suspension
  • Steering
  • Body
  • Interior (internal elements)
  • Exterior (external elements)
  • Doors and covers
  • Electrical equipment
  • Power devices
  • Washers and wipers
  • Lighting and appliances
  • Electrical circuits
Golf 4 
  • General information
  • User manual
  • Weekly checks
  • Maintenance
  • Power unit
  • Petrol engines
  • Diesel engines
  • Cooling system
  • Fuel system (petrol)
  • Control system (petrol)
  • Fuel system (diesel)
  • Exhaust system
  • Transmission
  • Clutch
  • Car gearbox
  • Drive shafts
  • Chassis
  • Car suspension
  • Steering
  • Wheels and tires
  • Brake system
  • Body
  • Exterior (external elements)
  • Interior (internal elements)
  • Ventilation and heating
  • Car doors and sunroof
  • Washers and glass cleaners
  • Electrical equipment
  • Power devices
  • Lighting and appliances
  • Electrical circuits
Golf 3 
  • Petrol engine
  • Engine repair
  • Lubrication system
  • Cooling system
  • Ignition system
  • Diesel engine
  • Engine repair
  • Diesel injection system
  • Pre-glow system
  • Transmission
  • Clutch
  • Gearbox and drive shafts
  • Chassis
  • Steering
  • Wheels and suspension
  • Brake system
  • Electrical equipment
  • Lighting and appliances
  • Electrical circuits
Golf 2 
  • General information
  • Introduction to guide
  • User manual
  • Petrol engines 1.3 l
  • Engine repair
  • Lubrication system
  • Cooling system
  • Carburetors
  • Supply system
  • Ignition system
  • Petrol engines 1.6/1.8 l
  • Engine repair
  • Supply system
  • Ignition system
  • Diesel engines
  • Engine repair
  • Lubrication system
  • Cooling system
  • Power and exhaust system
  • Transmission
  • Clutch
  • 4-speed gearbox 084
  • 5-speed gearbox 085
  • 4-speed gearbox 020/4R
  • 5-speed gearbox 020/4T
  • Automatic gearbox
  • Drive shafts
  • Chassis
  • Steering
  • Car suspension
  • Brake system
  • Body
  • Body elements
  • Doors, locks and windows
  • Electrical equipment
  • Equipment and devices
  • Power devices
Golf 2 (petrol) 
  • General information
  • Characteristics
  • Car care
  • Maintenance
  • Power unit
  • Engine repair
  • Engine 1.05/1.30
  • Engine 1.60/1.80
  • Cooling and lubrication system
  • Power and exhaust system
  • Transmission
  • Clutch
  • Car gearbox
  • Drive shafts
  • Chassis
  • Brake system
  • Steering
  • Suspension
  • Body
  • Body and equipment
  • Electrical equipment
  • Lighting and appliances
  • Electrical circuits
Golf 1 (petrol) 
  • General information
  • Characteristics
  • User manual
  • Maintenance
  • Power unit
  • Engine adjustment
  • Engine 1.1/1.3
  • Engine 1.5/1.6/1.8
  • Engine electrical equipment
  • Cooling system
  • Fuel system
  • Transmission
  • Clutch and manual gearbox
  • Automatic gearbox
  • Chassis
  • Steering
  • Front suspension
  • Rear suspension
  • Brake system
  • Electrical equipment
  • Lighting and appliances
  • Electrical circuits
  • Body
  • Body and equipment
  • Optional equipment
Golf 1 (diesel) 
  • General information
  • Specifications
  • Maintenance
  • Power unit
  • Engine repair
  • Exhaust and turbocharger
  • Cooling system
  • Fuel system
  • Fuel injection system
  • Transmission
  • Clutch and drive shafts
  • Car gearbox
  • Chassis
  • Suspension and wheels
  • Steering
  • Brake system
  • Wheels and tires
  • Body
  • Heating and ventilation
  • Exterior (external elements)
  • Interior (internal elements)
  • Doors and windows
  • Electrical equipment
  • Equipment and devices
  • Lighting system
  • Power devices
  • Electrical circuits
VWmanual.ru © 2016-2026 | Mobile version | News and articles | Sitemap: EN BG BY UA RS HR RO PL SK HU | Write message | Site search
Passat B2 • Passat B3 • Passat B4 • Passat B5 • Passat B6 • Golf 1, diesel • Golf 1, petrol • Golf 2, petrol • Golf 2 • Golf 3 • Golf 4 • Golf 5 • Polo 3 • Polo 4 • Touareg 1 • Tiguan 1 • Sharan 1 • Transporter T3 • Transporter T4 • LT 28 • LT 2D • Beetle • Caddy 3 •
Our website uses cookies to ensure functionality and convenience.