
Attention! Xenon bulbs are under pressure. When replacing them, it is recommended to wear protective goggles and gloves.
1. Switch off the ignition and switch off the relevant consumer/headlight.
2. Open the hood.
3. Disconnect the battery.
4. Remove cover 1 from the back of the dipped beam headlight by turning it clockwise (see arrow A in the illustration).
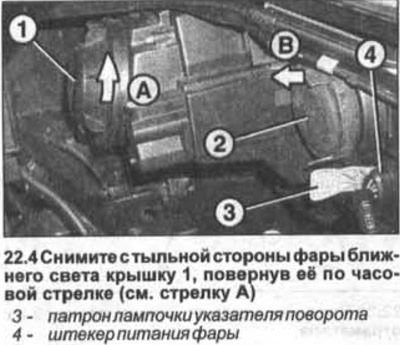
5. Remove cover 2 from the high beam and parking light (see arrow B in illustration 22.4).
When fitting covers 1 and 2, make sure that they are properly seated, otherwise water will enter the headlight housing.
6. Check the performance of the new light bulb. If necessary, contact a workshop to adjust the headlight beam throw.
Low beam headlights with halogen bulbs
Removing
7. Remove the protective cover from the back of the headlight.
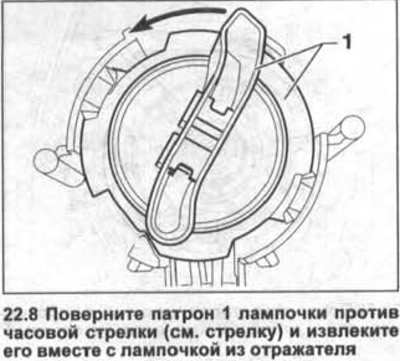
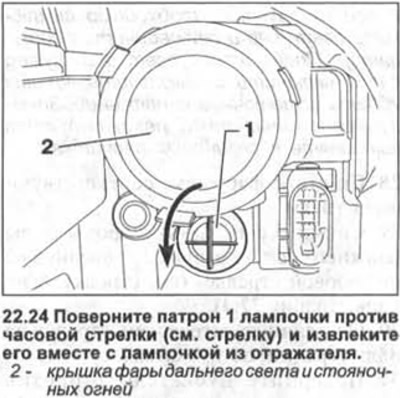
8. Turn bulb socket 1 counterclockwise (see arrow in illustration) and remove it together with the bulb from the reflector.
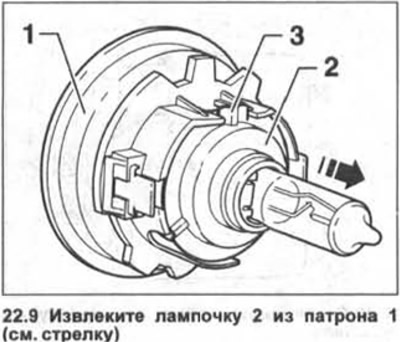
9. Remove bulb 2 from socket 1 (see arrow in illustration).
Installation
10. Fasten the new light bulb 2 in the socket 1 so that the protrusion 3 on the base of the bulb fits into the recess on the socket (see illustration 21.9).
11. Install the cartridge and bulb in the reflector so that the inscription «TOR» on the chuck is at the top, and then turn the chuck clockwise until it locks into place.
12. Replace the headlamp cover and turn it clockwise.
High beam headlights with halogen and xenon bulbs
Removing
13. Remove the protective cover from the back of the high beam headlight and parking lights.
14. Disconnect the power plug 1 of the high beam headlight bulb (see illustration).
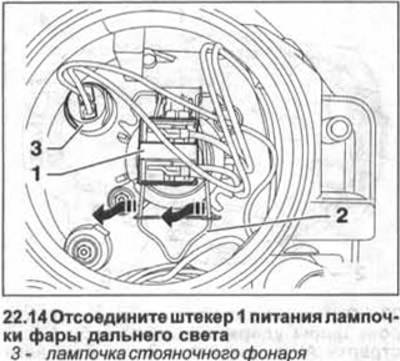
15. Press out the wire clamp 2 by pushing it forward and at the same time in the direction of the arrows in illustration 22.14.
16. Remove the bulb from the reflector.
Installation
17. Fasten the new light bulb in the socket so that the protrusions on the bulb base fit into the corresponding recesses on the socket.
18. Secure the light bulb with a wire clip.
19. Connect the high beam headlight bulb power plug.
20. Establish on the back party of a headlight a protective cover.
Parking lights (halogen bulbs)
Removing
21. Remove the protective cover from the back of the high beam headlight and parking lights.
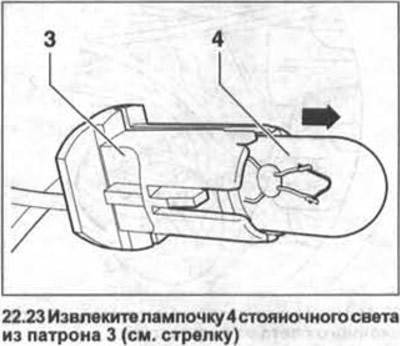
22. Remove cartridge 3 with a light bulb from the reflector (see illustration 22.14).
23. Remove the parking light bulb 4 from the socket 3 (see arrow in illustration).
Installation
The installation of the bulb and the removed parts is carried out in the reverse order of removal.
Halogen front indicator light
Removing
Attention! The direction indicator is located under the high beam headlight.
24. Turn bulb holder 1 counterclockwise (see arrow in illustration) and remove it together with the bulb from the reflector.
25. Press the bulb into the socket and at the same time turn it counterclockwise, and then remove the bulb from the socket.
Installation
26. Install a new light bulb in the socket and secure the socket in the reflector.
27. Turn the cartridge in the reflector clockwise until it locks into place. At the same time, make sure that the sealing ring is seated correctly.
Low beam headlights with xenon bulbs
Removing
Attention! High voltage is supplied to xenon bulbs. Therefore, before replacing them, you must turn off the headlights and disconnect the battery. After that, the headlights must be turned on and off again to remove residual voltage. Replacement of xenon lamps is recommended to be carried out in rubber gloves.
28. Remove a headlight, the corresponding chapter see.
29. Remove cover 1 from the back of the dipped beam headlight by turning it clockwise (see arrow A in illustration 22.4).
30. Disconnect the plug (see arrow in illustration) from the starter.
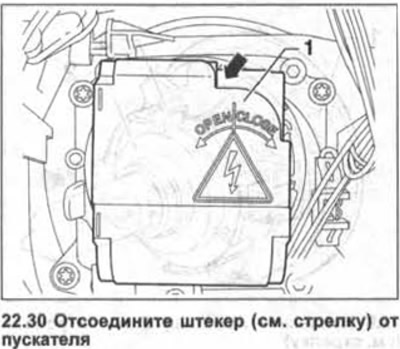
31. Turn starter 1 counterclockwise (see OPEN in illustration 22.30) and unplug it from the bulb.
Attention! Turning on the headlights with the starter disconnected is not allowed.
32. Turn retaining ring 2 counterclockwise and remove it (see arrow in illustration).

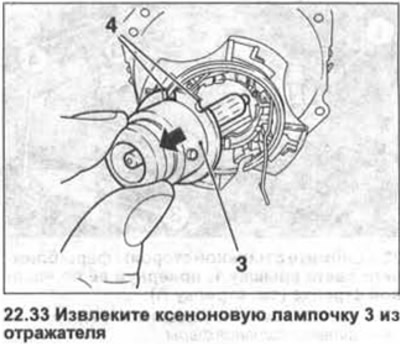
33. Remove the xenon bulb 3 from the reflector (see illustration).
Installation
34. Insert a new xenon bulb into the reflector so that the protrusions on the reflector fit into recesses 4 on the bulb holder (see illustration 22.33).
35. Screw on the retaining ring by turning it clockwise.
36. Install the starter on the light bulb and turn it clockwise (see CLOSE in illustration 22.30), to lock the starter.
37. Connect the power plug to the starter.
38. Install the protective cover on the back of the headlight and turn it clockwise.
39. Install the headlight on the installation place, see the relevant chapter.
Xenon parking lights
Removing
Attention! Parking lights and direction indicators are located under the high beam headlight and are closed by one cover.
40. Remove the protective cover of the parking lights and direction indicator.
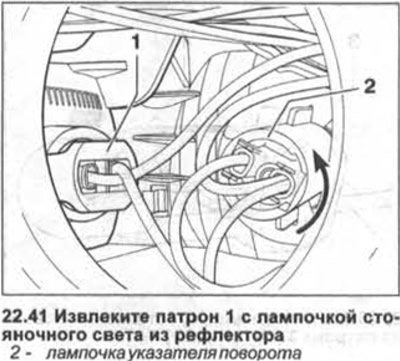
41. Remove cartridge 1 with parking light bulb from reflector (see illustration).
42. Remove the light bulb from the socket. The bulb is installed in the reverse order of removal.
Xenon headlight bulbs
Removing
Attention! Parking lights and direction indicators are located under the high beam headlight and are closed by one cover.
43. Remove the protective cover of the parking lights and direction indicator.
44. Turn bulb holder 2 counterclockwise (see arrow in illustration 22.41) and remove the bulb together with the cartridge from the reflector.
45. Press the light bulb into the socket and at the same time turn it counterclockwise in the socket, and then remove it from the socket.
Installation
46. Install a new bulb in the cartridge and secure the cartridge with the bulb in the reflector.
47. Turn the cartridge in the reflector clockwise until it locks into place.
48. Replace the protective cover.
Visitor comments