



Attention! When replacing headlight bulbs, wear gloves to avoid greasy fingerprints on the bulb glass, as even minor greasy fingerprints on a burning bulb will darken the bulb and cause the bulb to quickly fail. If such fingerprints are present, remove them with alcohol.
The headlight bulb replacement is carried out in the following order:
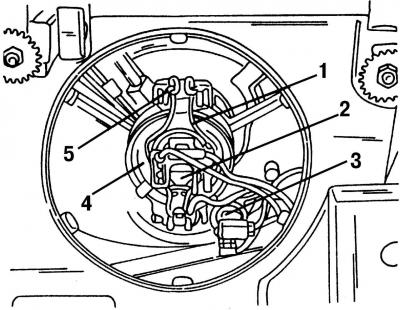
Fig. 351. Rear view of the headlight: 1 - clamp; 2 - electrical connector; 3 - side light bulb socket; 4 - headlight bulb; 5 - clamp lock
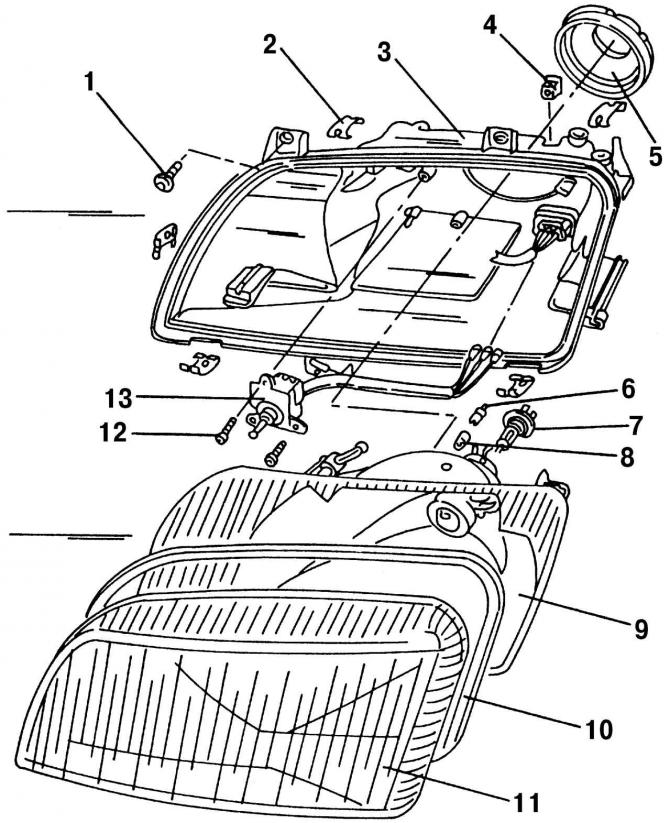
Fig. 350. Individual elements of the headlight: 1 - screw, 8 Nm; 2 - locking clamp; 3 - headlight housing; 4 - ventilation device; 5 - lid; 6 - side light bulb socket; 7 - double filament lamp, H4; 8 - parking light bulb; 9 - reflector; 10 - rubber sealing gasket; 11 - headlight diffuser; 12 - mounting screw; 13 - electric motor that turns the headlight reflector
- remove the protective cover 5 from the engine compartment (Fig. 350). To do this, turn the cover to the left and remove it. Now the headlight looks like Fig. 351;
- disconnect electrical connector 2 from the rear of the headlight;
- press the lock 5 of clamp 1 and fold the clamp down;
- remove headlight bulb 4;
- install a new lamp (work with gloves). When installing the lamp, the "protrusions" on the lamp base must fit into the grooves on the reflector;
- place clamp 1 on the lamp base and snap lock 5 into place;
- put the lid on and turn it clockwise.
After replacing the headlight bulb, check and adjust the headlights if necessary. We recommend adjusting the headlights at a service station.
Replacing the parking light bulb
The parking light bulb is replaced in the following order:
- remove the protective cover from the engine compartment;
- remove socket 3 (Fig. 351) with the parking light bulb and plug connector from the headlight housing;
- replace the faulty lamp and slide the socket with the new lamp and plug into the reflector;
- put on the protective cover and turn it clockwise.
Visitor comments