
The location of the bulbs in the left headlight
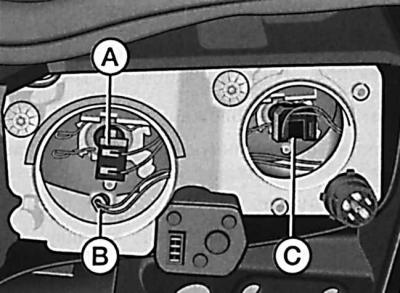
- A - low beam lamp,
- B - front side light lamp,
- C - high beam and fog light lamp
Before replacing the exterior light bulb, remove the ground wire from the battery. Remember that if the light bulb has just been on, it may be too hot.
Before replacing an exterior light bulb, check the appropriate electrical circuit and fuse. Do not touch the glass bulb of the lamp with bare hands. The fingerprint evaporates and is deposited on the reflector, resulting in poor lighting. Be sure to replace defective lamps with lamps of the same type. Wipe off any contact stains with a clean, lint-free cloth or alcohol.
When replacing xenon lamps, you must be very careful and careful, as a strong electric shock can be received from the power source of these lamps.
Replacement of gas discharge (xenon) lamps that can be identified by a sticker with a high voltage sign on the lamp body are not recommended to be manufactured by yourself.
Warning: H7 incandescent bulbs are pressurized and may burst during replacement, so gloves and goggles should be worn when replacing these bulbs.
Low beam lamp
Elements of fastening of a bulb of a low beam
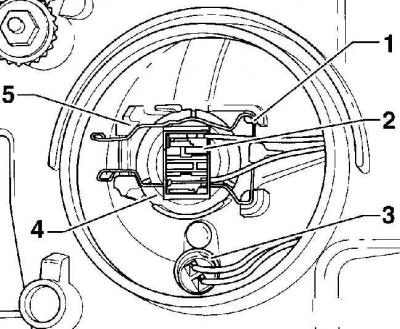
- 1 - spring clip,
- 2 - electrical connector,
- 3 - front side light lamp,
- 4 - low beam lamp,
- 5 - latch
1. Open the hood.
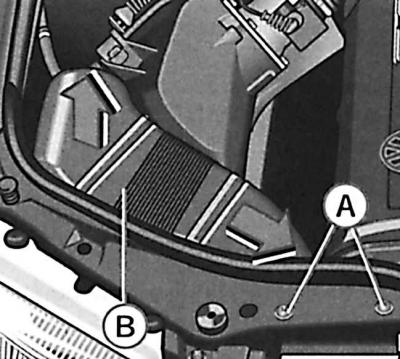
2. To access the right headlight bulbs, remove the air intake. To do this, unscrew the two screws (A) air intake mounts. Pull up the air intake at the rear end (IN) and move it to the middle of the car.
3. Pull back the plastic headlight cover and remove it.
4. Remove an electric socket from a back part of a bulb of a headlight, see fig. Elements of fastening of a bulb of a low beam.
5. Squeeze the light bulb spring clips and move the clips to the side. Remove the bulb from the headlight.
6. When installing the light bulb, do not touch the glass bulb bulb with your hands.
7. Install the new light bulb so that the mounting nose of the plate flange fits into the recess of the reflector.
8. Secure the light bulb with a spring clip by snapping it into the retainer.
9. Connect the electrical connector to the bulb.
10. Install the rear plastic headlight cover.
11. Check and, if necessary, adjust the headlights.
High beam and fog light
Elements for fastening the high-beam and fog light bulbs
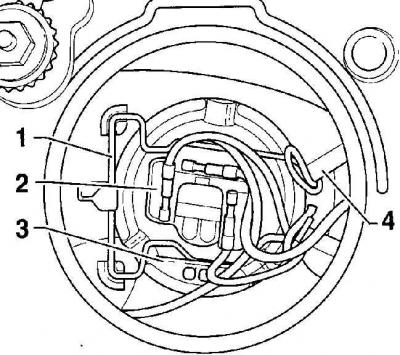
- 1 - spring clip,
- 2 - electrical connector,
- 3 - high beam and fog light lamp,
- 4 - latch
1. Pull back the plastic cover and remove it from the headlight.
2. Remove the electrical connector from the back of the headlight bulb.
3. Squeeze the light bulb spring clips and move the clips to the side. Remove the bulb from the headlight.
4. Install the new light bulb so that the mounting nose of the plate flange fits into the recess of the reflector. In this case, the middle of the three contacts of the electrical connector will take the upper position.
5. Secure the bulb with the spring clip.
6. Connect the electrical connector to the bulb and install the rear plastic cover on the headlight.
7. Check and, if necessary, adjust the headlights.
Front side light lamp
1. Pull back the plastic cover and remove it from the back of the headlight.
2. Remove the cartridge with the front side light bulb from the bottom of the reflector.
3. Press and, in this position, turn the bulb counterclockwise to remove it from the socket.
4. Insert a new light bulb into the socket, press and, in this position, turn clockwise until the light bulb is fixed.
5. Insert the bulb socket into the reflector.
6. Install the plastic headlight cover.
Front turn signal bulb
1. Open the hood.
2. Pull back the wire loop that is attached to the turn signal housing and unhook it.
3. Move forward and remove the turn signal.
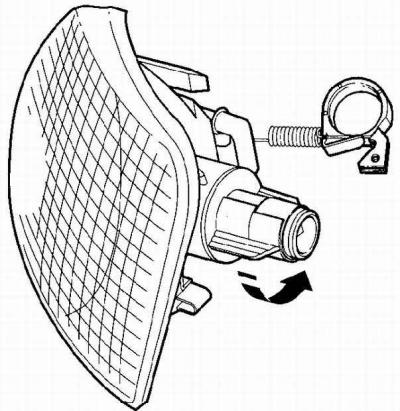
4. Turn the bulb holder counterclockwise and remove it from the turn signal housing.
5. Press and in this position turn the bulb counterclockwise to remove it from the socket.
6. Insert a new light bulb into the socket, press and in this position turn the light bulb clockwise until it locks into the socket.
7. Insert the bulb socket into the turn signal housing and turn clockwise until it locks into place.
8. Insert the turn signal housing and move it all the way back. Pay attention to the fact that the locking tabs on the turn signal housing fit into the headlight and fender guides.
9. Pull back the wire loop and secure it in the middle of the holder groove.
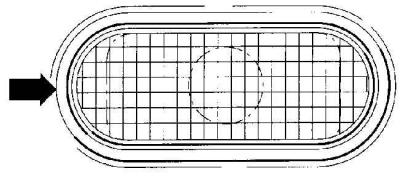
Side repeater lamp
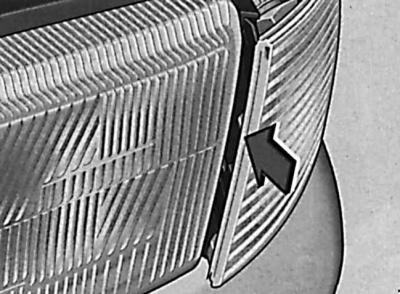
Removing the side turn signal
1. Being careful, move the turn signal forward and remove it from the wing, see fig. Removing the side turn signal.
2. Remove the bulb socket from the side repeater.
3. Remove the defective lamp from the socket and insert a new lamp into the socket.
4. Insert the cartridge into the side repeater guides until it locks into place.
5. First, insert the side turn signal with both slots into the rear part of the opening of the body and then push it until it is completely fixed.
Rear light bulbs
1. Open the trunk lid/tailgate.
2. On Sedan vehicles, fold down the trunk trim at the location of the rear light.
3. On Variant vehicles, open the side luggage compartment cover at the location of the rear light.
4. Disconnect the electrical connector from the rear light.
5. Push both lamp holder latches towards each other.
6. Remove the lamp holder.
7. Press and in this position turn the defective light bulb counterclockwise to remove it from the socket.
8. Insert a new light bulb into the socket, press and in this position turn clockwise until it locks into the socket.
9. Insert the bulb holder into the rear light until it locks into place.
10. On Sedan vehicles, reinstall the boot trim.
11. On Variant vehicles, close the luggage compartment lid.
12. Close the trunk lid/tailgate.
License plate light
On Sedan vehicles, the bulb must be replaced by a workshop "Volkswagen", since a special tool is required to access the lamp housing. The following is the execution order for Variant vehicles.
1. Open the back door.
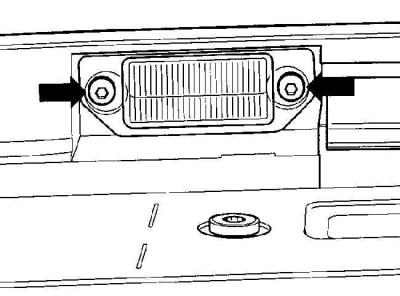
2. Unscrew screws and remove glass of a lantern.
3. Remove the defective lamp from the lamp holder and insert a new lamp.
4. Insert the glass of the lantern into the corresponding hole in the rear door, while making sure that the rubber seal and the lantern as a whole are in the correct position in relation to the adjacent lanterns.
5. Loosely tighten the screws for fixing the glass of the lantern, at the same time make sure that the sealing washers of the fixing screws are in the correct position.
6. Close the back door.
Bulb of an additional lantern of a signal of braking
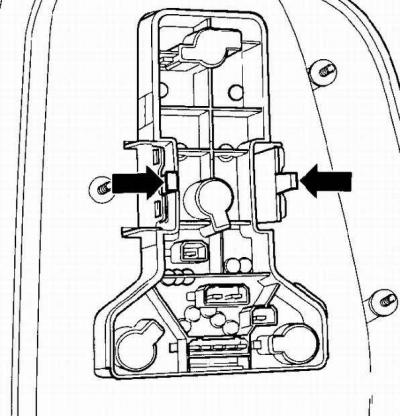
Elements of fastening of the holder of bulbs of an additional lantern of a signal of braking
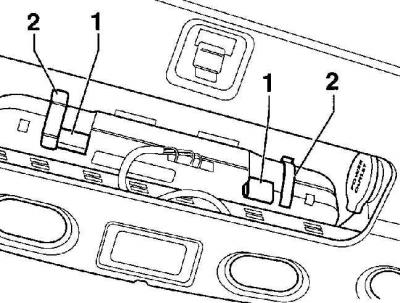
- 1 - plastic spring retainer,
- 2 - metal holders
Parts of additional brake light
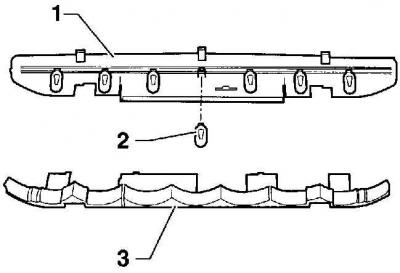
- 1 - bulb holder,
- 2 - light bulb,
- 3 - reflector
Additional brake light on vehicles Option
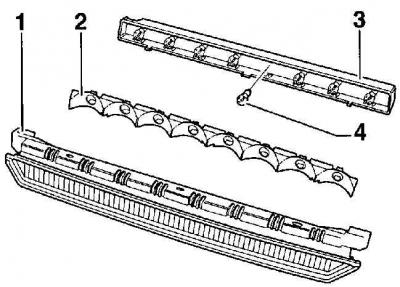
- 1 - diffuser,
- 2 - reflector,
- 3 - bulb holder,
- 4 - light bulb
sedan cars
An additional brake light is installed on a shelf at the bottom of the rear window.
1. Open the trunk lid.
2. Press back the two plastic spring clips located next to the metal holders and remove the bulb holder downwards, see fig. Elements of fastening of the holder of bulbs of an additional lantern of a signal of braking.
3. Disconnect the electrical connector from the bulb holder.
4. Remove the defective glass base bulb from the holder and insert a new bulb, see fig. Details of the additional brake light.
5. Connect the electrical connector to the bulb holder.
6. Install the light bulb holder into the housing, while the spring clips should snap into place.
Cars option
1. Remove an internal upholstery of a back door.
2. Press tabs of clips and take the holder of bulbs from an additional lantern of a signal of braking, see fig. Additional brake light on vehicles Option.
3. Remove the defective glass base bulb from the bulb holder and install a new bulb in its place.
4. Insert the bulb holder into the housing, making sure the spring clips snap into place.
5. Install the tailgate interior trim.
Visitor comments