



Contents: Light switch and headlight corrector ↓ Sunroof control switch ↓ Driver's door window switches ↓ Rear door window switches ↓ Front passenger door window switch ↓ Decorative plugs for the instrument…↓ Hazard warning lights, rear window…↓ Fuel filler cap lock switch ↓
Warning: Before removing any switch, remove the ground cable from the battery and reconnect it to the battery only after the switch is installed.
Light switch and headlight corrector
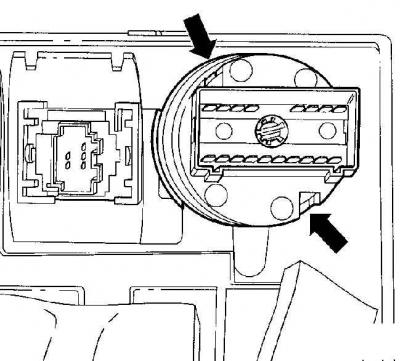
Location of light switch latches
Removing the lower instrument panel trim panel on the driver's side
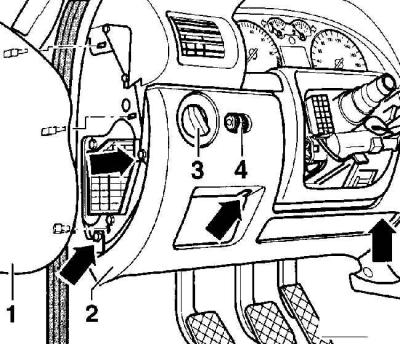
- 1 - side cover,
- 2 - lower trim panel,
- 3 - light switch,
- 4 - headlight corrector
The arrows indicate the location of the screws that secure the lower trim panel.
1. Remove the decorative cover from the left end of the instrument panel, see Fig. Removing the lower trim panel of the instrument panel on the driver's side.
2. Remove the screws securing the driver's side lower instrument panel trim panel and remove it.
3. Disconnect the electrical connectors from the light switch (3) and the headlight beam adjuster (4), see Fig. Removing the lower instrument panel trim panel on the driver's side.
4. Squeeze the tabs on the light switch (arrows) and, moving it forward, remove it from the lower trim panel of the instrument panel on the driver's side, see Fig. Location of the light switch tabs.
5. To install, insert the light switch into the guides in the lower instrument panel trim on the driver's side and press it down until the clips snap into place.
6. When installing the headlight corrector, insert it from the back until the clips snap into place.
7. Connect the electrical connectors to the light switch and headlight range control.
8. Install and secure the driver's side instrument panel lower trim.
Sunroof control switch
Location of the sunroof control switch mounting screws
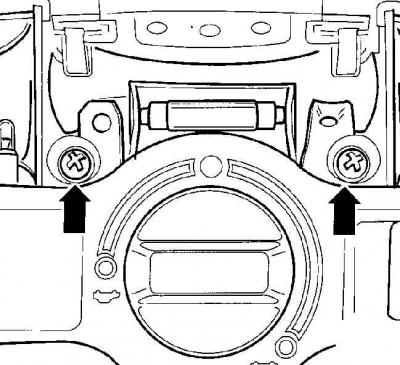
1. Remove the diffuser. To do this, insert a knife blade or other similar object into the gap between the housing and the diffuser and carefully pry the diffuser out.
2. Unscrew the screws securing the switch, see Fig. Location of the screws securing the sunroof control switch.
3. Disconnect the electrical connector and remove the switch.
4. The switch is installed in the reverse order of removal.
Driver's door window switches
Location of screws for mounting window switches on driver's door
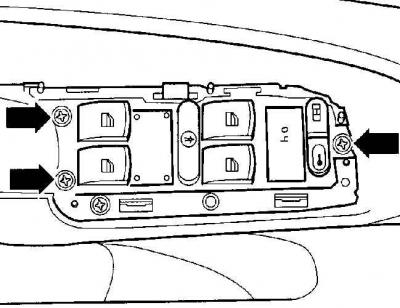
Direction for releasing the lock and disconnecting the electrical connector
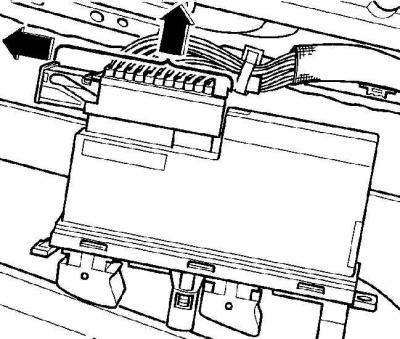
The window lift switches on the driver's door are made in the form of a block and if there is a fault, the entire block must be replaced.
1. Remove the inside door handle.
2. Remove the three screws and remove the window switches from the door trim, see Fig. Location of the screws securing the window switches on the driver's door.
3. Release the retainer and disconnect the electrical connector from the switch unit, see Fig. Direction of releasing the retainer and disconnecting the electrical connector.
4. Installation is carried out in the reverse order of removal.
Rear door window switches
Removal the rear door window switch
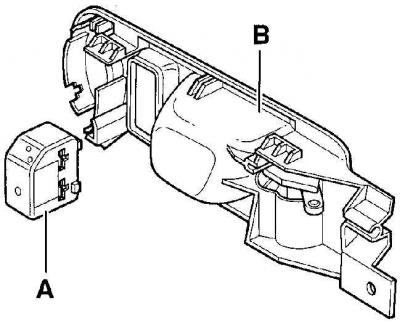
- A - window lift switch
- B - case
1. Remove the rear door interior trim.
2. Disconnect the electrical connector from the window switch. Press the side of the switch (A) and pull it out of the socket in the inner door opening handle housing, see Fig. Removing the rear door window switch.
3. Insert the window lift switch into the socket of the inner door opening handle housing until it clicks into place.
4. Further installation is carried out in the reverse order of removal.
Front passenger door window switch
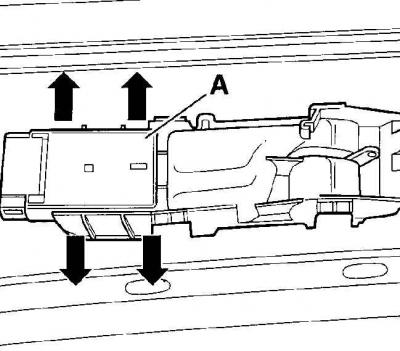
Direction of pressing the clamps to remove the front passenger door window switch (A)
1. Remove the interior door trim.
2. Disconnect the electrical connector from the window switch.
3. Press the side fasteners of the switch (A) outward and remove it from the housing, see Fig. Direction of pressing the fasteners to remove the front passenger door window switch (A).
4. Insert the window switch into the housing and secure it.
5. Further installation is carried out in the reverse order of removal.
Decorative plugs for the instrument panel
Warning: The decorative cap fastening clips are located on both longitudinal sides of the cap.
1. To avoid scratching the instrument panel when removing the decorative plug, tape the area around the plug.
(The original text can be found at: vwmanual.ru)
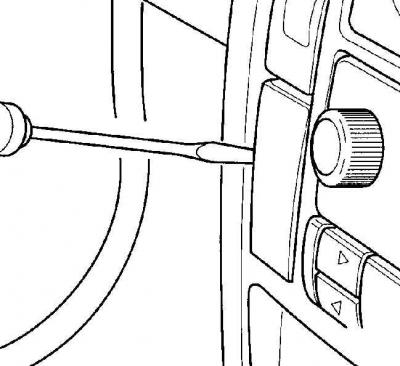
2. Using a thin screwdriver blade or a knife, pry the decorative plug out of the instrument panel.
Hazard warning lights, rear window defroster and other switches
Removal the hazard warning light switch key
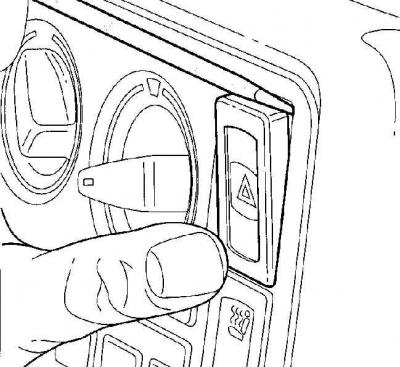
The switches are mounted in the same way.
To avoid scratching the instrument panel when removing the switch, tape the area around the switch.
1. Using a thin screwdriver blade or a knife inserted under the short side of the switch key, remove the switch key, see Fig. Removing the Hazard Warning Light Switch Key.
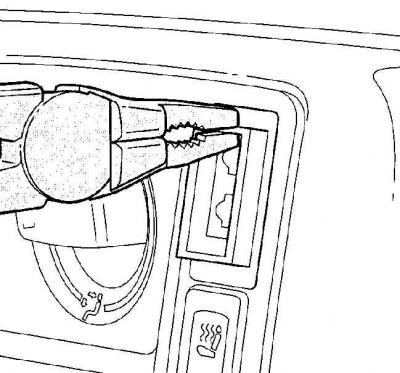
2. Use pliers to remove the switch from the instrument panel.
3. Disconnect the electrical connector from the switch.
4. When installing the switch, connect the electrical connector to it and secure it with the clamp.
5. Slide the switch into the instrument panel socket until it locks into place.
6. Set the switch key until the latch clicks into place.
Fuel filler cap lock switch
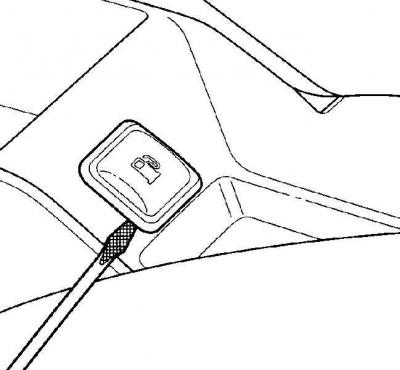
1. Insert a thin screwdriver blade or knife into the switch housing and pry and remove the switch from the center console.
2. Disconnect the electrical connector from the switch.
3. When installing the switch, connect the electrical connector to it and secure it with the clamp.
4. Insert the switch into the center console socket until the latch clicks into place.
Visitor comments