
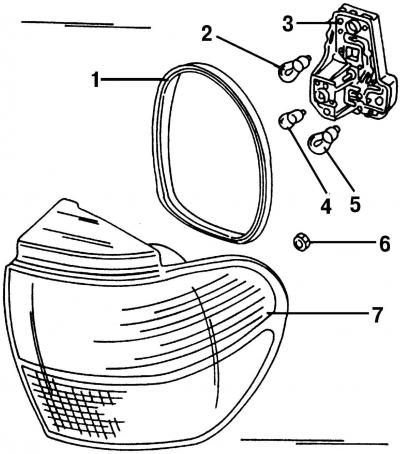
Pic. 352. Details of the rear light: 1 - rubber sealing gasket; 2 - incandescent lamp of the direction indicator, 21 V; 3 - cartridge of incandescent lamps; 4 - incandescent lamp of the rear position light, 21 V; 5 - double-filament brake light and tail light, 21/5 W; 6 - nut, 6 Nm; 7 - lamp diffuser
In the case of the rear lights on the right and left sides of the car there are incandescent lamps for the rear position light 4 (pic. 352), brake lights 5 and direction indicators 2.
The remaining additional lamps are located on the rear door in the middle lighting unit.
Replacement of incandescent lamps of back lanterns
Replace the rear light bulbs in the following order:
- using a screwdriver, remove the clips of the inner lining of the trunk (in the corner of the cabin, to the right or left of the trunk);
- remove the inner upholstery of the trunk in the corresponding corner of the cabin;
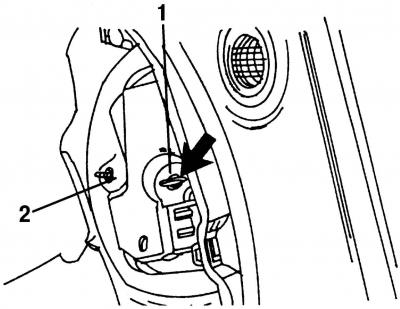
Pic. 353. Rear light on the inside: 1 - lock; 2 - fastening nut
- use a screwdriver to move the lock 1 (pic. 353) so that you can pull out the board assembly;
- press the defective lamp and, turning it counterclockwise, remove it from the cartridge;
- insert a new bulb into the socket (holding a napkin) and turn clockwise until it locks.
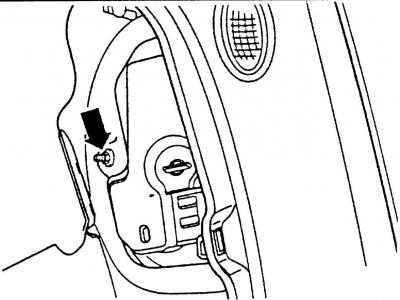
Pic. 354. Removing the rear light housing
If you want to remove the entire rear light housing, then unscrew from the inside of the body with a key «by 8 mm» three nuts (pic. 354, shown by arrow) rear light mounts. From the outside of the body, remove the rear light and its rubber seal. If the seal is porous, it must be replaced to prevent moisture from entering the car.
Middle rear light unit
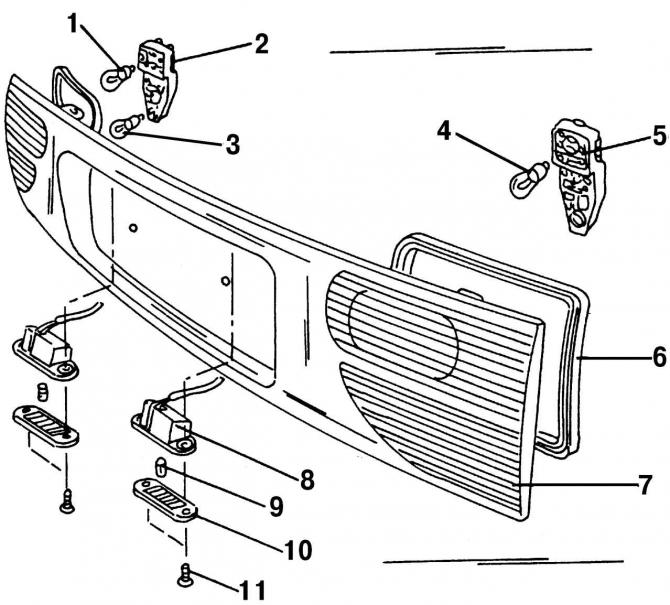
Pic. 355. The middle block of rear lighting devices: 1 - reversing lamp lamp; 2 - lamp holder; 3 - rear fog lamp; 4 - reversing lamp; 5 - lamp holder; 6 - rubber sealing gasket; 7 - glass group of lighting fixtures; 8 - license plate light; 9 - license plate lamp; 10 - license plate light diffuser; 11 - screw
The block of lighting devices located on the tailgate of the Sharan car includes incandescent lamps for reversing lights 1 and 4 (pic. 355) and 3 rear fog lamps.
Removing the lighting unit is carried out in the following order:
- open the tailgate, unscrew the nine screws securing the door upholstery and remove the upholstery down;
- disconnect the electrical connectors from both boards with lamps on the right and left by prying them with a screwdriver;
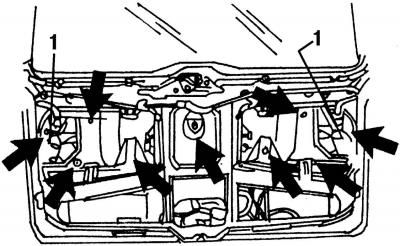
Pic. 356. Mounting points for the middle block of lighting devices (shown by arrows)
- unscrew nine nuts (pic. 356) fixing the lighting unit to the tailgate;
- close the tailgate and remove the lighting unit together with the rubber seals towards you.
Installation of the lighting unit is carried out in the reverse order of removal, taking into account the following:
- tighten the nine block fastening nuts evenly around the circle to a torque of 6 Nm;
- slide the inner upholstery of the tailgate from below so that the holes match and tighten the screws in a circle;
- Replace porous or damaged rubber gasket with a new one to prevent moisture from getting inside the vehicle.
Replacing license plate lamps
To replace the license plate lamp, proceed as follows:
- remove two screws 11 (pic. 355) mounting diffuser 10 license plate light;
- remove diffuser;
- remove the lamp with glass base and install a new lamp;
- install diffuser.
Note. After replacing a bulb, always check the operation of the headlights and lamps by turning them on.
Visitor comments