



Contents: Removal ↓ Installation ↓
Removal
Automobile lift onto the trestles and remove the wheel.
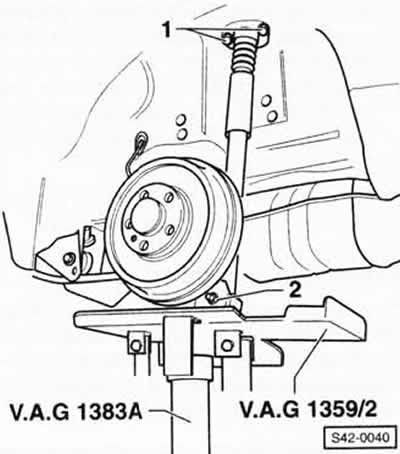
Place a suitable jack against the shock absorber receiver and support the bridge.
Vehicle with headlights equipped with xenon lamps: disconnect the rear sensor rod of the headlight beam angle adjustment system from the front axle beam.
Unscrew bolts "1" and unscrew nut "2". Remove the lower shock absorber mounting bolt.
Remove the shock absorber.
The defective shock absorber must be disposed of properly, see the relevant chapter below.
Installation
Before installation, check the shock absorber, see the relevant chapter below.
Attach the shock absorber and screw it on with new bolts "1". Tighten the bolts to a torque of 30 Nm, then turn them in the tightening direction by ¼ turn (90°).
Vehicle with headlights equipped with xenon lamps: Before tightening, adjust the upper position of the rod of the rear headlight beam angle adjustment system so that the sensor lever points backwards and turns upwards when the rear axle is elastically deformed.
Insert a new bolt from the inside, screw on a new nut "2" from the outside and tighten it by hand, see figure S42-0040.
Ensure the previous direction of rotation of the tire, tighten the wheel with bolts, lower the car and only then tighten the wheel bolts in a crosswise manner with a torque of 120 Nm.
Caution: Strictly follow the instructions given in the chapter "Removing and installing the wheel".
The luggage compartment directly behind the rear seat can accommodate a load weighing 90 kg.
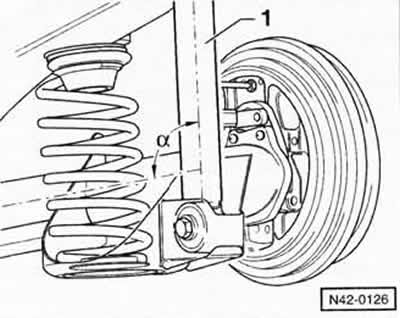
Before tightening the mounting bolt, align the shock absorber so that it is positioned relative to the rear axle axis at an angle of a = 95°.
Tighten the lower bolt to a torque of 40 Nm, then turn it in the tightening direction by ¼ turn (90°).
View the original on this portal: VWManual
Visitor comments