



Contents: Manual check ↓ Shock absorber disposal ↓ Drilling the shock absorber walls ↓ Sawing the shock absorber ↓
The presence of the following dynamic properties of the vehicle indicates a defect in the shock absorber:
- Long-term vibration of the body due to uneven road surfaces.
- The body sways when the road unevenness follows one after another.
- Wheels bounce even on a flat road.
- Car failure when braking (may also have other reasons).
- Danger when turning due to insufficient longitudinal stability, skidding of the vehicle.
- Abnormal tire wear with uneven tread wear.
- Rumbling noises when driving. Of course, these noises often arise for other reasons, such as loose bolts and nuts on the chassis, a defective wheel bearing, or a constant velocity joint. Therefore, before replacing the shock absorber, you should always check it, if necessary, on a shock absorber test stand.
The shock absorber can be checked manually. However, an accurate check of the ability of the shock absorber installed on the car to withstand the load is possible only with the help of a diagnostic device, and of the shock absorber removed from the car - on a stand for checking shock absorbers.
Manual check
Remove the shock absorber.
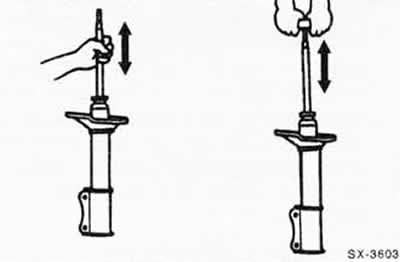
Holding the shock absorber in the mounting position, stretch it and then compress it. During the entire stroke, the piston rod of the shock absorber should move evenly, heavily and without jolts.
Check the piston rod for surface damage, bending and proper movement in the guide bushing.
Inspect the rubber support in the housing eye. The rubber supports should fit securely in the housing and not have any cracks or damage. Defective supports can cause rattling noises when driving.
In a gas-filled shock absorber, the piston rod returns to its original position automatically with sufficient gas pressure. If this is not the case, it is not necessary to replace the shock absorber. The shock absorber remains functional until there is an increase in oil loss. The damping effect of the shock absorber is fully preserved even without gas pressure. However, the noise quality of the shock absorber may deteriorate.
If the shock absorber is working properly, minor traces of oil on its surface are not a reason to replace it. The rule of thumb is: If the oil stain is obvious and extends no further than from the piston rod seal to the lower spring plate, the shock absorber is considered OK. The prerequisite for this is that the oil stain is matte, dull or, due to dust, has dried. A slight oil leak is even an advantage, since it lubricates the sealing ring and therefore lasts longer.
If there is significant oil loss, the shock absorber should be replaced.
Shock absorber disposal
To dispose of a shock absorber, you must first drain the hydraulic oil from it. The empty shock absorber can then be handed in as regular scrap metal.
Caution: Hydraulic oil is a problematic material and should never be simply dumped on the ground or disposed of with normal household waste. Local and city authorities should provide information on the location of the nearest special waste collection points.
Safety instructions
The gas pressure in a new shock absorber reaches 25 bar. Therefore, when opening the shock absorber, it is necessary to shield the work area and be sure to wear protective glasses.
The contents of the internal cavities of the shock absorber can be removed by drilling or sawing through its outer walls in the places indicated below.
Drilling the shock absorber walls
Clamp the removed shock absorber in a vice vertically with the piston rod facing down.
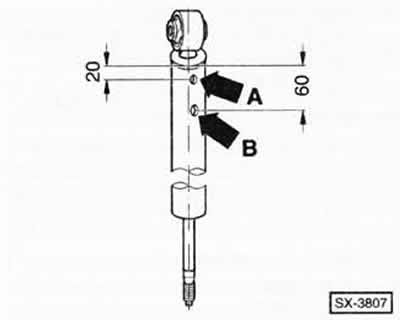
Step back from the bottom of the shock absorber approximately 20 mm "A", drill a hole in the outer wall with a diameter of 3 mm.
Note: After drilling the outer wall, gas will escape. Cover the hole with a rag while the gas is being removed. Then continue drilling until the inner pipe is drilled (approximately 25 mm).
Stepping back approximately 60 mm from the bottom of "B", drill another hole in the shock absorber with a diameter of 6 mm, passing through the inner pipe.
By moving the shock absorber piston in both directions at full stroke, squeeze out hydraulic oil into a container provided.
Allow the oil to drain completely from the shock absorber.
Hand over hydraulic oil to a special waste collection point.
Take the empty shock absorber to a scrap metal collection point.
Sawing the shock absorber
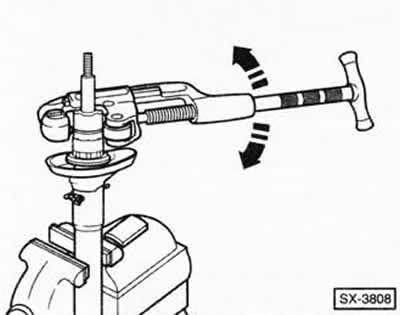
Clamp the shock absorber in a vice.
Place a pipe cutter, such as the Stahlwille Express 150/3, and cut the outer pipe.
Caution: When using a gas-filled shock absorber, gas will escape; wear protective glasses when working.
Pull the piston rod upwards, while holding the inner pipe with a pipe wrench and pressing down so that it remains in the outer pipe when the piston rod is slowly pulled upwards.
Remove the piston rod from the inner tube.
Hold the shock absorber over a container and drain the oil completely until it stops leaking.
Hand over the oil to a special waste collection point.
Empty shock absorber should be handed over to scrap metal.
Visitor comments