
English Русский
Български
Беларускі
Український
Српски
Hrvatski
Română
Polski
Slovenský
Magyar
  |  Articles  |  Sitemap  |  Contacts  |    |
Car maintenance Ford Car maintenance Hyundai Car maintenance Chevrolet Car maintenance BMW Car maintenance Audi Car maintenance Opel Car maintenance AvtoVAZ
VWmanual.ru


Main   Passat   Golf   Polo   Touareg   Tiguan   Sharan   Transporter   Others  
Golf 1 (1974-1984, diesel) Golf 1 (1974-1984, petrol) Golf 2 (1984-1993, petrol) Golf 2 (1984-1993) Golf 3 (1991-1997) Golf 4 (1997-2004) Golf 5 (2003-2008)

Fuses — replacement (VW Golf 5)

  • Main
  • Golf
  • Golf 5
  • Electrical equipment
  • Lighting and appliances
  • Fuses — replacement
            0


Contents: Fuse box on the instrument panel ↓ Fuse box in the engine compartment ↓
To avoid short circuits, damage to wiring and electrical equipment due to network overload, individual electrical circuits are protected by fuses with fusible links. Fuses of different ratings with so-called blade contacts are used.

Before replacing a fuse, always switch off the corresponding consumer and the ignition.

It is recommended to have a spare fuse and carry it with you of a certain rating so that you can quickly replace a blown one if necessary.

If the new fuse also burns out after a short period of time, the corresponding electrical circuit must be checked.

Warning! Never replace fuses with wire or other similar means, as this may cause serious damage to electrical equipment.


The main fuses are located in the fuse and relay box.

[The text is copied from this portal: vwmanual]

One fuse box is located in the instrument panel, and the second is in the engine compartment. A table with the purpose of the fuses is given in the vehicle operating instructions.

Nominal currentColor coding
5 Abeige/light brown
7.5 Abrown
10 Ared
15 Ablue
20 Ayellow
25 Atransparent
30 Agreen
40 Aorange

Attention! The purpose of the fuses depends on the vehicle configuration and year of manufacture.


A blown fuse can be identified by the melted metal insert (see illustration 5.0).
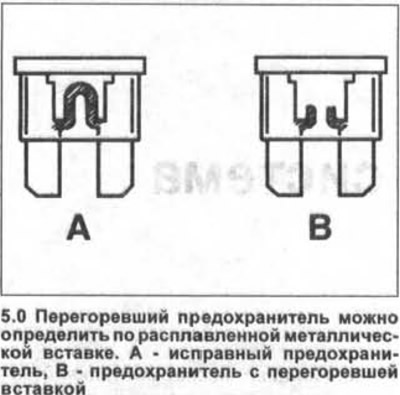
A blown fuse can be identified by the melted metal insert (see illustration 5.0).


1. Remove the blown fuse using the plastic tweezers located on the inside of the fuse box cover on the instrument panel (see illustration).
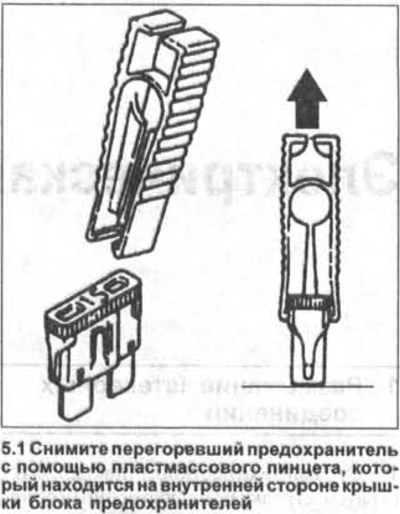


1. Remove the blown fuse using the plastic tweezers located on the inside of the fuse box cover on…


2. Insert a new fuse rated for the same amperage as the blown one.

The fuse rating is indicated on the back of the housing. In addition, the housing has markings applied with paint, the color of which corresponds to a certain rating.

Attention! There are fuses with higher ratings. However, such fuses are larger in size and, in addition, their rating is marked on the fuse body.


Important! The relays in Golf/Touran vehicles are located in the fuse box in the engine compartment and also in the box under the instrument panel. To access the relays under the instrument panel, it is necessary to remove the compartment on the driver's side where the relays are located.


Fuse box on the instrument panel


3. Golf cars: Pry off the side cover on the instrument panel with a screwdriver or a plastic wedge, such as HAZET 1965-20, and remove it (see arrow in illustration).
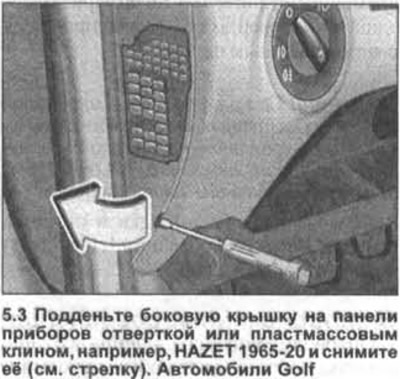
3. Golf cars: Pry off the side cover on the instrument panel with a screwdriver or a plastic wedge,…


The fuse box is located under the cover.


4. Touran vehicles: Open pocket 1, move it back and release it from hinges 2 and 3 (see illustration). In this case, first release the pocket from the outer hinge 2. Remove the pocket from the instrument panel and remove the protective mesh from the fuse box.
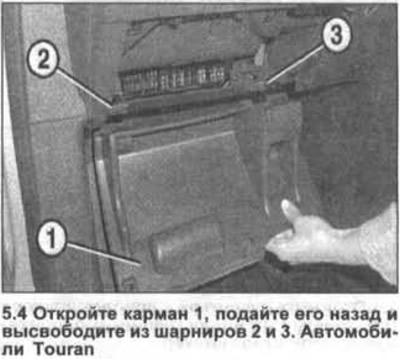
4. Touran vehicles: Open pocket 1, move it back and release it from hinges 2 and 3 (see…


Fuse box in the engine compartment


5. Open the hood.

6. Cars manufactured before 04/04. Press the leashes (see arrows in illustration, part A) and remove cover 1, which covers the fuse box. When installing the cover, it should be placed on the block and fixed.
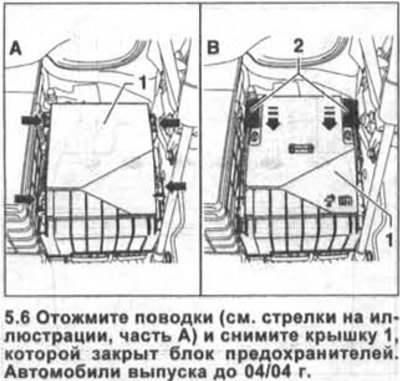
6. Cars manufactured before 04/04. Press the leashes (see arrows in illustration, part A) and…


7. Cars manufactured from 05/04. Move the latches 3 on the cover forward, in the direction of the arrows in Illustration 5.6, Part B, and remove the cover 1 from the block. When installing the cover, place it on the block, press it down and simultaneously push the latches back.

This article is available at russian, bulgarian, belarusian, ukrainian, serbian, croatian, romanian, polish, slovak, hungarian
The text has been checked: Kolesnikov Artem

Share information:

Previous articles
Parking Assist Sensors — Removal and Installation
Power elements in the remote control
Sound signal — removal and installation
Disconnecting plug connections
Next articles
Lighting fixtures — general provisions
Headlight Bulbs — Replacement (Golf)
Headlight bulbs — replacement (Touran)
Headlight — removal and installation
Executive electric motor of the tilt controller of the optical axis of the headlights (Golf)
Fog lights — removal and installation


Similar articles from other manuals for VW cars:
Fuses for electrical circuits Passat B3 (1988-1993)
Main and additional fuses Polo 3 (1995-2003)
Fuses Touareg 1 (2002-2006)
Location of fuses Tiguan 1 (2007-2015)
Replacing fuses Transporter T4 (1990-2003)
Description and location of fuses (before 2005) Caddy 3 (2003-2010)
Link to this page in different formats


Visitor comments


No comments yet


How much will 41 + 43 =


Golf 5 
  • General information
  • User manual
  • Maintenance
  • Troubleshooting
  • Power unit
  • Engine repair
  • Cooling and ventilation system
  • Fuel system
  • Ignition system
  • Transmission
  • Clutch
  • Mechanical gearbox
  • Automatic gearbox
  • Chassis
  • Brake system
  • Car suspension
  • Steering
  • Body
  • Interior (internal elements)
  • Exterior (external elements)
  • Doors and covers
  • Electrical equipment
  • Power devices
  • Washers and wipers
  • Lighting and appliances
  • Electrical circuits
Golf 4 
  • General information
  • User manual
  • Weekly checks
  • Maintenance
  • Power unit
  • Petrol engines
  • Diesel engines
  • Cooling system
  • Fuel system (petrol)
  • Control system (petrol)
  • Fuel system (diesel)
  • Exhaust system
  • Transmission
  • Clutch
  • Car gearbox
  • Drive shafts
  • Chassis
  • Car suspension
  • Steering
  • Wheels and tires
  • Brake system
  • Body
  • Exterior (external elements)
  • Interior (internal elements)
  • Ventilation and heating
  • Car doors and sunroof
  • Washers and glass cleaners
  • Electrical equipment
  • Power devices
  • Lighting and appliances
  • Electrical circuits
Golf 3 
  • Petrol engine
  • Engine repair
  • Lubrication system
  • Cooling system
  • Ignition system
  • Diesel engine
  • Engine repair
  • Diesel injection system
  • Pre-glow system
  • Transmission
  • Clutch
  • Gearbox and drive shafts
  • Chassis
  • Steering
  • Wheels and suspension
  • Brake system
  • Electrical equipment
  • Lighting and appliances
  • Electrical circuits
Golf 2 
  • General information
  • Introduction to guide
  • User manual
  • Petrol engines 1.3 l
  • Engine repair
  • Lubrication system
  • Cooling system
  • Carburetors
  • Supply system
  • Ignition system
  • Petrol engines 1.6/1.8 l
  • Engine repair
  • Supply system
  • Ignition system
  • Diesel engines
  • Engine repair
  • Lubrication system
  • Cooling system
  • Power and exhaust system
  • Transmission
  • Clutch
  • 4-speed gearbox 084
  • 5-speed gearbox 085
  • 4-speed gearbox 020/4R
  • 5-speed gearbox 020/4T
  • Automatic gearbox
  • Drive shafts
  • Chassis
  • Steering
  • Car suspension
  • Brake system
  • Body
  • Body elements
  • Doors, locks and windows
  • Electrical equipment
  • Equipment and devices
  • Power devices
Golf 2 (petrol) 
  • General information
  • Characteristics
  • Car care
  • Maintenance
  • Power unit
  • Engine repair
  • Engine 1.05/1.30
  • Engine 1.60/1.80
  • Cooling and lubrication system
  • Power and exhaust system
  • Transmission
  • Clutch
  • Car gearbox
  • Drive shafts
  • Chassis
  • Brake system
  • Steering
  • Suspension
  • Body
  • Body and equipment
  • Electrical equipment
  • Lighting and appliances
  • Electrical circuits
Golf 1 (petrol) 
  • General information
  • Characteristics
  • User manual
  • Maintenance
  • Power unit
  • Engine adjustment
  • Engine 1.1/1.3
  • Engine 1.5/1.6/1.8
  • Engine electrical equipment
  • Cooling system
  • Fuel system
  • Transmission
  • Clutch and manual gearbox
  • Automatic gearbox
  • Chassis
  • Steering
  • Front suspension
  • Rear suspension
  • Brake system
  • Electrical equipment
  • Lighting and appliances
  • Electrical circuits
  • Body
  • Body and equipment
  • Optional equipment
Golf 1 (diesel) 
  • General information
  • Specifications
  • Maintenance
  • Power unit
  • Engine repair
  • Exhaust and turbocharger
  • Cooling system
  • Fuel system
  • Fuel injection system
  • Transmission
  • Clutch and drive shafts
  • Car gearbox
  • Chassis
  • Suspension and wheels
  • Steering
  • Brake system
  • Wheels and tires
  • Body
  • Heating and ventilation
  • Exterior (external elements)
  • Interior (internal elements)
  • Doors and windows
  • Electrical equipment
  • Equipment and devices
  • Lighting system
  • Power devices
  • Electrical circuits
VWmanual.ru © 2016-2026 | Mobile version | News and articles | Sitemap: EN BG BY UA RS HR RO PL SK HU | Write message | Site search
Passat B2 • Passat B3 • Passat B4 • Passat B5 • Passat B6 • Golf 1, diesel • Golf 1, petrol • Golf 2, petrol • Golf 2 • Golf 3 • Golf 4 • Golf 5 • Polo 3 • Polo 4 • Touareg 1 • Tiguan 1 • Sharan 1 • Transporter T3 • Transporter T4 • LT 28 • LT 2D • Beetle • Caddy 3 •
Our website uses cookies to ensure functionality and convenience.