
Bearing beam front door
The door lock, power window and loudspeakers are fixed on the carrier beam of the door. The window regulator can only be removed together with the support beam.
The door carrier can only be removed after the power window clips that hold the glass are removed. To do this, the glass must be lowered to the mounting holes on the carrier beam and the clamp bolts must be loosened.
Removing
1. Remove the door upholstery.
2. Remove the outside door handle.
3. Remove protective caps 3 (see illustration).
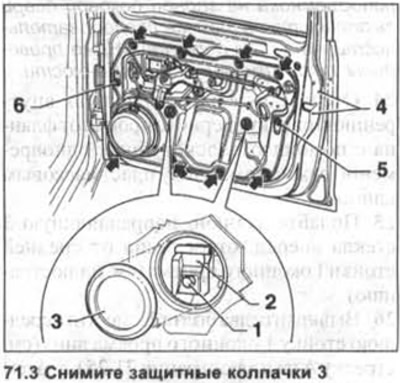
4. Lower the window so that bolts 1, which secure the glass, become accessible through the mounting holes (see illustration 71.3).
5. Loosen the bolts 1 and release the clips 2 of the power window (see illustration 71.3).
Attention! Bolts 1 must not be completely unscrewed.
6. Move the glass up and fix it in this position, for example, with adhesive tape or a plastic wedge.
Attention! In order to remove the glass, it is necessary to lift it by the back side and remove it from the window opening.
7. Disconnect the battery.
8. Disconnect the side rear-view mirror connector that is attached to the power window motor.
9. Remove the bellows and disconnect the plug from the A-pillar.
10. Release the wiring harness from the holder and slide it into the door.
11. Unscrew the two bolts 4 that secure the door lock (see illustration 71.3).
12. unscrew bolts 5 and 6 (see illustration 71.3).
13. Slide the door carrier up and off at the bottom of the door. In this case, the lower part of the window regulator is also removed.
14. Feed the carrier beam obliquely down and remove it from the door cavity, shifting towards the hinges.
First, the top of the power window is removed from the opening, and then the door lock.
Installation
15. Place the support beam in place.
16. Fix a plait of wires in an aperture of a door. Be careful not to damage the wires.
17. Screw in the bolts and tighten them with 8 Nm. In this case, bolts 5 and 6 are first tightened. The remaining bolts can be tightened in any order (see illustration 71.3).
18. Secure the door lock by tightening its fastening bolts with a force of 20 Nm.
19. Insert the glass into the opening and into the guides if it was removed from the frame.
20. Slide the glass down and install it in the clips, and then thread it into the rear guide. In this window position, tighten the glass clamp bolts to 8 Nm.
Further assembly is carried out in the reverse order of removal.
21. Connect the battery.
22. Check up operability of a window regulator before to establish into place an upholstery of a door.
23. Check the functioning of the door lock without closing the door.
Rear side door
Attention! Removal and installation of the power window on the rear side door are carried out in the same sequence as on the front. Below are just the available features.
24. Disconnect the sealing inner strip of the doorway from the flange using pliers, while pressing it from below with a plastic wedge.
25. Feed the rear glass guide 3 forward, disconnecting from the middle pillar 1 of the window opening (see illustration).
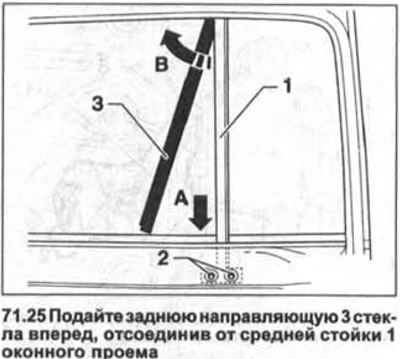
26. Unscrew two bolts 2, shift the middle pillar 1 of the window opening down (see arrow A in illustration 71.25), and then feed the support in the direction of arrow B and remove it from the doorway.
27. Remove the spacer pins that secure the glass in the power window clips.
28. Remove the glass by pushing it up and towards the passenger compartment.
Visitor comments