



Front door
Removal
1. Remove the door trim.
2. Remove two plugs from the door frame 4 (see illustration).
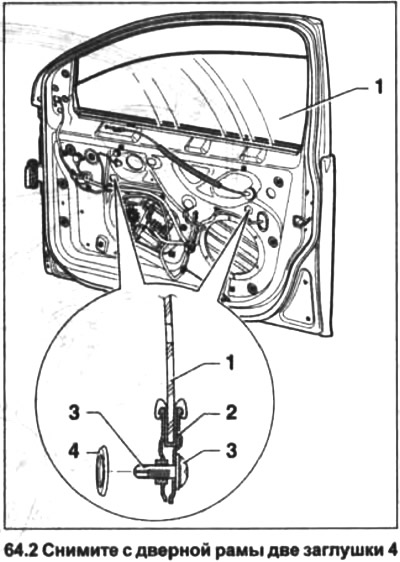
3. Lower glass 1 down enough to provide sufficient access to the clamping bolts in the mounting holes (see illustration 64.2).
Attention! If the glass does not go down, for example, due to a faulty electric window lifter, then unscrew the bolts securing the electric window lifter motor and push the glass down by hand.
4. Loosen the clamping bolts 3 by turning them clockwise. Do not unscrew the bolts completely (see illustration 64.2).
Attention! Access to bolts 3 is possible both from the outside and from the inside. If the bolts are loosened from the inside of the door, they should be turned to the right.
5. Release the clamps 2 (see illustration 64.2).
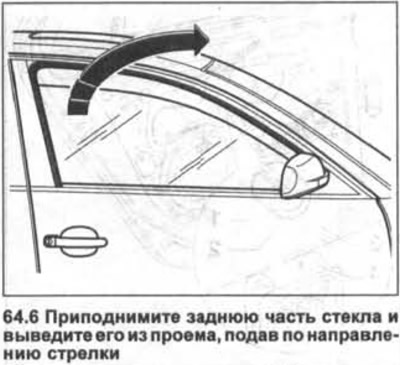
6. Lift the rear part of the glass and remove it from the opening, moving it in the direction of the arrow (see illustration).
Installation
The glass is installed in the reverse order of removal.
The original information is posted on the website: VWMANUAL.ru
Make sure the glass is positioned correctly in the guides and insert it into the rear guide.
7. Tighten the clamp bolts by turning them clockwise, applying a torque of 8 Nm.
8. Check the operation of the window lift.
Back door
Removal
9. Remove the door trim.
10. Remove the plug 1 from the door frame (see illustration).
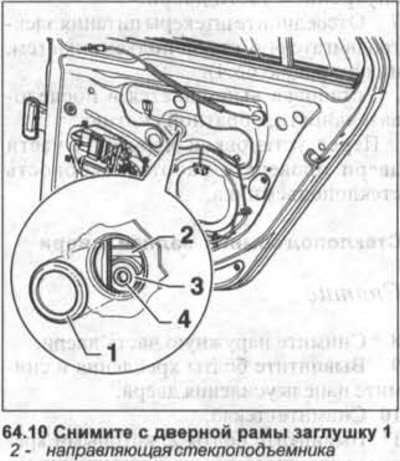
11. Lower the door glass slightly to provide access to the release clips 4 and 3 in the mounting hole (see illustration 64.10).
12. Screw a 5x70 mm screw into the expansion clamp 4 and remove its rivet (see illustration 64.10).
13. Screw the 8x80 mm screw into the expansion clamp 3 and remove it from the clamp (see illustration 64.10).
Caution! When screwing in a screw with great force, the retainer may shift back and fall into the door cavity.
14. Release the front guide 3 from the mount, unscrew the screws 2 and remove the cover 1 by pulling it in the direction of the arrow (see illustration).
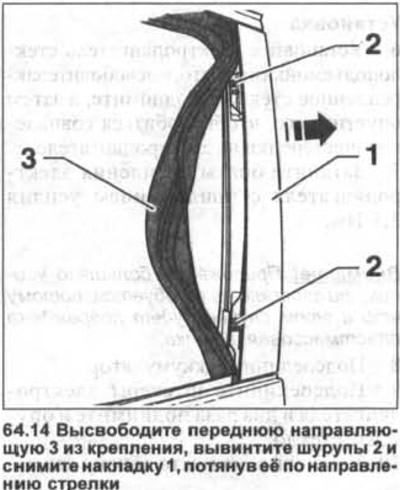
15. Pull the glass out of the door cavity by pushing it upwards.
Installation
16. Insert the new expansion clip 2 into the glass 3 so that it protrudes evenly on both sides of the glass (see illustration).
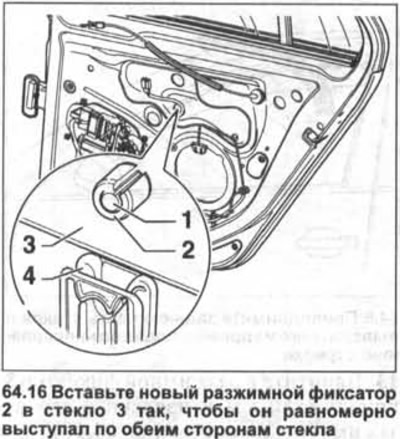
17. Insert new rivet 1 into the expansion retainer.
18. Insert glass 3 into the door cavity, lower it down and install it in the slot of guide 4 (see illustration 64.14). Fix the glass in the guide by hitting it lightly from above.
Further installation is carried out in the reverse order of removal.
19. Connect the battery and check the operation of the window regulator before installing the door trim.
Visitor comments