
Attention! The procedure for removing and installing the rear side door is the same as for the front.
Removing
1. Open the door.
2. Press the stop latch under the protective cover (see arrow A in the illustration) and disconnect the cover 13 of the front pillar.
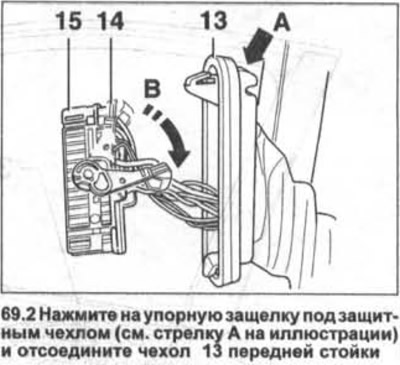
3. Take pawl 14 down (see arrow B in illustration 69.2) and disconnect plug 15 on the A-pillar.
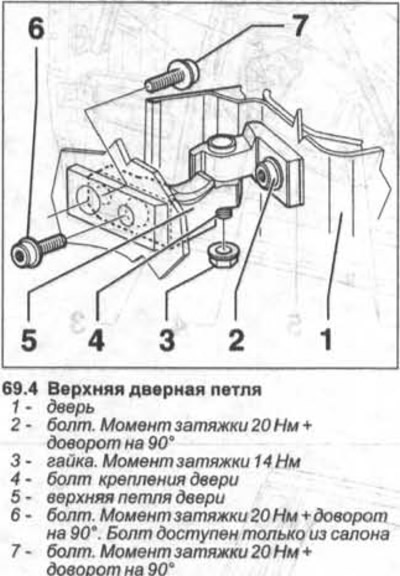
4. Unscrew the nut 3 bolts 4 fastening the upper hinge (see illustration).
5. Unscrew the lower bolt 9 on the lower door hinge using a special wrench, e.g. HAZET 2597 with HAZET 6396 handle (see illustration).
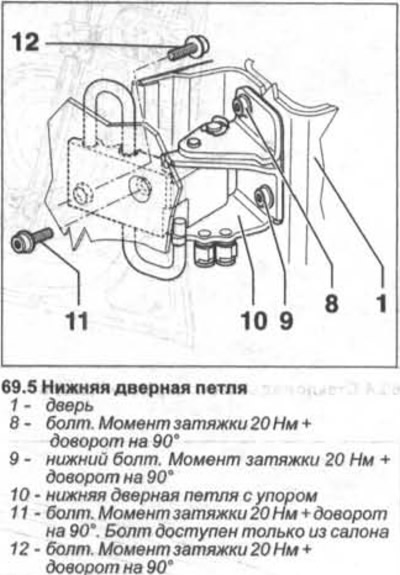
Attention! When removing, unscrew only the lower bolt 9 from the lower door hinge (see illustration 69.5).
6. Remove the door from the hinges and lay it on a soft pad.
Installation of a door is carried out in sequence, return to removal.
7. Screw in the new bottom bolt 9 and tighten it with 20 Nm. Then tighten with a wrench 1/4 turn (90°) (see illustration 69.5).
8. Screw on nut 3 and tighten it with a force of 14 Nm (see illustration 69.4).
9. Close the door and check the gaps. Adjust the door if necessary.
Fit
10. Check door gaps.
The door is installed correctly if, after closing, its gaps relative to adjacent body parts are parallel, and the door itself does not protrude or sink, its contour coincides with the contour of adjacent parts.
The fall of the rear side door relative to the front door by about 1 mm is allowed.
Gap width. Touran vehicles:
- Gap between front door and front fender - 3.0 + 1 mm
- The gap between the front and rear doors - 3.9 + 1 mm
- Gap between rear door and rear fender - 3.0 + 1 mm
- The gap between the door and the threshold - 4.0 + 1 mm
If the specified nominal dimensions are not maintained, then the lock bracket should be removed from the body and the door hinge bolts should be loosened.
11. Loosen bolts 6 and 7 for fastening the upper hinge and bolts 11 and 12 for the lower door hinge (see illustrations 69.4 and 69.5).
Attention! In order to gain access to bolt 6, it is necessary to remove the instrument panel or the upper part of the B-pillar trim if a rear side door is fitted.
Attention! To access bolt 11, remove the lower part of the A-pillar trim or the lower part of the B-pillar trim if the rear side door is removed.
12. Fit the door, moving it in the right direction.
Attention! Attempts to fit the door in a different way, for example, by moving it up, will be fruitless, because the door will settle again.
13. Loosen the hinge bolts 2, 8 and 9 to fit the door along the contour and fit the door (see illustrations 69.4 and 69.5).
14. After adjusting the door, tighten the hinge bolts with a force of 20 Nm, and then tighten them with a wrench 1/4 turn (90°).
15. Reinstall and bolt the lock bracket by hand-tightening the bolts just enough so that the bracket can only be displaced with sufficient force.
16. Close the door. In this case, the bracket will move and take the desired position. After that, carefully open the door and tighten the bolts securing the bracket with a force of 20 Nm.
Visitor comments