
Golf Cars
Driver's door
1. Remove trim 1 on the door armrest by prying it up with a plastic wedge 9 and pushing it up (see illustration).

73.1. Driver's door upholstery. Golf Cars
1 - lining on the door armrest
2 - two screws
3 - bolt
4 - three screws
5 - lock drive cable from the inside door handle
6 - inner door handle
7 - bolt
8 - triangular overlay
9 - plastic wedge, e.g. HAZET1965-20
10 - pliers, for example, HAZET799-4
11 - upholstery of the driver's door
2. Disconnect the plugs on the back of the armrest pad.
3. Remove screws 2, 3 and 4 (see illustration 73.1).
4. Using pliers 10, release the clips on the bottom and sides of the door upholstery (see illustration 73.1).
5. Release the upholstery from the glass opening.
6. Disconnect the plugs on the back of the upholstery.
7. Disconnect the cable pull 5 from the inner handle 6 and remove the upholstery (see illustration 73.1).
8. Unscrew bolt 7 (see illustration 73.1).
9. Remove the triangular pad 8 by prying it with a plastic wedge (see illustration 73.1).
10. Disconnect the tweeter plug on the back of the upholstery.
Installation of an upholstery is carried out in sequence, return to removal.
If necessary, replace damaged upholstery clips with new ones or replace lost ones with new ones.
Front passenger door
11. Remove the plastic wedge 9 pad 13 from the armrest (see illustration).
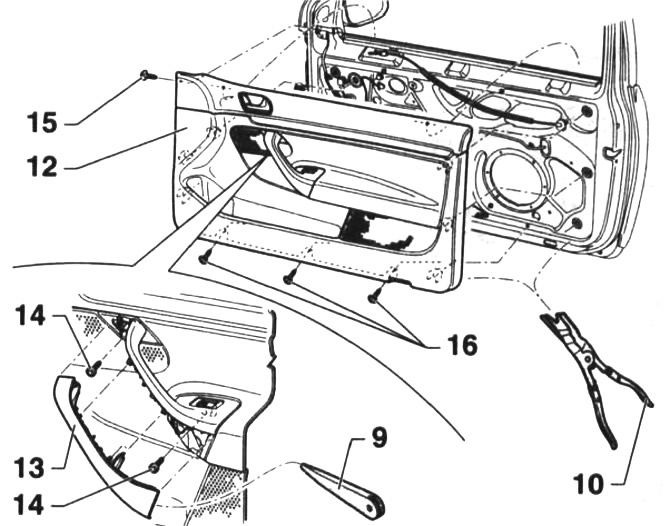
73.11. Remove the plastic wedge 9 pad 13 from the armrest
12 - door upholstery
13 - armrest pad
14 - two screws
15 - screw
16 - three screws
12. Unscrew the screws 14,15 and use pliers 10 to release the door upholstery clips from the bottom and sides (see illustration 73.11 and 73.1).
Further removal and installation of the upholstery are carried out in the same way as on the driver's door.
Upholstery of rear side doors
The upholstery on the rear side door of a four-door car is removed in the same way as from the driver's door. At the bottom, the upholstery is fixed with one screw.
Rear side doors with manual window handle
First remove the power window handle.
Touran cars
Driver's door
13. Remove trim 1 on the door armrest by prying it with a screwdriver 8 or a plastic wedge and pushing it up (see illustration).
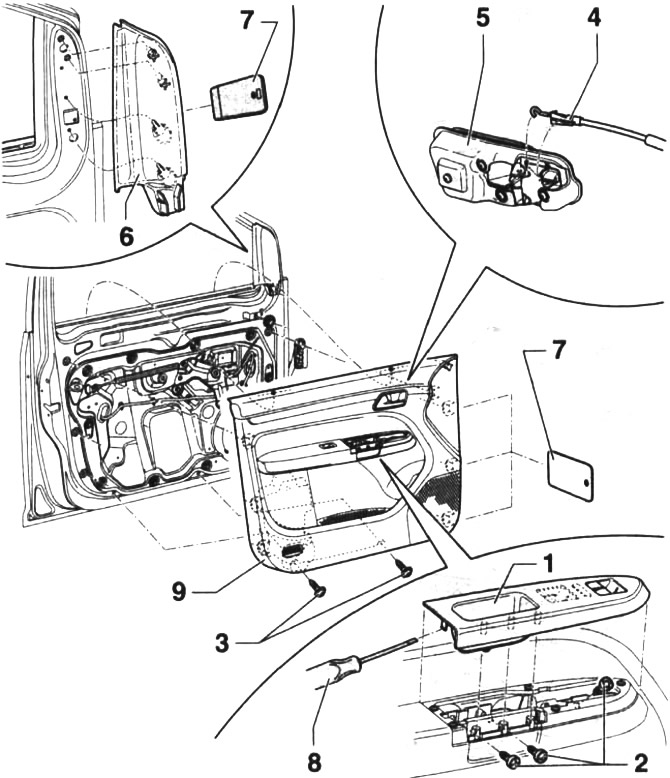
73.13. Driver's door upholstery. Touran cars
1 - lining on the door armrest
2 - three screws
3 - two screws
4 - lock drive cable from the inside door handle
5 - inner door handle
6 - overlay window opening
7 - plastic wedge
8 - screwdriver
9 - upholstery of the driver's door
14. Disconnect the plugs on the back of the armrest pad.
15. Remove screws 2 and 3 (see illustration 73.13).
16. Use the plastic wedge 7 to release the door upholstery clips (see illustration 73.13).
17. Release an upholstery from an aperture for glass.
18. Disconnect the plugs on the back of the upholstery.
19. Disconnect the cable rod 4 from the inner handle 5 and remove the upholstery (see illustration 73.13).
20. Remove the trim 6 by prying it with a plastic wedge 7 (see illustration 73.13).
Installation of an upholstery is carried out in sequence, return to removal.
If necessary, replace damaged upholstery clips with new ones or replace lost ones with new ones.
Front passenger door
21. Remove the trim 11 on the door armrest by prying it with a screwdriver 8 or a plastic wedge and pushing it up (see illustration).
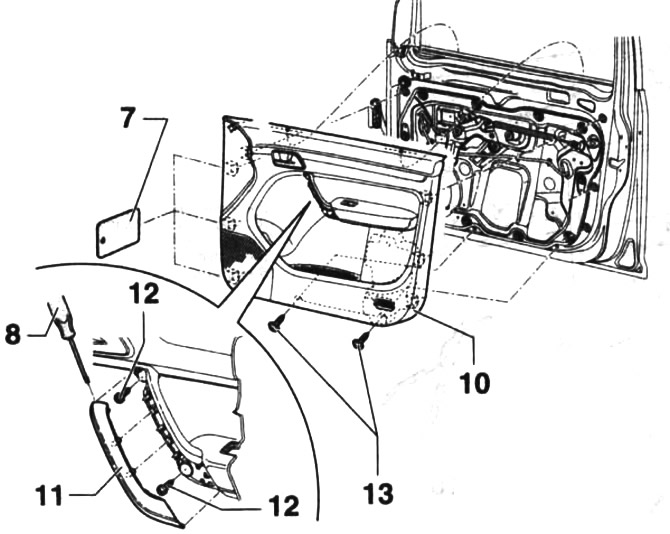
73.21. Remove trim 11 on the door armrest by prying it with a screwdriver 8 or a plastic wedge and pushing it up
10 - door upholstery
11 - armrest pad
12 - two screws
13 - two screws
22. Unscrew the screws 112 and 13, release the door upholstery clips with a plastic wedge 7 (see illustration 73.21).
Further removal and installation of the upholstery are carried out in the same way as on the driver's door.
Upholstery of rear side doors
The upholstery on the rear side door of a four-door car is removed in the same way as from the driver's door. At the bottom, the upholstery is fixed with one screw.
Rear side doors with manual window handle
First remove the power window handle.
Visitor comments