
To remove the clutch cable, you need to dismantle the release spring. This means that it is necessary to dismantle the trim on the lower left side (from the driver's side). When dismantling, proceed as follows:
Press the clutch pedal all the way down several times in a row.
Place the locking band in position 1 above the rubber cuff by moving this element with a slot along the cable. Then put the side ends of the belt around the cable and squeeze the adjusting mechanism in the area of the rubber cuff. If the mechanism cannot be compressed, then it is damaged and the cable must be dismantled by breaking it.
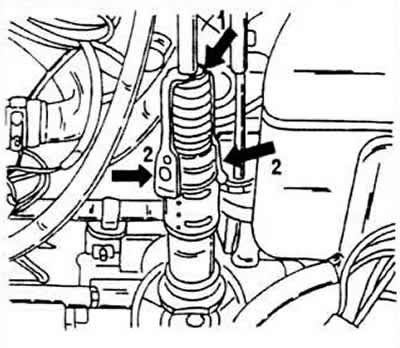
Attach the side ends of the locking belt in zones 2 with pins to the adjusting mechanism.
Disconnect the clutch cable from the release lever.
Next, the release spring is dismantled:
Remove trim from lower left side (from the driver's side) and disconnect the relay plate from the fasteners.
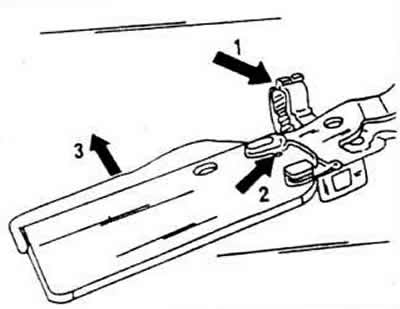
Remove the protective plate located between the relay plate and the pedal bearing bracket. To do this, release the electrical cables from the clamp 1 and push the snap-in locking element 2 towards the pedal bearing bracket. Push the protective plate in the direction indicated by arrow 3 towards the dashboard until it comes out of the elements that stop it. After that, carefully remove the plate by moving it downwards, at the same time making sure that none of the wires are torn off or stretched.
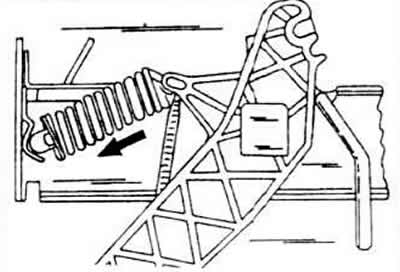
Insert a screwdriver between the steering column and the clutch pedal and bring it to the return spring. Press the clutch pedal and unhook the spring from the pedal by moving it in the direction of the arrow.
Disconnect the clutch cable from the pedal and remove it from the vehicle. The rubber guide remains on the front wall, i.e. rope must be carefully threaded (drag through) through her.
The clutch cable is mounted in sequence. reverse dismantling, however, the scope of work is different depending on whether the clutch cable is pre-tensioned or not.
Clutch cable pre-tensioned
Lightly lubricate the place where the clutch cable is attached to the pedal with graphitized grease.
Pull the clutch cable through the front wall and hang it in the front notch of the clutch pedal (there are two notches).
Lead the end of the clutch cable through the support to the gearbox and release lever. Be careful not to damage the plastic sleeve on the cable.

Attach the end of the cable to the gearbox and fix the cable in the mounting node.
Remove the stop band and set it aside. to then use again.
Reinstall the retracting spring:
Insert the relay plate into the left mounting device before mounting the spring.
Pull the clutch pedal towards the driver.
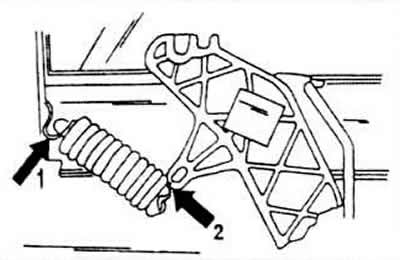
Slide the spring between the clutch pedal and the relay plate retainer until it seats in the retainer 1, and then simultaneously push towards the clutch pedal support 2. To help yourself, you can depress the clutch pedal.
Press the clutch pedal several times in succession.
After installation, check the working condition of the adjusting mechanism, as described above.
Clutch cable not pretensioned
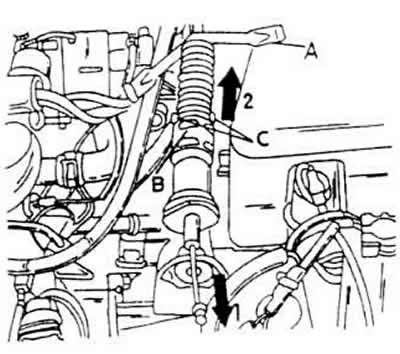
Place the retaining strap (A) above the rubber collar around the clutch cable.
Connect the clutch cable in the direction of arrow 1 and hold it in this position while the adjusting mechanism (IN) move it from side to side several times until it is compressed and can be pressed in the direction of arrow 2 and against the front wall
By holding the regulator in this position, you can hang the side ends of the clamping belt on the pins (WITH) to the regulator. You need an assistant to do this job; one holds the regulator and cable, the other hangs the locking band.
Attach the clutch cable to the gearbox.
Install the return spring as already described.
Clear clamp (locking) belt.
Check the additional clutch adjustment mechanism as described above.
Visitor comments