
Operations apply to all types of carburetors. Minor differences can be easily fixed by yourself. Using fig. 115, do the following:
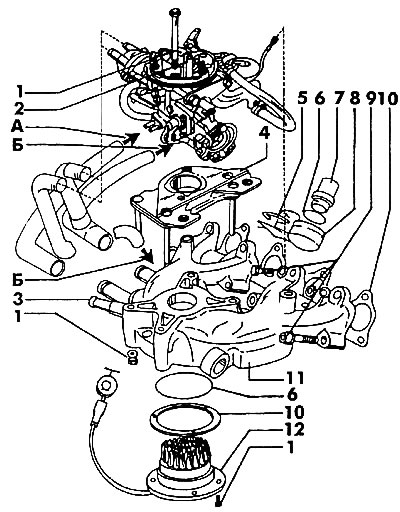
Pic. 115. Carburetor and intake manifold: 1 - bolt (10 Nm), 2 - carburetor cover, 3 - vacuum connection for the brake booster, 4 - support, 5 - retaining spring, 6 - sealing ring, always to be replaced, 7 - heater thermal switch, 8 - thermostat housing, 9 - bolt, (25 Nm), 10 - gaskets that must always be replaced, 11 - intake manifold, 12 - mixture heating device; A - to the thermostat; B - to fitting
Remove the air filter. Remember the order and place of connection of hoses and pipelines, it must be restored during assembly. It's best to remove the cover first (releasing the clamps), remove the filter element, then disconnect the remaining hoses, pipes and electrical wires.
Disconnect the fuel supply line to the carburetor, as well as the electrical wire going to the solenoid valve that shuts off the fuel supply at idle.
Disconnect the accelerator control rod. To do this, loosen both nuts on the carburetor body and remove the rod. Disconnect the rod from the damper.
Remove the starter connector as well as the electrical air/fuel mixture heater.
Loosen the nuts on the intake manifold flange and remove the carburetor.
Plug the manifold inlet with a clean rag to prevent accidental entry of dirt, dust or foreign objects into the engine.
Installing the carburetor is carried out in reverse order. Use a new gasket. Check in advance that there are no fragments of the old gasket on both seating surfaces. When installing the air filter, pay attention to the correct installation of the hoses. Adjust the position of the throttle control rod (see here).
Visitor comments