
Adjustment
Steering rack adjustment can be assessed during normal operation as follows:
- A) If the rotation of the steering wheel is difficult, and there is no self-return of the steering wheel to its original position, the rack is pressed too tightly.
- b) If vibration is felt in the steering and the steering wheel turns too easily, the adjustment is too loose (make sure the vibration is not caused by something else).
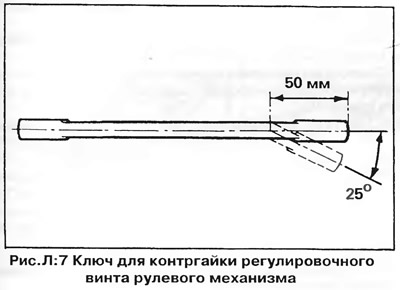
To adjust the steering mechanism, you will need a special key, shown in fig. L:7. The key can be made independently from a regular 17 mm ring spanner - for this it needs to be heated at a distance of about 50 mm from the end and bent at an angle of 25°.
Use this wrench to loosen the adjusting screw locknut on the back of the housing (pic. L:8). Loosen the adjusting screw slightly, then turn it in until you feel the screw touch the rack stop washer. Lock the screw in this position by tightening the locknut.
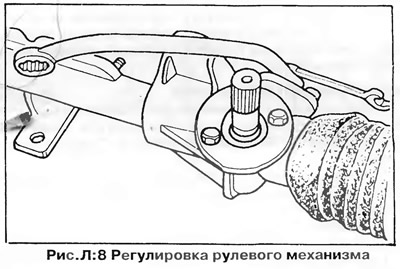
Check steering operation. If the control is tight, loosen the adjusting screw slightly, if it is too light, tighten it slightly, and then check the steering wheel rotation again.
Replacement of covers of the steering mechanism
Covers must be replaced in case of any damage (cracks, abrasions, tears, etc.).
The covers are attached with spring clips or clamps to the steering rods and the casing of the steering mechanism. If you need to replace the boots, remove the tie rod ends, then pull off the steering gear boots (see section "Steering rods and joints"). When installing new covers, lubricate the inside of the boot and tie rod - this will facilitate the installation of the boot. Be careful not to damage the cover, as even small cracks will allow water and dirt to enter the steering gear.
Removing the steering gear
1. Loosen the wheel bolts, lift and support the front of the car on supports (see chapter "Basic rules for work"). Remove the front wheels.
2. Disconnect both tie rod joints from the steering knuckle arms using a ball joint remover.
3. Disconnect a drive of a gear change from an arm on the case of the steering mechanism.
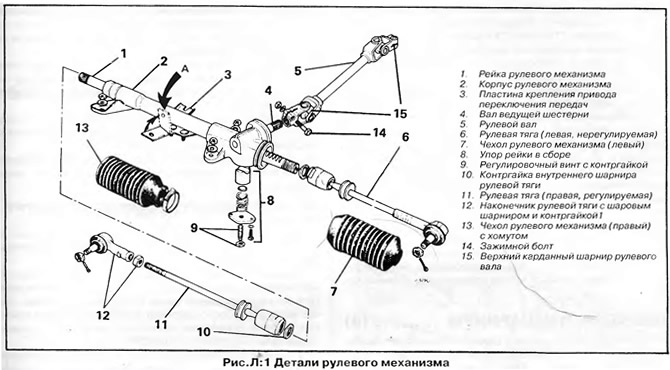
4 Remove the clamping bolt that secures the lower steering shaft joint to the steering pinion shaft (4, fig. L:1).
5. Unscrew three (or four) nuts (M13) fastening the steering gear housing to the body brackets.
6. Remove the steering gear from the studs and carefully remove it through the opening of the left wheel arch.
Installation
Installation of the steering mechanism is generally carried out in the reverse order of removal. Pay attention to the following:
- A) The rack, pinion and steering gear housing are not supplied as separate parts; If damaged or worn, replace steering gear assembly. Exchange genuine VW units are supplied without tie rods, in this case, move the tie rods to the new steering gear from the old one or install new tie rods (see above).
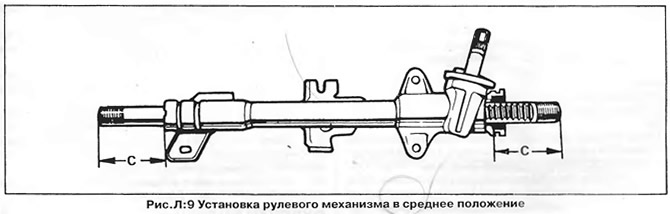
- b) Before installing the steering gear, set the rack to the middle position - size "WITH" both sides should be the same (pic. L:9).
- V) Screw the tie rods onto the rack on both sides, maintaining the dimension "IN" (rice. L:2) - see section "Technical data".
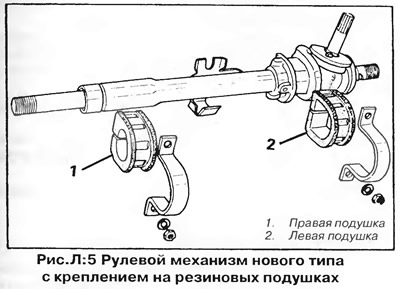
- G) On cars of later releases, the steering gear mount has been changed - the steering gear is mounted with two brackets on rubber pads (pic. L:5). This type of steering box cannot be fitted to an older vehicle (until August 1977). Before installing such a steering mechanism, check the condition of the rubber pads, replace them if necessary.
- d) When installing a new steering gear on a car with an automatic transmission, bend up the plate designed to mount the gear shift actuator (Ah, fig. L:1) - otherwise the plate will touch the exhaust pipe.
- e) Use new self-locking nuts to stud the steering gear.
- and) First, insert the pinion shaft into the steering shaft lower pivot, aligning the transverse groove of the shaft (A) with hinge hole (IN) — rice. L:11, and then install the steering gear on the studs.
- h) Tighten all nuts and bolts to the torque specified in section "Technical data".
- And) Adjust the gearshift drive as described in chapter "Clutch and manual transmission".
- To) Check the front wheel alignment as described above.
Visitor comments