



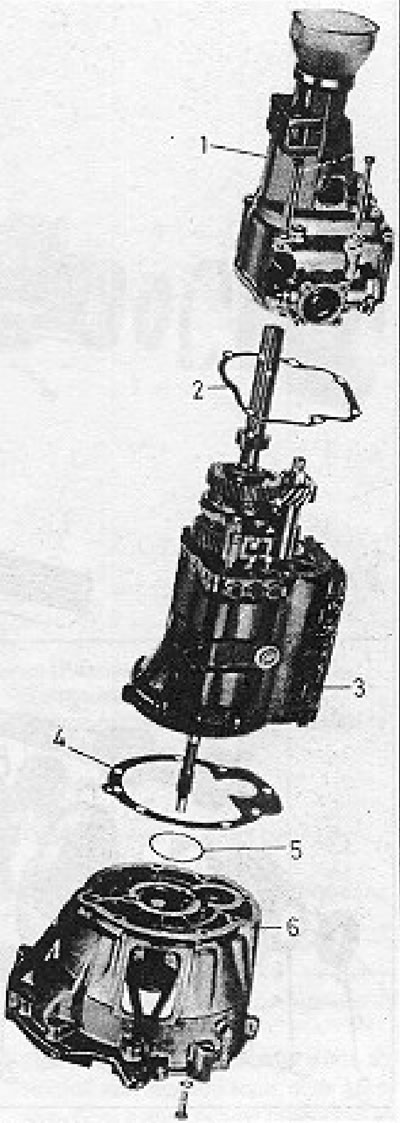
Figure 6.36. 5-speed gearbox housing sections (Section 12): 1 - Rear expansion casing; 2 - Gasket; 3 - Main casing; 4 - Gasket; 5 - Washer; 6 - Clutch housing.
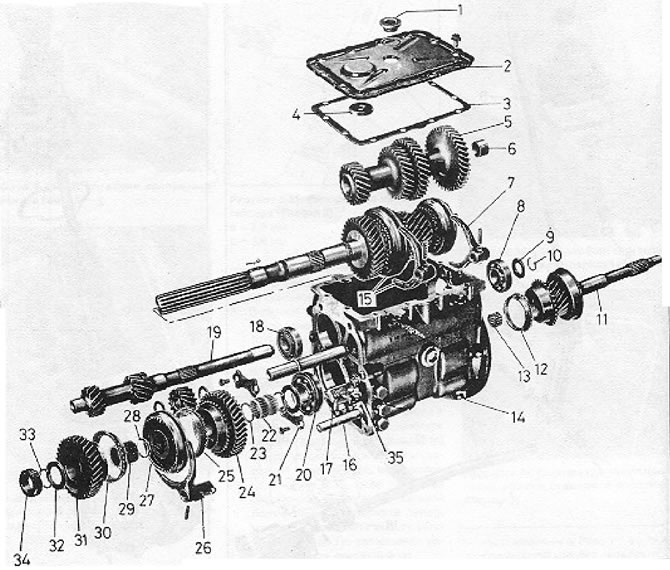
Figure 6.37. Detailed view of the main gearbox housing components (Section 12): 1 - Drain plug; 2 - Oil pan cover; 3 - Gasket; 4 - Magnet; 5 - Gear; 6 - Bushing; 7 - 4/5 speed selector fork; 8 - Front countershaft bearing; 9 - Plate; 10 - Spring clamp; 11 - Input shaft; 12 - Synchronizer ring; 13 - Needle bearing; 14 - Box casing; 15 - 2/3 speed selector fork; 16 - 1st gear/reverse selector shaft; 17 - 4/5 speed selector shaft; 13 - Rear countershaft bearing; 19 - Countershaft; 20 - Main shaft bearing; 21 - Bearing mounting plate; 22 - First gear needle bearing; 23 - Thrust washer; 24 - First gear pinion; 25 - Synchronizer ring; 26 - 1st gear/reverse selector fork; 27 - 1st gear/reverse synchronizer; 28 - Spring clamp; 29 - Needle bearing; 30 - Synchronizer ring; 31 - Reverse gear; 32 - Thrust washer; 33 - Spring clamp; 34 - Speedometer drive; 35 - 2/3 speed selector shaft.
1. After removing the gearbox and draining all the oil from it, clean off all external dirt using paraffin and a stiff brush, or water and detergent.
2 Place the gearbox on a clean work bench and loosen and remove the expansion flange bolts.
3. Engage second gear by pulling the inner lever slightly outward and turning it.
4. Tap the expansion joint housing off its retaining tabs using a plastic mallet.
5. Remove the old gasket and discard it.
6. Remove the bearing and clutch release lever as described in Chapter 5.
7. Wrap the cotter pins on the input shaft to avoid damaging the seal lips, then unscrew and remove the clutch cover from the gearbox cover.
8. Remove the washer located between the clutch housing and the bearing.
9. Remove and discard the old gasket.
10. Remove the reverse gear and its thrust washer.
The original text is available on the portal: vwmanual.ru
11. Unscrew and remove the oil pan and remove the gasket.
12. Loosen each retaining plug three full turns.
13. From the rear end of the main shaft, remove the locking spring clip and remove the speedometer drive gear from the shaft.
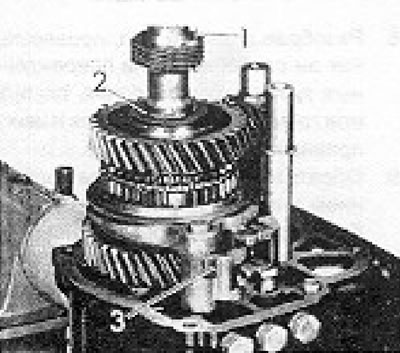
Figure 6.38. Rear end of the main shaft: 1 - Speedometer drive locking clamp; 2 - Thrust washer; 3 - 1st reverse gear fork pin.
14. Remove the shaft clamp, and then remove the thrust washer and reverse gear with the synchronizer ring and needle bearing from the shaft.
15. Engage first gear by sliding the synchronizer sleeve.
16. Tap the roller pin out of the 1st/reverse selector fork and remove the fork from the selector shaft.
17. Remove the clamp securing the 1st/Reverse synchronizer hub.
18. Remove the clamp and plate from the end of the counter shaft.
19. Remove the counter shaft from the bearing. Without the special tool (6305) this will be a very difficult job, and it is better to remove it by breaking the plastic bearing ball cage so that it will be possible to insert three small bolts into the holes formed after removing the cage, and then screw nuts onto them. If you then attach a puller to these bolts, you can pull out the bearing without damaging the gear teeth or housing. The inner race of the bearing is installed on the shaft very tightly, and trying to remove it from the shaft is useless.
20. Using a plastic mallet, tap the counter shaft out of the housing while at the same time pulling out the 1st/Reverse synchronizer.
21. Remove the countershaft gear from the casing.
22. Remove the input shaft from the housing.
23. From the rear end of the main shaft, remove the spring clip and the first gear with the synchronizer ring and needle bearing.
24. Remove the next clamp and thrust washer.
25. Loosen and remove the screws from the bearing mounting plates. They will most likely be very tight and will require the use of an auxiliary tool.
26. Remove the bearing mounting plate.
27. Remove the rear countershaft bearing from the gearbox housing.
28. Engage fourth gear by moving the synchronizer sleeve.
29. Protrude the roller pin from the 4/5 speed selector fork.
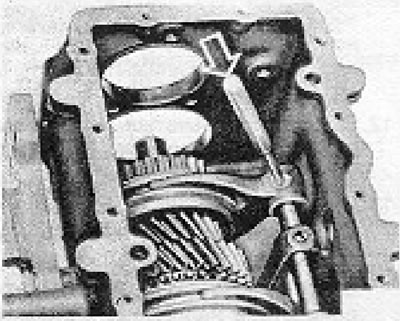
Figure 6.39. Removing the roller pin of the 4/5 speed selector fork.
30. Move the 4/5 speed selector lever back and remove the selector fork.
31. Remove the 1st/reverse selector shaft until the 2/3 selector fork roller pin can be tapped out. Remove this fork.
32. Set all selector shafts to neutral position.
33. Unscrew the retaining plugs and remove the springs and balls. Remove the selector shafts.
34. Remove the intermediate plungers from their holes between the selector shafts using a pencil magnet.
35. Now remove the rear end of the main shaft from its bearing. Using a large hammer with a plastic head can replace the use of a press.
36. Remove the main shaft bearing from the housing and remove the main shaft.
37. Wipe the inside of the gearbox to remove deposits and sediment, use a magnet.
38. Remove the oil seal from the clutch housing and install a new one, applying grease to its lips.
39. If necessary, the reverse idler shaft can be removed by screwing a bolt into the tapped hole on its end and then using a piece of metal tubing as a pressure sleeve while tightening this bolt until it hits the thrust washer.
40. Now check the condition of the expansion joint housing. Any wear in the shift components will require replacement of the lever or pin, as well as replacement of bushings and shims. Access to the gear shift finger can be gained by removing the end cover.
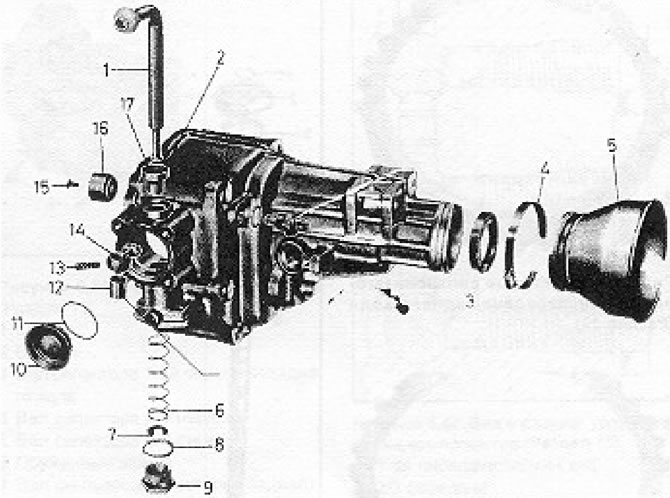
Figure 6.49. Expansion housing components: 1 - Inner gear shift lever; 2 - Expansion casing; 3 - Seal; 4 - Clamp; 5 - Lid; 6 - Spring; 7 - Plate; 8 - Gasket ring; 9 - Plug; 10 - Cap (replace if you remove); 11 - Gasket ring; 12 - Bushing; 13 - Spring; 14 - Gear shift finger; 15 - Screw; 16 - Countershaft needle bearing; 17 - Bushing/gasket.
41. Replace the rear expansion joint housing oil seal and apply grease to the lips of the new oil seal.
42. Remove the speedometer drive gear from the housing.
43. After you have completely disassembled the gearbox, check all parts and components as described below. The ball bearings on the cross shaft can be replaced, as can the shaft itself, as separate parts.
Visitor comments