
English Русский
Български
Беларускі
Український
Српски
Hrvatski
Română
Polski
Slovenský
Magyar
  |  Articles  |  Sitemap  |  Contacts  |    |
Car maintenance Ford Car maintenance Hyundai Car maintenance Chevrolet Car maintenance BMW Car maintenance Audi Car maintenance Opel Car maintenance AvtoVAZ
VWmanual.ru


Main   Passat   Golf   Polo   Touareg   Tiguan   Sharan   Transporter   Others  
Golf 1 (1974-1984, diesel) Golf 1 (1974-1984, petrol) Golf 2 (1984-1993, petrol) Golf 2 (1984-1993) Golf 3 (1991-1997) Golf 4 (1997-2004) Golf 5 (2003-2008)

Removal and installation the radio (VW Golf 4)

  • Main
  • Golf
  • Golf 4
  • Electrical equipment
  • Lighting and appliances
  • Removal and installation the radio
            0


Contents: Removal ↓ Installation ↓
The factory installed radio has a pocket that makes it easy to remove and install the radio. Two special keys are required to remove the radio.

The car is equipped with a radio receiver as standard equipment, which has a coded anti-theft device, which is based on a microprocessor. After disconnecting the radio receiver from the car's electrical network, (battery removal, radio removal or initial radio installation) you must enter a security code. The radio can only be turned on after entering the correct code.

Before removing the ground wire from the battery, check whether you have the radio receiver code. If you do not have the security code, the radio receiver can only be put into operation at a specialized Volkswagen station.

The individual security code for the radio receiver is included in the technical documentation included with the vehicle upon sale.

Removal


1. Turn off the ignition.

2. Remove the ground cable from the battery.

The original material is available on the portal VWMANUAL

Warning: When the ground wire is removed from the battery, the contents of the memory cells of the electronic control units and the radio receiver are erased.
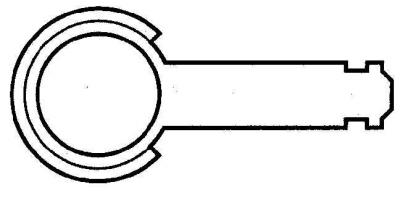

Warning: When the ground wire is removed from the battery, the contents of the memory cells of the…


3. To remove the radio, you need to use two special keys 3316.
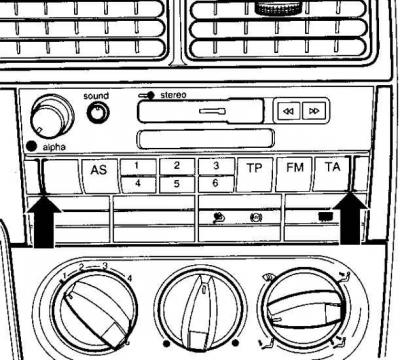


3. To remove the radio, you need to use two special keys 3316.


4. Insert two keys into the narrow slots located on both sides of the radio until the keys lock into place.
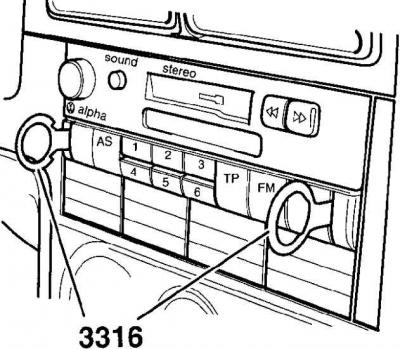
4. Insert two keys into the narrow slots located on both sides of the radio until the keys lock…


5. Pull the radio out of the socket using the key heads. When pulling it out, do not tilt the radio or pull it to the side.

6. Remove the special keys by pressing down the side latches of the radio.

7. Disconnect the speaker and antenna electrical connectors from the radio, as well as the multi-pin connector that supplies power to the radio.

8. If non-multi-pin connectors are used for connection, label the connectors before disconnecting them.

Installation


1. Connect the electrical connectors to the back of the radio.

2. Insert the radio into the instrument panel socket until the spring clips snap into place.


3. Connect the ground wire to the battery.

4. After installing the radio, enter the security code.

Warning: Radios with a security code have a red key emblem on the front key.


Warning: The individual radio security code is included in the technical documentation supplied with the vehicle at the time of sale. Keep a record of the individual code in a safe place and never keep it in the vehicle.


5. Please enter your radio security code as follows.

6. Turn on the radio.

7. Press the TR and TA keys simultaneously until 1000 appears, then release the keys.

8. Enter the security code using station selection keys 1 through 4. Key 1 defines the first code number, key 2 defines the second code number, etc.

9. Press the TR and TA keys simultaneously again until SAVE appears, then release the keys. The receiver is now operational and the display shows the frequency of the received radio station.

10. If the security code has been entered correctly into the radio, the LED next to the radio name should flash after the key is removed from the ignition.

Warning: If the security code has been entered incorrectly into the radio, the SAVE sign will first flash and then remain lit. After this, you can only repeat the process of entering the security code once. If you enter the security code incorrectly again, the radio will be locked and will not be able to be used for one hour. After one hour, during which the radio must be switched on, enter the security code again.

This article is available at russian, bulgarian, belarusian, ukrainian, serbian, croatian, romanian, polish, slovak, hungarian
The text has been checked: Kolesnikov Artem

Share information:

Previous articles
Removal and installation switches
Removal and installation steering column switches
Removal and installation the instrument cluster
Removal and installation the headlight corrector actuator motor
Headlight adjustment
Removal and installation the rear light
Next articles
Removal and installation high-frequency speakers
Removal and installation low frequency speakers
Recommendations for installing the phone
External antenna
Checking the rear window defroster


Similar articles from other manuals for VW cars:
Removal and installation radio Passat B3 (1988-1993)
Removal and installation the radio console/heating control unit… Polo 4 (2001-2009)
Radio navigation system RNS 300 Tiguan 1 (2007-2015)
Radio receiver — removal and installation Transporter T4 (1990-2003)
Radio Receiver — removal and installation (models with 2.4l… LT 28 (1975-1991)
Link to this page in different formats


Visitor comments


No comments yet


How much will 18 + 28 =


Golf 5 
  • General information
  • User manual
  • Maintenance
  • Troubleshooting
  • Power unit
  • Engine repair
  • Cooling and ventilation system
  • Fuel system
  • Ignition system
  • Transmission
  • Clutch
  • Mechanical gearbox
  • Automatic gearbox
  • Chassis
  • Brake system
  • Car suspension
  • Steering
  • Body
  • Interior (internal elements)
  • Exterior (external elements)
  • Doors and covers
  • Electrical equipment
  • Power devices
  • Washers and wipers
  • Lighting and appliances
  • Electrical circuits
Golf 4 
  • General information
  • User manual
  • Weekly checks
  • Maintenance
  • Power unit
  • Petrol engines
  • Diesel engines
  • Cooling system
  • Fuel system (petrol)
  • Control system (petrol)
  • Fuel system (diesel)
  • Exhaust system
  • Transmission
  • Clutch
  • Car gearbox
  • Drive shafts
  • Chassis
  • Car suspension
  • Steering
  • Wheels and tires
  • Brake system
  • Body
  • Exterior (external elements)
  • Interior (internal elements)
  • Ventilation and heating
  • Car doors and sunroof
  • Washers and glass cleaners
  • Electrical equipment
  • Power devices
  • Lighting and appliances
  • Electrical circuits
Golf 3 
  • Petrol engine
  • Engine repair
  • Lubrication system
  • Cooling system
  • Ignition system
  • Diesel engine
  • Engine repair
  • Diesel injection system
  • Pre-glow system
  • Transmission
  • Clutch
  • Gearbox and drive shafts
  • Chassis
  • Steering
  • Wheels and suspension
  • Brake system
  • Electrical equipment
  • Lighting and appliances
  • Electrical circuits
Golf 2 
  • General information
  • Introduction to guide
  • User manual
  • Petrol engines 1.3 l
  • Engine repair
  • Lubrication system
  • Cooling system
  • Carburetors
  • Supply system
  • Ignition system
  • Petrol engines 1.6/1.8 l
  • Engine repair
  • Supply system
  • Ignition system
  • Diesel engines
  • Engine repair
  • Lubrication system
  • Cooling system
  • Power and exhaust system
  • Transmission
  • Clutch
  • 4-speed gearbox 084
  • 5-speed gearbox 085
  • 4-speed gearbox 020/4R
  • 5-speed gearbox 020/4T
  • Automatic gearbox
  • Drive shafts
  • Chassis
  • Steering
  • Car suspension
  • Brake system
  • Body
  • Body elements
  • Doors, locks and windows
  • Electrical equipment
  • Equipment and devices
  • Power devices
Golf 2 (petrol) 
  • General information
  • Characteristics
  • Car care
  • Maintenance
  • Power unit
  • Engine repair
  • Engine 1.05/1.30
  • Engine 1.60/1.80
  • Cooling and lubrication system
  • Power and exhaust system
  • Transmission
  • Clutch
  • Car gearbox
  • Drive shafts
  • Chassis
  • Brake system
  • Steering
  • Suspension
  • Body
  • Body and equipment
  • Electrical equipment
  • Lighting and appliances
  • Electrical circuits
Golf 1 (petrol) 
  • General information
  • Characteristics
  • User manual
  • Maintenance
  • Power unit
  • Engine adjustment
  • Engine 1.1/1.3
  • Engine 1.5/1.6/1.8
  • Engine electrical equipment
  • Cooling system
  • Fuel system
  • Transmission
  • Clutch and manual gearbox
  • Automatic gearbox
  • Chassis
  • Steering
  • Front suspension
  • Rear suspension
  • Brake system
  • Electrical equipment
  • Lighting and appliances
  • Electrical circuits
  • Body
  • Body and equipment
  • Optional equipment
Golf 1 (diesel) 
  • General information
  • Specifications
  • Maintenance
  • Power unit
  • Engine repair
  • Exhaust and turbocharger
  • Cooling system
  • Fuel system
  • Fuel injection system
  • Transmission
  • Clutch and drive shafts
  • Car gearbox
  • Chassis
  • Suspension and wheels
  • Steering
  • Brake system
  • Wheels and tires
  • Body
  • Heating and ventilation
  • Exterior (external elements)
  • Interior (internal elements)
  • Doors and windows
  • Electrical equipment
  • Equipment and devices
  • Lighting system
  • Power devices
  • Electrical circuits
VWmanual.ru © 2016-2026 | Mobile version | News and articles | Sitemap: EN BG BY UA RS HR RO PL SK HU | Write message | Site search
Passat B2 • Passat B3 • Passat B4 • Passat B5 • Passat B6 • Golf 1, diesel • Golf 1, petrol • Golf 2, petrol • Golf 2 • Golf 3 • Golf 4 • Golf 5 • Polo 3 • Polo 4 • Touareg 1 • Tiguan 1 • Sharan 1 • Transporter T3 • Transporter T4 • LT 28 • LT 2D • Beetle • Caddy 3 •
Our website uses cookies to ensure functionality and convenience.