
Removing
Loosen the wheel bolts, raise the front of the vehicle and remove the wheel.
Remove the front bumper.
Remove the mudguard from the wheel arch.
Unscrew the rubber bumper of the engine compartment hood. Loosen the front spoiler bolts (if it is installed) near the front wing.
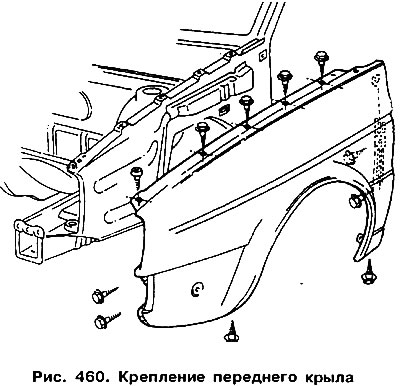
Loosen bolts and self-tapping Phillips screws (pic. 460).
Being covered with anti-corrosion protective mastic, the wing is held very firmly. Therefore, it is recommended to use an industrial hair dryer to soften the mastic (with a temperature of at least 600°C). In the absence of such a hair dryer, it is recommended to cut the layers of mastic with a sharp knife.
Separate the fender from the body with a screwdriver.
Attention! If you have a hair dryer, heat the front fender around the A-pillar. To do this, open the door and warm up the stoic through the slot. To protect the surrounding elements, put a flat nozzle on the hair dryer. At the same time, the assistant must separate the wing.
Installation
Clean all contact surfaces of the front fender.
Attention! Before installing the front fender, the screw fixing points in the area of the wheel arch and the front pillar must be coated with zinc coating AKL 381 035 10.
Apply a new tape of sealant under the top wing flange.
Then punch holes in the sealant above the threaded holes.
Align the front fender and screw in the bolts and self-tapping screws.
Carefully treat all joints of the front wing with the body with anti-corrosion mastic.
Insert the rubber bumper of the engine compartment hood.
Install the mudguard in the wheel well. Install the bumper.
Attach the front spoiler (if it exists). Put the wheel on, lower the car.
Tighten the wheel bolts to 110 Nm.
Visitor comments