



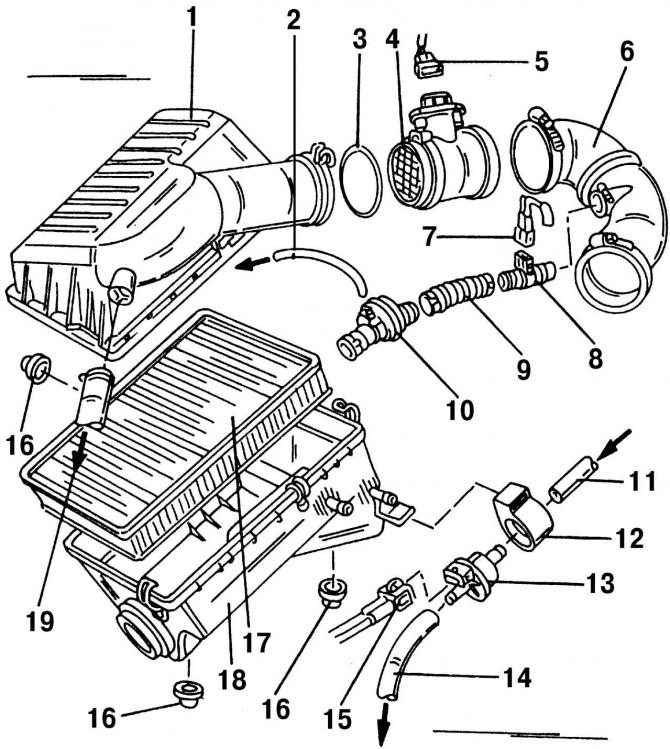
Fig. 202. Air filter and parts located near it: 1 - upper part of the air filter; 2 - vacuum hose; 3 - O-ring seal; 4 - mass air flow sensor; 5 - plug connector for mass air flow sensor, black; 6 - air intake hose; 7 - plug-in block, black; 8 - heating element of the crankcase ventilation system; 9 - connecting hose; 10 - crankcase ventilation system valve; 11 - ventilation hose; 12 - clamp for (13); 13 - electromagnetic valve of the activated carbon cleaning system; 14 - ventilation hose; 15 - plug-in connector, green for (13); 16 - rubber coupling; 17 - filter element; 18 - lower part of the air filter; 19 - Air intake hose
- remove the upper part of the air filter 1 (Fig. 202);
- disconnect the connector 5 of the air flow sensor and the connector 7 of the heating element;
- remove valve 10 of the crankcase ventilation system and ventilation hose 11 from the cylinder head, which goes to the electromagnetic valve 13 of the cleaning system using activated carbon from the upper part of the intake manifold;
- disconnect the high voltage (HV) wires from the spark plugs (this will require a special tool 3 277 A);
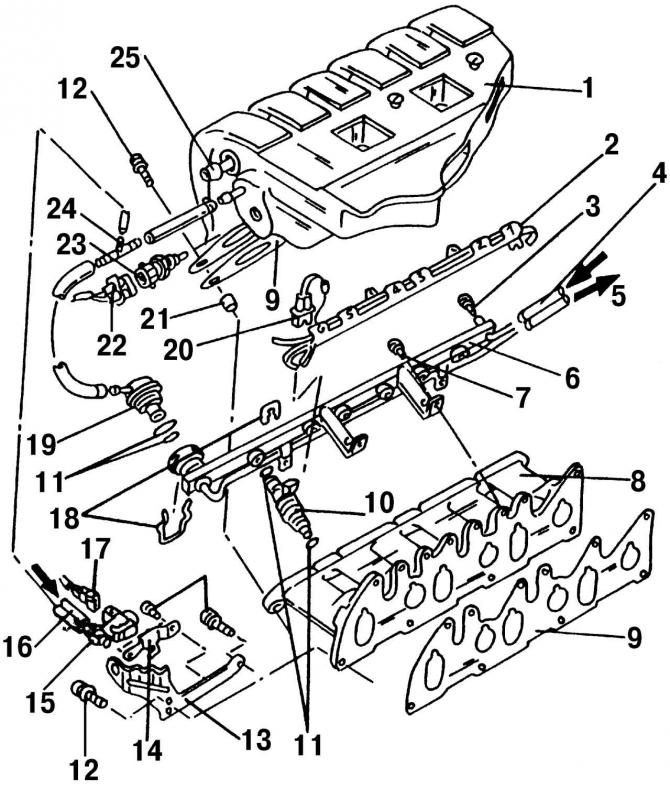
Fig. 201. Upper and lower parts of the intake manifold and nearby parts: 1 - upper part of the intake manifold; 2 - HV wire guide; 3 - sealing ring; 4 - fuel supply hose; 5 - fuel return hose; 6 - fuel distribution line; 7 - bolt, 10 Nm; 8 - lower part of the intake manifold; 9 - gasket, replace; 10 - nozzle; 11 - O-ring; 12 - bolt, 25 Nm; 13 - lifting eye; 14 - Secondary air supply valve bracket; 15 - secondary air supply valve; 16 - vacuum hose; 17 - plug-in block, blue; 18 - clamps; 19 - fuel supply pressure regulator; 20 - plug-in block, black; 21 - guide bushing; 22 - plug-in block, black; 23 - temperature sensor; 24 - T-piece; 25 - vacuum hose, to the brake booster
- remove the HV wire guide 2 (Fig. 201) from the front and opposite side of the intake manifold 1;
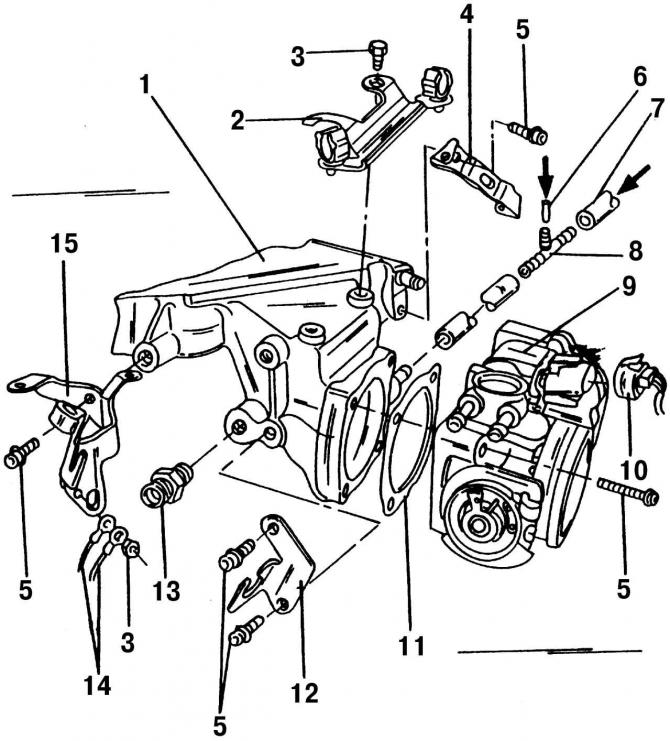
Fig. 200. Parts installed near the throttle body: 1 - upper part of the intake manifold; 2 - cable guide; 3 - bolt, 10 Nm; 4 - rear right support between the upper part of the intake manifold and the cylinder head; 5 - bolt, 25 Nm; 6 - vacuum hose, from the crankcase ventilation system valve; 7 - ventilation hose, from the activated carbon cleaning system; 8 - T-shaped fitting; 9 - throttle body; 10 - Plug-in connector, black, 8 connectors; 11 - gasket, should be replaced; 12 - throttle cable support; 13 - connecting element, 35 Nm (for EGR valve); 14 - "mass" cable; 15 - left rear support between the upper part of the intake manifold and the cylinder head
- remove the throttle drive cable together with the support 12 (Fig. 200) of the throttle drive, but do this in such a way as not to remove the cable mounting clamp;
- mark and remove the coolant hoses from the throttle body, making sure the cooling system is not under pressure;
- disconnect the fuel lines from the cylinder head;
- open the fuel tank cap for a while (in order to release excess pressure), then cover the hose connection points with a thick rag and slowly disconnect the hoses. If fuel does splash, the rag will stop it;
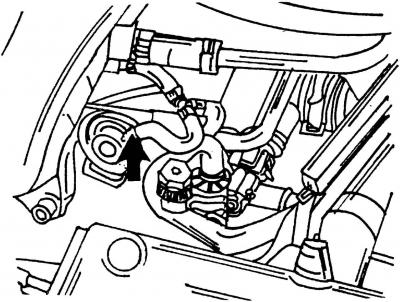
Fig. 203. Disconnecting the vacuum hose of the secondary air inlet valve
- disconnect the vacuum hose (fig. 203, shown by arrow) secondary air inlet valve between the fuel pressure regulator and the upper part of the intake manifold;
- disconnect the vacuum hose going to the brake booster;
- remove both rear brackets between the top of the intake manifold and the cylinder head;
- unscrew the EGR valve hose on the top of the intake manifold;
- unscrew the dipstick guide tube from the bottom of the intake manifold;
- remove the upper part of the intake manifold together with the throttle body (when installing, pay attention to the location of the guide bushings) and immediately seal the open intake ports;
- disconnect the electrical wires from the injectors, from the oil pressure switch and from the oil temperature sensor;
- remove the injectors together with the fuel distribution line;
- remove the injector retainers and the injectors themselves. If the injector sits very firmly in place, you can place a 16 mm open-end wrench under its body and use it to push out the injector
- remove the O-rings from both ends of the injector and discard them immediately.
Caution! When removing the injectors, be careful not to damage the connector plugs and sprayers. The injectors cannot be disassembled.
Caution! Do not allow engine oil to enter the injector.
Install the injectors in the reverse order of removal. Lubricate the new O-rings with clean engine oil.
Visitor comments