
Note: Vehicles with direct injection gasoline engines have a fuel pressure regulator built into the fuel delivery unit. The fuel pressure regulator cannot be separated from the fuel supply unit. The fuel pump control unit is located directly on the fuel supply unit.
Safety instructions
When removing the fuel pump, some fuel may leak out. Fuel vapors are poisonous and flammable, so the workplace must be well ventilated. Avoid contact of fuel with skin. Work with petrol-resistant gloves. No open flames, no smoking, fire hazard! Prepare a fire extinguisher.
Before removing the fuel pump and the fuel level sensor, use the fuel from the fuel tank as completely as possible. The fuel tank must be filled no more than ⅔ of its capacity. To ventilate the workplace, you can also use a radial fan, the electric motor of which is not washed by the air flow and whose performance is at least 15 m3/h
Removing
Disconnect ground wire from battery (-).
Attention: Read the instructions given in chapter «Removing and installing the battery».
Tilt the rear seat forward.
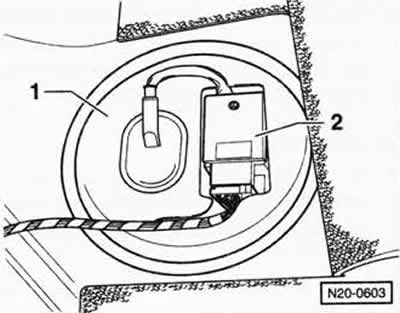
Pry off the cover -1- of the fuel supply unit and remove it (on vehicles with petrol engines with direct injection, remove it together with fuel pump control unit -2-).
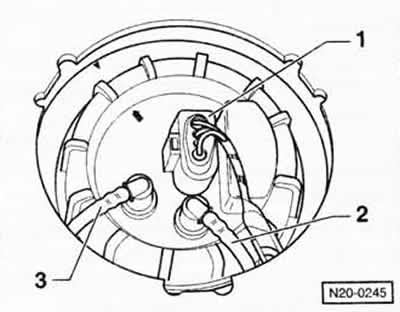
Carefully unfasten connector -1- for fuel level sender and fuel pump with hand or a small screwdriver and unplug connector.
Safety instructions
The fuel supply line is under pressure! Cover the joint with a thick, clean cloth before releasing the hose. Put on goggles and only then, carefully releasing the connection, release the fuel pressure.
Before removing, mark position of fuel lines -2/3- with felt-tip pen.
Disconnect the supply -3- and return -2- fuel lines by pressing the locking buttons on the quick couplings. Seal fuel lines with suitable plugs or wrap their ends with adhesive tape.
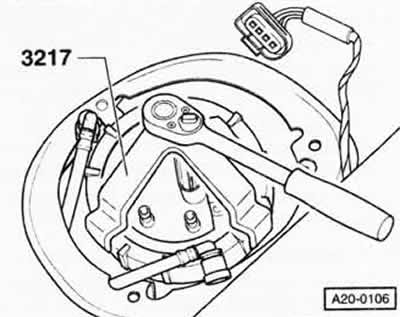
Using the VW/SEAT-3217 special tool, loosen and then unscrew the union nut.
Note: If a special tool is not available, loosen the nut with a hard wood rod by tapping it lightly with a hammer.
Attention: To avoid fire, there must be no sparks during impacts.
Carefully remove the fuel supply unit/fuel level sensor and O-ring from the fuel tank opening.
Drain the fuel from the fuel supply unit into the fuel tank or a suitable container.
Check sealing ring for damage and porosity, replace if necessary.
Installation
Insert the fuel supply assembly into the fuel tank, making sure that the fuel level sensor lever is not bent.
Insert the sealing ring for the blind flange dry into the opening of the fuel tank and moisten the ring with fuel only to mount the fuel supply unit.
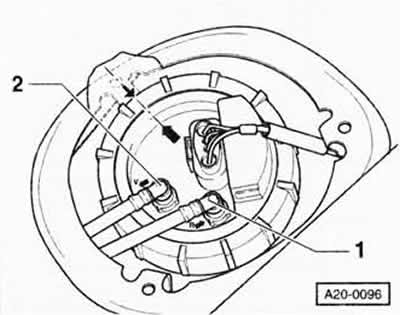
Check the correct installation position of the fuel supply unit: the mark on the blind flange -arrow- must match the mark on the fuel tank. If necessary, turn the fuel supply unit a little.
Using the special tool VW/SEAT-3217, tighten the union nut for the blind flange to a torque of 80 Nm. Or, tighten the nut with a hard wood rod, lightly hitting it with a hammer. To avoid fire, there must be no sparks during impacts!
Connect the supply -2- and return -1- fuel lines according to the markings, while the quick couplings are locked. The arrows on the flange show the respective fuel flow directions.
Connect and secure the multi-pin connector.
Attach the cover, making sure that the arrow on the cover points forward in the direction of travel of the vehicle.
Tilt the rear seat back.
Connect ground wire to battery (-).
Attention: Read the instructions given in chapter «Removing and installing the battery».
Attention: If the engine does not start after replacing the fuel supply unit, it is necessary to remove air from the fuel system through the air lock on the fuel manifold.
Visitor comments