
1.2L petrol engine
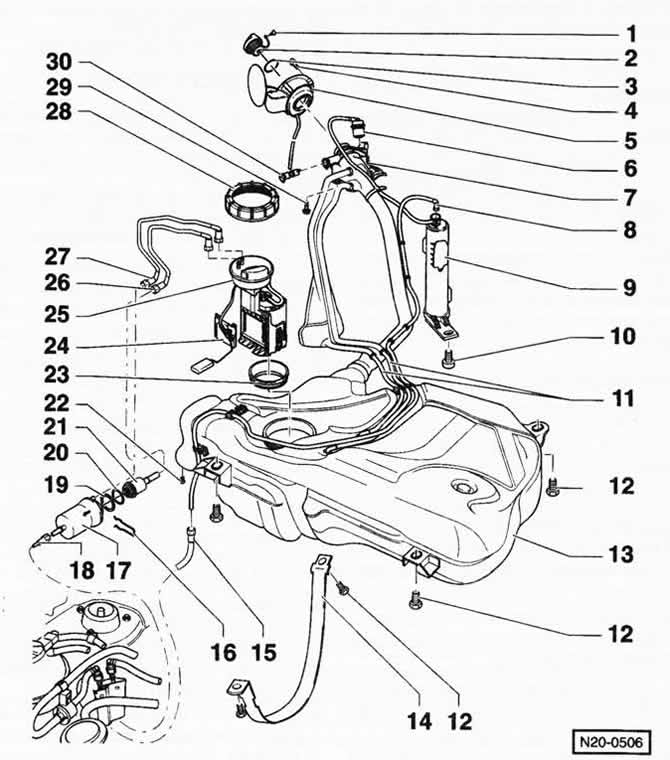
1 - fixing clip
2 — a cover of a jellied mouth of a fuel tank
3 - sealing ring
Replace if damaged.
4 - screw
5 - filler niche cover assembly
With rubber top.
6 - check valve
Prevents fuel from leaking out of the tank when the car rolls over. To remove, unfasten the valve from the nozzle upwards.
Valve actuation check: If the valve is held vertically, it should open. At 45°tilt, the valve should close.
7 - ground connection
Check fastening strength.
8 - pipeline of the ventilation system
Check fastening strength.
9 - activated carbon filter
10 - bolt, 10 Nm
11 - pipelines of the ventilation system
Attached to the fuel tank. Ensure fastening strength.
12 - bolt, 25 Nm
13 - fuel tank
When removing, use a gearbox jack. If the fuel tank has been replaced, bleed air from the fuel supply system.
14 - fastening clamp
15 - pipeline of the ventilation system
Ensure fastening strength.
16 - clamp
Ensure fastening strength.
17 - fuel filter
Mounting position: the arrow on the filter housing points in the direction of the liquid flow, i.e. from the fuel tank to the engine.
18 - fuel supply line
To the fuel manifold. Black. Ensure fastening strength.
19 - sealing ring
Replace if damaged.
20 — o-ring of circular cross-section
Always replace.
21 - fuel pressure regulator
22 - screw, 5 Nm
for the clamp on the fuel filter.
23 - sealing ring
Replace if damaged.
When installing, insert dry into the opening of the fuel tank. Moisten with fuel only for mounting the flange.
24 - fuel level sensor
25 - fuel supply unit
Consists of a fuel pump and a fuel level sensor. Clean the mesh when dirty. Ensure mounting position relative to fuel tank (embossed arrow).
26 - return fuel line
Blue. Attaches to the side of the fuel tank. Ensure fastening strength.
27 - fuel supply line
Black. Attaches to the side of the fuel tank. Ensure fastening strength.
28 - union nut, 80 Nm
29 - bolt, 10 Nm
30 - air valve
To remove the locking pin, it is easy to press inward and remove the valve.
Visitor comments