
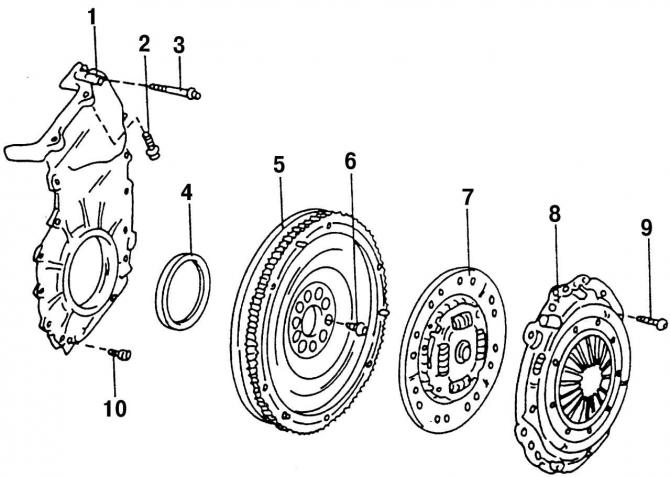
Pic. 85. Elements of the rear side of the engine: 1 - stuffing box cover; 2 - bolt, 25 Nm; 3 - bolt, 10 Nm; 4 - stuffing box; 5 - flywheel; 6 - flywheel mounting bolt; 7 - driven clutch disc; 8 - clutch pressure plate; 9 - clutch basket mounting bolt, 20 Nm; 10 - bolt, 10 Nm
Front and rear 4 (pic. 85) crankshaft oil seals should be changed after each removal of the crankshaft or oil seal flanges. Replacement of oil seals is carried out, as a rule, using a special tool, observing the necessary precautions. If oil leaks are found at the locations of the oil seals, they are replaced. Oil seals can be replaced on an installed engine.
Removing
Removing the front crankshaft oil seal is carried out in the following order:
- block the crankshaft with a lock in a stationary state and turn on the gear;
- unscrew the vibration damper mounting bolt, which is tightened with a torque of 450 Nm. At the service station «Volkswagen» for this, a clamp is usually used;
- to remove the front seal:
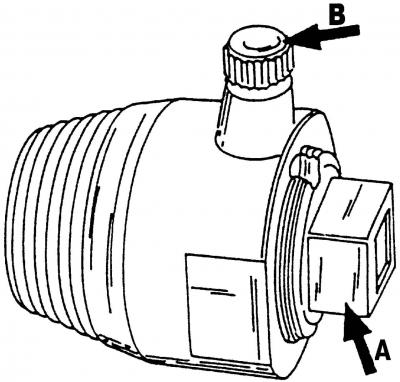
Pic. 86. Puller 3203 front crankshaft oil seal (vibration damper side): And - an internal part of a stripper 3203; B - set screw
- turn inside out A (pic. 86) puller 3203 about three turns (about 4 mm) from the outer part and fix the puller in this position with the set screw B;
- lubricate the threaded head of the tool and slide it as far as possible over the stuffing box;
- loosen set screw B and screw in the inside of the tool, with even pressure, until the gland is pushed out;
- clamp the puller in a vise and remove the oil seal from it with tongs.
Removal of a back epiploon of a cranked shaft carry out in a following order:
- remove the gearbox, clutch and flywheel;
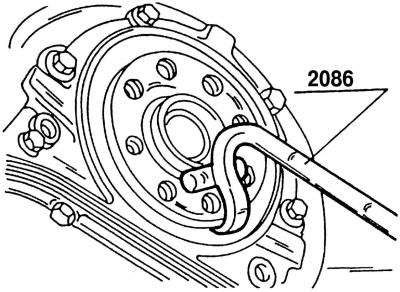
Pic. 87. Puller lever 2086
- install lever (pic. 87) puller 2086 on the crankshaft flange and use it to remove the rear oil seal;
- if there is no puller 2086, then the rear oil seal can be removed with a screwdriver, while making sure that the stuffing box cover is not damaged;
- if the engine is removed, then unscrew the cover of the rear oil seal and remove it together with the oil seal. Then from the inside knock out the stuffing box from the cover.
Installing the oil seal on a removed engine
When installing the oil seal on a removed engine, do the following:
- Lubricate the work surface and the outer side of the oil seal with engine oil and carefully press it into the cover so that the outer surface of the oil seal is completely inside. When working with a hammer, be careful not to deform the gland;
- carefully place the stuffing box cover with the applied gasket on the crankshaft and bolt it to the cylinder block. Tighten the bolts evenly all around.
Installing the oil seal on the engine
When installing the front oil seal on the engine, do the following:

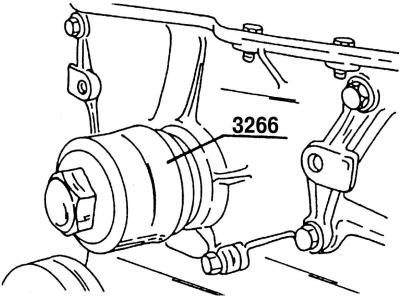
Pic. 88. Guide sleeve 3266/1 special tool
- put on guide sleeve 3266/1 (pic. 88) special tool on the crankshaft journal, lubricate the inner and outer sides of the oil seal with engine oil and put it on the guide sleeve;
Pic. 89. Sleeve 3266
- slide another bushing 3266 of the same tool onto guide bushing 3266/1 (pic. 89) and tighten the crankshaft vibration damper bolt, located in the center, until the oil seal sits in its place;
- after installing the front oil seal, remove all parts of the tool.
When installing the rear oil seal on the engine, do the following:
- using a hammer, push the seal onto the cover. Be careful not to damage the seal lip;
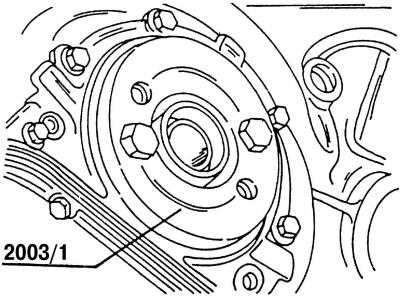
Pic. 90. Fitting the oil seal on the flywheel side with tool 2003/1
- fixture 2003/1 (pic. 90) or with a metal circle with a hole in the center for the edge of the crankshaft, bolted into the threaded holes of the clutch pressure plate, evenly tightening both bolts, press in the oil seal.
After installing the front or rear oil seal on the engine, all further assembly work is carried out in the reverse order of disassembly, depending on which oil seal was replaced.
Visitor comments