
English Русский
Български
Беларускі
Український
Српски
Hrvatski
Română
Polski
Slovenský
Magyar
  |  Articles  |  Sitemap  |  Contacts  |    |
Car maintenance Ford Car maintenance Hyundai Car maintenance Chevrolet Car maintenance BMW Car maintenance Audi Car maintenance Opel Car maintenance AvtoVAZ
VWmanual.ru


Main   Passat   Golf   Polo   Touareg   Tiguan   Sharan   Transporter   Others  
Sharan 1 (1995-2000)

Checking pistons and connecting rods (VW Sharan 1)

  • Main
  • Sharan
  • Sharan 1
  • Petrol engines
  • Engine repair 2.8 l (AAA)
  • Checking pistons and connecting rods
            0


Clean the piston from carbon deposits and remove all deposits from the piston and connecting rod lubrication channels. Carefully inspect all parts. Cracks of any kind on the piston, piston rings, pin, connecting rod and its cover are not allowed. If they have scoring, scratches or signs of wear, these parts should be replaced. When inspecting the piston:

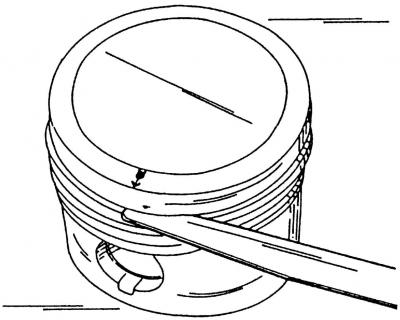
Fig. 62. Measuring the gap between the piston rings and the ring grooves in the piston head

Fig. 62. Measuring the gap between the piston rings and the ring grooves in the piston head

  • measure the gap between the piston rings and the ring grooves in the piston head using a set of feeler gauges (Fig. 62). The nominal gap for the upper and lower compression rings 1 (Fig. 63) is 0.02 - 0.07 mm, and for the oil scraper ring 2 - 0.02 - 0.06 mm. The maximum permissible gaps for wear are 0.15 mm. If there is a gap, then either the ring or the piston ring groove is worn;
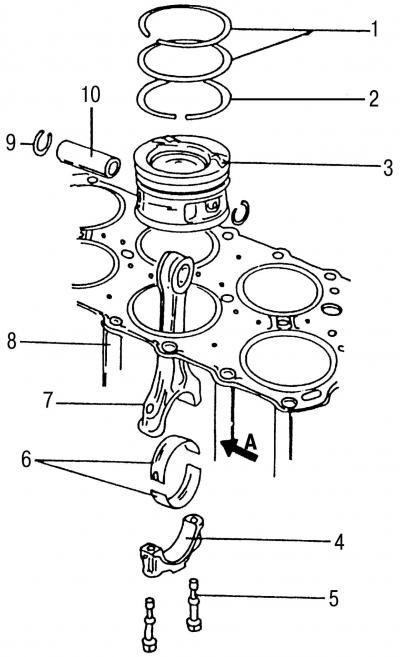

Fig. 63. Piston group parts: 1 - compression piston rings; 2 - oil scraper ring; 3 - piston; 4 -…

Fig. 63. Piston group parts: 1 - compression piston rings; 2 - oil scraper ring; 3 - piston; 4 - connecting rod cover; 5 - connecting rod mounting bolt; 6 - connecting rod bearings; 7 - connecting rod; 8 - cylinder block; 9 - retaining ring; 10 - piston pin; arrow A points towards the front of the engine


The information is posted on this website: www.VWmanual.ru
  • insert all piston rings one by one, starting with the lower one relative to the crankcase, into the cylinder bore. Turn one of the pistons over and push the rings down about 15 mm. After that, they will be directly in the cylinder bore;
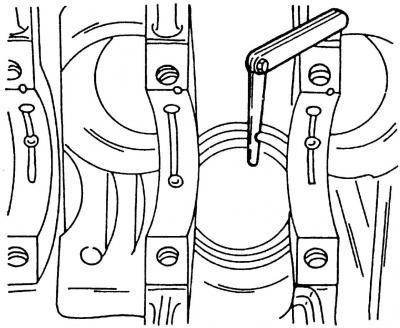
Fig. 64. Measuring the gap of piston ring locks in the cylinder bore

Fig. 64. Measuring the gap of piston ring locks in the cylinder bore

  • insert a feeler gauge into the piston ring groove — into the lock — to determine the gap (Fig. 64). For compression piston rings, the gap in the lock should be 0.2–0.40 mm, and for the oil scraper ring — 0.25–0.50 mm. The maximum permissible gap during wear for all rings is 1.0 mm;
  • if the gap in the lock is too small (for example, new piston rings, which should also be measured), then it needs to be increased. The rings are very fragile, so this work should be done carefully. It is best to clamp the file in a vice and file down the end of the ring;
  • check the piston pins and connecting rod bushings for wear and scoring. Even if only one connecting rod is damaged, the entire unit should be replaced;
  • the connecting rod mounting bolts on the VR6 engine are screwed directly into the connecting rods (no nuts are used) and are so-called "flexible screws" that should be replaced after each unscrewing;
  • check the connecting rods with a measuring device for twisting and bending.

This article is available at russian, bulgarian, belarusian, ukrainian, serbian, croatian, romanian, polish, slovak, hungarian
The text has been checked: Tarasov Ivan

Share information:

Previous articles
Measuring the inner diameter of a cylinder
Removal pistons and connecting rods
Hydraulic tappet — removal and installation
Installing the cylinder head
Cylinder head assembly
Cylinder head repair
Next articles
Assembly of pistons and connecting rods
Installing pistons and connecting rods
Cylinder Block — Check
Removal the crankshaft
Checking the crankshaft
Installing the crankshaft


Similar articles from other manuals for VW cars:
Disassembly and assembly of pistons and connecting rods Passat B6 (2005-2010)
Removal pistons and connecting rods Golf 2 (1984-1993, petrol)
Checking the levels of the main working fluids Polo 3 (1995-2003)
Checking pistons, piston rings and cylinder diameter Touareg 1 (2002-2006)
Checking the operation of the intake manifold flap Tiguan 1 (2007-2015)
Checking the pistons Transporter T3 (1979-1992)
Disassembly and assembly of pistons and connecting rods Caddy 3 (2003-2010)
Link to this page in different formats


Visitor comments


No comments yet


How much will 44 + 28 =


Sharan 1 
  • General information
  • Introduction to guide
  • Maintenance
  • Petrol engines
  • Engine repair 2.8 l (AAA)
  • Engine repair 2.0 l (ADY)
  • Lubrication system
  • Cooling system
  • Fuel injection system
  • Ignition system
  • Diesel engines
  • Engine repair
  • Lubrication system
  • Cooling system
  • Supply system
  • Transmission
  • Clutch
  • Manual gearbox and shafts
  • Chassis
  • Steering
  • Car suspension
  • Brake system
  • Electrical equipment
  • Equipment and devices
  • Power devices
  • Electrical circuits
VWmanual.ru © 2016-2026 | Mobile version | News and articles | Sitemap: EN BG BY UA RS HR RO PL SK HU | Write message | Site search
Passat B2 • Passat B3 • Passat B4 • Passat B5 • Passat B6 • Golf 1, diesel • Golf 1, petrol • Golf 2, petrol • Golf 2 • Golf 3 • Golf 4 • Golf 5 • Polo 3 • Polo 4 • Touareg 1 • Tiguan 1 • Sharan 1 • Transporter T3 • Transporter T4 • LT 28 • LT 2D • Beetle • Caddy 3 •
Our website uses cookies to ensure functionality and convenience.