English Русский
Български
Беларускі
Український
Српски
Hrvatski
Română
Polski
Slovenský
Magyar
  |  Articles  |  Sitemap  |  Contacts  |    |
Car maintenance Ford Car maintenance Hyundai Car maintenance Chevrolet Car maintenance BMW Car maintenance Audi Car maintenance Opel Car maintenance AvtoVAZ
VWmanual.ru


Main   Passat   Golf   Polo   Touareg   Tiguan   Sharan   Transporter   Others  
Sharan 1 (1995-2000)

Hydraulic tappet — removal and installation (VW Sharan 1)

  • Main
  • Sharan
  • Sharan 1
  • Petrol engines
  • Engine repair 2.8 l (AAA)
  • Hydraulic tappet — removal and installation
            0


Please follow these guidelines:
  • after removal, hydraulic tappets should be installed with the contact surface facing down on a clean surface;
  • always replace the tappets completely, as they cannot be adjusted or repaired;
  • valve noise when starting the engine is normal. However, if it is too loud, you need to check the tappets, for this:
  • start the engine and let it run until the cooling fan comes on;
  • increase the engine speed to 2500 min⁻¹ and let it run for 2 min;

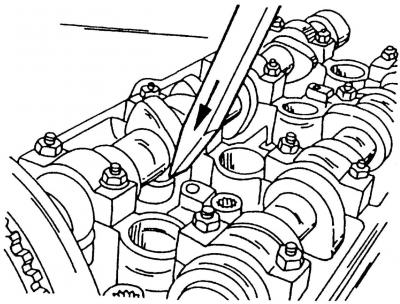
Fig. 53. Checking the hydraulic tappet

Fig. 53. Checking the hydraulic tappet

  • if the valves are still noisy, then to determine the faulty tappet, turn off the engine, remove the cylinder head cover and rotate the camshaft so that its cam for the tappet being checked faces upward. Then press on the tappet with a piece of plastic or a sharpened wooden stick (Fig. 53). If the gap is more than 0.10 mm before the valve opens, then the tappet must be replaced.

After installing a new tappet, the engine can be started no earlier than 30 minutes later. Otherwise, the valves may knock on the pistons.

This article is available at russian, bulgarian, belarusian, ukrainian, serbian, croatian, romanian, polish, slovak, hungarian
The text has been checked: Tarasov Ivan

Share information:

Previous articles
Installing the cylinder head
Cylinder head assembly
Cylinder head repair
Disassembling the cylinder head
Removal the cylinder head
General recommendations for engine disassembly and assembly
Next articles
Removal pistons and connecting rods
Measuring the inner diameter of a cylinder
Checking pistons and connecting rods
Assembly of pistons and connecting rods
Installing pistons and connecting rods
Cylinder Block — Check


Similar articles from other manuals for VW cars:
Checking hydraulic tappets Passat B3 (1988-1993)
Hydraulic brake system Golf 1 (1974-1984, petrol)
Checking hydraulic compensators Polo 3 (1995-2003)
Removal and installation the pressure sensor for hydraulic… Touareg 1 (2002-2006)
Clutch hydraulic drive parts and components Tiguan 1 (2007-2015)
Hydraulic disc tappets Transporter T4 (1990-2003)
Components and units of the hydraulic part of the cooling system Caddy 3 (2003-2010)
Link to this page in different formats


Visitor comments


No comments yet


How much will 21 + 37 =


Sharan 1 
  • General information
  • Introduction to guide
  • Maintenance
  • Petrol engines
  • Engine repair 2.8 l (AAA)
  • Engine repair 2.0 l (ADY)
  • Lubrication system
  • Cooling system
  • Fuel injection system
  • Ignition system
  • Diesel engines
  • Engine repair
  • Lubrication system
  • Cooling system
  • Supply system
  • Transmission
  • Clutch
  • Manual gearbox and shafts
  • Chassis
  • Steering
  • Car suspension
  • Brake system
  • Electrical equipment
  • Equipment and devices
  • Power devices
  • Electrical circuits
VWmanual.ru © 2016-2026 | Mobile version | News and articles | Sitemap: EN BG BY UA RS HR RO PL SK HU | Write message | Site search
Passat B2 • Passat B3 • Passat B4 • Passat B5 • Passat B6 • Golf 1, diesel • Golf 1, petrol • Golf 2, petrol • Golf 2 • Golf 3 • Golf 4 • Golf 5 • Polo 3 • Polo 4 • Touareg 1 • Tiguan 1 • Sharan 1 • Transporter T3 • Transporter T4 • LT 28 • LT 2D • Beetle • Caddy 3 •
Our website uses cookies to ensure functionality and convenience.