
English Русский
Български
Беларускі
Український
Српски
Hrvatski
Română
Polski
Slovenský
Magyar
  |  Articles  |  Sitemap  |  Contacts  |    |
Car maintenance Ford Car maintenance Hyundai Car maintenance Chevrolet Car maintenance BMW Car maintenance Audi Car maintenance Opel Car maintenance AvtoVAZ
VWmanual.ru


Main   Passat   Golf   Polo   Touareg   Tiguan   Sharan   Transporter   Others  
Sharan 1 (1995-2000)

Installing the camshaft and oil seal into the cylinder head (VW Sharan 1)

  • Main
  • Sharan
  • Sharan 1
  • Diesel engines
  • Engine repair
  • Installing the camshaft and oil seal into the cylinder head
            0


Lubricate well and insert the tappets into the holes according to the marks on them. If the tappets were removed, be sure to read the instructions.

Generously lubricate the camshaft with oil in the bearing areas. Install the camshafts in their seats and turn them several times. Install the shafts so that both cams of the first cylinder on the two shafts are facing upwards.
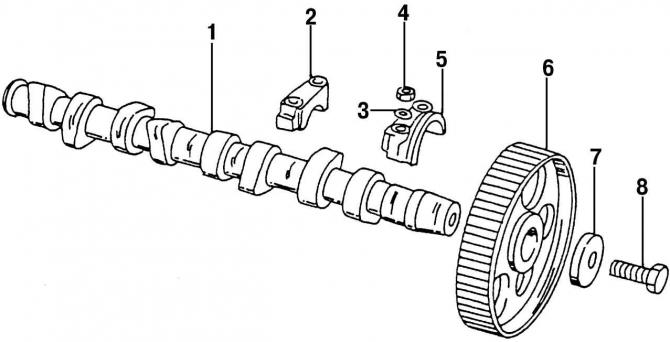
Fig. 435. Individual elements of the camshaft: 1 - camshaft; 2 - camshaft bearing cap; 3 - washer;…

Fig. 435. Individual elements of the camshaft: 1 - camshaft; 2 - camshaft bearing cap; 3 - washer; 4 - nut, 20 Nm; 5 - rear bearing cover; 6 - camshaft gear wheel; 7 - washer; 8 - bolt, 45 Nm


Using Fig. 435, put on bearing caps No.1, 3 and 5 and hand-tighten the nuts. Since the bearing caps are offset, check to see if they are seated correctly. To do this, using Fig. 406, determine if the caps have been put on correctly.

Tighten the nuts of the installed bearing caps alternately and crosswise in several passes to a tightening torque of 20 N·m. Make sure that the surface of the caps is located opposite the surface of the cylinder head.

Put on caps No.2 and No.4 and tighten the nuts. Tighten the nuts alternately and crosswise in several passes to a tightening torque of 20 N·m.


Take the camshaft seal and see which side the spring is on. The side with the spring should be facing inward. Lubricate the sealing surface (the rolling surface of the camshaft should also be lubricated). A pipe of the appropriate diameter can be used to install a new seal. The pipe must fully match the size of the outer part of the seal.
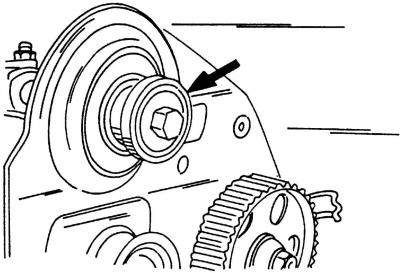
Fig. 439. Removing the camshaft oil seal using a special tool

Fig. 439. Removing the camshaft oil seal using a special tool


The information is posted on this resource www.vwmanual.ru

Push the seal straight in and tap it until its outer surface is completely in. The seal can also be installed in the manner shown in Fig. 439.

Install the camshaft timing gear onto the camshaft (don't forget about the wedge) and tighten the bolt with the washer. Keeping the camshaft stationary (for example, using an old toothed drive belt) and tighten the bolt to a torque of 80 Nm.

Perform the remaining work in the reverse order of the removal process.

This article is available at russian, bulgarian, belarusian, ukrainian, serbian, croatian, romanian, polish, slovak, hungarian
The text has been checked: Tarasov Ivan

Share information:

Previous articles
Camshaft oil seal
Removal the camshaft
Camshaft and oil seal
Flywheel — removal and installation
Installing the intermediate shaft
Removal the intermediate shaft
Next articles
Determination of axial clearance of the crankshaft
Crankshaft seals — removal and installation
Checking the crankshaft parts
Measuring cylinder bores
Checking the mating surface of the cylinder block


Similar articles from other manuals for VW cars:
Installing the cylinder head Passat B2 (1981-1988)
Cylinder head and camshaft Golf 3 (1991-1997)
Cylinder block, camshaft and flywheel Polo 3 (1995-2003)
Removal and installation the cylinder head cover Touareg 1 (2002-2006)
Cylinder head Tiguan 1 (2007-2015)
Removal and installation the cylinder head (petrol 4-cylinder) Transporter T4 (1990-2003)
Assembling the head and installing the camshaft LT 28 (1975-1991)
Link to this page in different formats


Visitor comments


No comments yet


How much will 32 + 45 =


Sharan 1 
  • General information
  • Introduction to guide
  • Maintenance
  • Petrol engines
  • Engine repair 2.8 l (AAA)
  • Engine repair 2.0 l (ADY)
  • Lubrication system
  • Cooling system
  • Fuel injection system
  • Ignition system
  • Diesel engines
  • Engine repair
  • Lubrication system
  • Cooling system
  • Supply system
  • Transmission
  • Clutch
  • Manual gearbox and shafts
  • Chassis
  • Steering
  • Car suspension
  • Brake system
  • Electrical equipment
  • Equipment and devices
  • Power devices
  • Electrical circuits
VWmanual.ru © 2016-2026 | Mobile version | News and articles | Sitemap: EN BG BY UA RS HR RO PL SK HU | Write message | Site search
Passat B2 • Passat B3 • Passat B4 • Passat B5 • Passat B6 • Golf 1, diesel • Golf 1, petrol • Golf 2, petrol • Golf 2 • Golf 3 • Golf 4 • Golf 5 • Polo 3 • Polo 4 • Touareg 1 • Tiguan 1 • Sharan 1 • Transporter T3 • Transporter T4 • LT 28 • LT 2D • Beetle • Caddy 3 •
Our website uses cookies to ensure functionality and convenience.