
English Русский
Български
Беларускі
Український
Српски
Hrvatski
Română
Polski
Slovenský
Magyar
  |  Articles  |  Sitemap  |  Contacts  |    |
Car maintenance Ford Car maintenance Hyundai Car maintenance Chevrolet Car maintenance BMW Car maintenance Audi Car maintenance Opel Car maintenance AvtoVAZ
VWmanual.ru


Main   Passat   Golf   Polo   Touareg   Tiguan   Sharan   Transporter   Others  
Sharan 1 (1995-2000)

Checking pistons and connecting rods (VW Sharan 1)

  • Main
  • Sharan
  • Sharan 1
  • Diesel engines
  • Engine repair
  • Checking pistons and connecting rods
            0


Check all parts carefully. If they have nicks, scratches or signs of wear, these parts should be replaced.

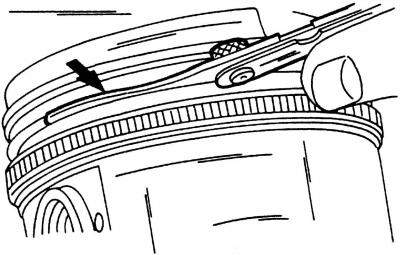
Fig. 427. Checking the clearance between the piston rings and grooves

Fig. 427. Checking the clearance between the piston rings and grooves


Measure the height clearance between the piston rings and grooves using a feeler gauge (Fig. 427). If the compression ring clearance is greater than 0.25 mm, or the oil scraper ring clearance is greater than 0.15 mm, then either the rings or the piston are worn. The nominal values are given in the tolerance and control table.

Insert all piston rings one by one, starting with the lower one relative to the crankcase, into the cylinder bore. Turn one of the pistons over and press the rings down about 20 mm. After that, they will be directly in the cylinder bore.
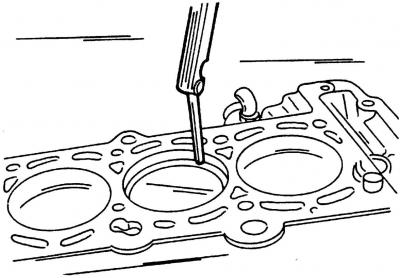
Fig. 428. Checking the gap in the ring lock. Insert the piston rings with the inverted piston into…

Fig. 428. Checking the gap in the ring lock. Insert the piston rings with the inverted piston into the cylinder bore so that they are located horizontally in the cylinder bore


Insert a feeler gauge into the gap between the two ends of the ring to measure the gap in the piston ring lock. Fig. 428 shows how to measure the gap correctly. For compression piston rings, the gap should be 0.2-0.4 mm; for oil scraper rings - 0.25 - 0.4 mm. The wear limit of all rings is 1.0 mm.

With a small gap (for example, for new rings, which should also be measured) the ends of the rings can be filed down. To do this, clamp the file in a vice and file down the ends of the rings. If the thermal gap is too large, the corresponding ring must be replaced.

(The information is available on the website: VWManual)

Check the piston pins and connecting rod bushings for wear and tear. Also, if only one connecting rod is damaged, the entire part should be replaced. Always replace the connecting rod bearing bolts with new ones. Check the connecting rods for deformation and twisting using a connecting rod straightening device. The obtained values should be minimal. If you have any doubts about the condition of the connecting rods, contact a service station to take the appropriate measurements. If one connecting rod is bent, the entire set should be replaced.

This article is available at russian, bulgarian, belarusian, ukrainian, serbian, croatian, romanian, polish, slovak, hungarian
The text has been checked: Tarasov Ivan

Share information:

Previous articles
Removal and disassembly of the connecting rod and piston group
Connecting rod and piston group — design description
Installing the toothed drive belt and adjusting the timing drive
Removal the timing belt
Poly V-belt and toothed drive belts
Hydraulic tappets — removal and installation
Next articles
Assembly of pistons and connecting rods
Installing pistons and connecting rods
Removal the intermediate shaft
Installing the intermediate shaft
Flywheel — removal and installation
Camshaft and oil seal


Similar articles from other manuals for VW cars:
Disassembly and assembly of pistons and connecting rods Passat B6 (2005-2010)
Removal pistons and connecting rods Golf 2 (1984-1993, petrol)
Checking the levels of the main working fluids Polo 3 (1995-2003)
Checking pistons, piston rings and cylinder diameter Touareg 1 (2002-2006)
Checking the operation of the intake manifold flap Tiguan 1 (2007-2015)
Checking the pistons Transporter T3 (1979-1992)
Disassembly and assembly of pistons and connecting rods Caddy 3 (2003-2010)
Link to this page in different formats


Visitor comments


No comments yet


How much will 24 + 30 =


Sharan 1 
  • General information
  • Introduction to guide
  • Maintenance
  • Petrol engines
  • Engine repair 2.8 l (AAA)
  • Engine repair 2.0 l (ADY)
  • Lubrication system
  • Cooling system
  • Fuel injection system
  • Ignition system
  • Diesel engines
  • Engine repair
  • Lubrication system
  • Cooling system
  • Supply system
  • Transmission
  • Clutch
  • Manual gearbox and shafts
  • Chassis
  • Steering
  • Car suspension
  • Brake system
  • Electrical equipment
  • Equipment and devices
  • Power devices
  • Electrical circuits
VWmanual.ru © 2016-2026 | Mobile version | News and articles | Sitemap: EN BG BY UA RS HR RO PL SK HU | Write message | Site search
Passat B2 • Passat B3 • Passat B4 • Passat B5 • Passat B6 • Golf 1, diesel • Golf 1, petrol • Golf 2, petrol • Golf 2 • Golf 3 • Golf 4 • Golf 5 • Polo 3 • Polo 4 • Touareg 1 • Tiguan 1 • Sharan 1 • Transporter T3 • Transporter T4 • LT 28 • LT 2D • Beetle • Caddy 3 •
Our website uses cookies to ensure functionality and convenience.