
English Русский
Български
Беларускі
Український
Српски
Hrvatski
Română
Polski
Slovenský
Magyar
  |  Articles  |  Sitemap  |  Contacts  |    |
Car maintenance Ford Car maintenance Hyundai Car maintenance Chevrolet Car maintenance BMW Car maintenance Audi Car maintenance Opel Car maintenance AvtoVAZ
VWmanual.ru


Main   Passat   Golf   Polo   Touareg   Tiguan   Sharan   Transporter   Others  
LT 28 (1975-1991) LT 2D (1996-2003) Beetle (1960-1986) Caddy 3 (2003-2010)

Removal and installation the fuel pump (VW Lt 2d)

  • Main
  • Volkswagen
  • LT 2D
  • Power unit
  • Petrol engines 2.3 l
  • Removal and installation the fuel pump
            0


Contents: Removal ↓ Installation ↓ Examination ↓

Removal


1. Remove the fuel tank.

2. Use key 3217 to unscrew the union nut (figure 2.60).
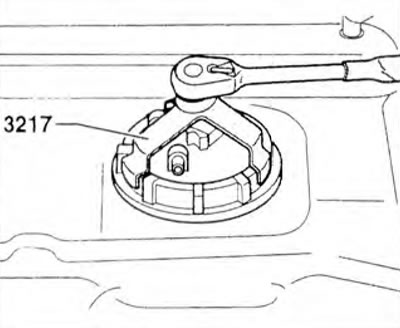
Figure 2.60. Use wrench 3217 to unscrew the union nut.

Figure 2.60. Use wrench 3217 to unscrew the union nut.


3. Remove the fuel pump together with the gasket 1 (figure 2.61).

Installation


4. Installation is carried out in the reverse order of removal. The mark on the fuel pump 1 must match the mark on the fuel tank 2 (figure 2.62).
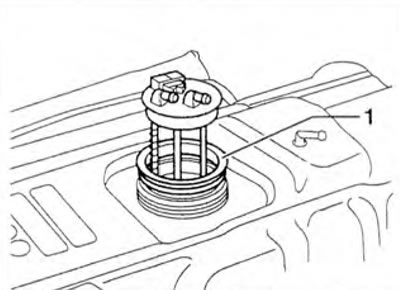
Figure 2.61. Remove the fuel pump together with the gasket 1.
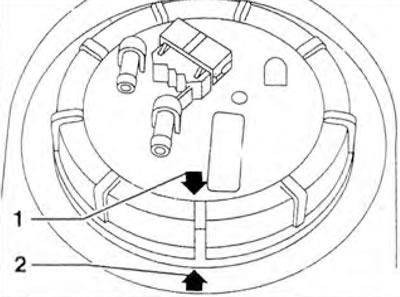
Figure 2.61. Remove the fuel pump together with the gasket 1.


Figure 2.62. The mark on fuel pump 1 must match the mark on fuel tank 2.

Figure 2.62. The mark on fuel pump 1 must match the mark on fuel tank 2.


Examination


5. Turn on the ignition. You should hear the fuel pump run briefly.

6. If the pump does not work, turn off the ignition and remove the relay (arrow) from the relay box under the driver's seat (figure 2.63).
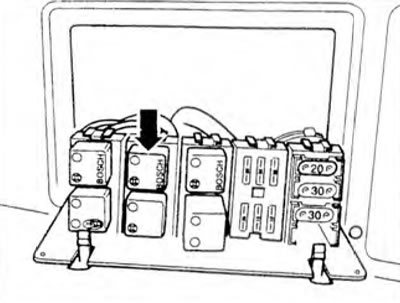
Figure 2.63. If the pump does not work, turn off the ignition and remove the relay (arrow) from the…

Figure 2.63. If the pump does not work, turn off the ignition and remove the relay (arrow) from the relay box under the driver's seat.


Caution: If the relay cannot be removed from the unit without using a tool, first disconnect the negative battery cable.


7. Connect the VAG 1348/3A tester with the VAG 1348/3-2 adapter to contact 1 (terminal 87) and contact 5 (terminal 30).

8. Turn on the tester.

The fuel pump is working


9. Connect the 1526 A multimeter to measure voltage with the red test tip (+) to contact 2 (terminal 86) and the black test tip to contact 4 (terminal 85).

10. Turn on the ignition. Nominal value: battery voltage.

If the nominal value is obtained: replace the fuel pump relay.

11. If the nominal value is not obtained: check the wiring for open circuit.

The fuel pump is not working


12. Connect the 1526 A multimeter to measure voltage with the red test tip (+) to contact 5 (terminal 30) and the black test tip to contact 4 (terminal 85). Nominal value: battery voltage.


13. If the nominal value is not obtained: check the wiring for open circuit.
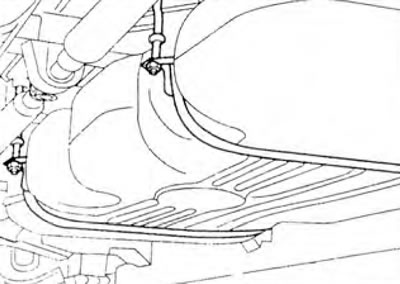
Figure 2.64. Loosen the nuts of both fasteners until the threads end.

Figure 2.64. Loosen the nuts of both fasteners until the threads end.


14. If the nominal value is obtained: loosen the nuts of both fasteners until the end of the thread (figure 2.64).

15. Disconnect the connector from the flange on the fuel tank.

16. Connect the VAG 1527 LED indicator lamp with auxiliary wires from VAG 1594 to the outer contacts of the connector.

17. Turn on the tester. The LED should light up.

18. If the LED does not light up: Check the wiring for a break in accordance with the wiring diagram and fix the problem

19. The LED lights up (voltage supply is in order): remove the fuel pump. Check if the electrical connections between the flange and the fuel pump are good. If no breaks are found in the wiring: replace the fuel pump.

This article is available at russian, bulgarian, belarusian, ukrainian, serbian, croatian, romanian, polish, slovak, hungarian
The text has been checked: Kolesnikov Artem

Share information:

Previous articles
Removal and installation the cooling system pump
Cooling system
Lubrication system
Piston and connecting rod
Crankshaft
Lapping valve seats
Next articles
Exhaust gas system
Motronic fuel injection and ignition control system
Connecting the VAG 1551 fault code reader and selecting the «Engine electronics» function
Interrogation and clearing of fault memory
Diagnostics of actuators
Block of measured values


Similar articles from other manuals for VW cars:
Fuel pump Passat B2 (1981-1988)
High pressure fuel pump Golf 3 (1991-1997)
Checking the fuel pump Polo 3 (1995-2003)
Fuel tank filler flap Touareg 1 (2002-2006)
High pressure fuel pump Tiguan 1 (2007-2015)
Electric Fuel Pump — General Information Sharan 1 (1995-2000)
Checking for voltage at the fuel pump Transporter T4 (1990-2003)
Link to this page in different formats


Visitor comments


No comments yet


How much will 11 + 47 =


Caddy 3 
  • General information
  • User manual
  • Daily care
  • Maintenance
  • Petrol engines 1.4 l
  • Engine repair
  • Cooling and lubrication system
  • Power and exhaust system
  • Petrol engines 1.6 l
  • Engine repair
  • Cooling and lubrication system
  • Power and exhaust system
  • Diesel engines
  • Engine repair
  • Cooling and lubrication system
  • Power and exhaust system
  • Transmission
  • Mechanical gearbox 0AH
  • Mechanical gearbox 0A4
  • Drive shafts
  • Chassis
  • Car suspension
  • Steering
  • Brake system
  • Body and wiring diagrams
  • Interior and exterior
  • Electrical circuits
Beetle 
  • General information
  • Maintenance
  • Power unit
  • Engine repair
  • Cooling and lubrication system
  • Supply system
  • Exhaust system
  • Transmission
  • Clutch
  • Car gearbox
  • Chassis
  • Front suspension
  • Rear suspension
  • Steering
  • Brake system
  • Wheels and tires
  • Body
  • Exterior
  • Electrical equipment
  • Equipment and devices
  • Power devices
  • Electrical circuits
LT 2D 
  • General information
  • User manual
  • Maintenance
  • Power unit
  • Petrol engines 2.3 l
  • Diesel engines 2.5 l
  • Diesel engines 2.8 l
  • Injection system (diesel 2.8 l)
  • Transmission
  • Clutch
  • Manual gearbox
  • Differential
  • Chassis
  • Car suspension
  • Steering system
  • Brake system
  • Body
  • Body elements
  • Heating system
  • Electrical equipment
  • Equipment and devices
  • Electrical circuits
LT 28 
  • General information
  • Maintenance
  • Power unit
  • Petrol engines 2.0L
  • Petrol engines 2.4L
  • Diesel engines
  • Cooling and heating
  • Fuel and exhaust system
  • Ignition system
  • Transmission
  • Clutch
  • Car gearbox
  • Cardan shaft
  • Rear axle
  • Chassis
  • Brake system
  • Car suspension
  • Steering system
  • Body
  • Body elements
  • Doors, locks and windows
  • Electrical equipment
  • Power devices
  • Equipment and devices
  • Electrical circuits
VWmanual.ru © 2016-2026 | Mobile version | News and articles | Sitemap: EN BG BY UA RS HR RO PL SK HU | Write message | Site search
Passat B2 • Passat B3 • Passat B4 • Passat B5 • Passat B6 • Golf 1, diesel • Golf 1, petrol • Golf 2, petrol • Golf 2 • Golf 3 • Golf 4 • Golf 5 • Polo 3 • Polo 4 • Touareg 1 • Tiguan 1 • Sharan 1 • Transporter T3 • Transporter T4 • LT 28 • LT 2D • Beetle • Caddy 3 •
Our website uses cookies to ensure functionality and convenience.