



Contents: Exhaust manifold flap control valve…↓ Evaporative emission control system…↓ Functional check of the exhaust…↓
Using this diagnostics, the following actuators are checked:
- exhaust manifold flap control valve (3-channel);
- solenoid valve of the gasoline vapor recovery system;
- functional check of the exhaust manifold flap control valve.
1. Connect the VAG 1551 (VAG 1552) fault code reader and enter "01" "Engine Electronics." The ignition must be off. The display should show the following information:
- LT HELP Diagnostics
- Dial function XX
2. Press "03" to select the "Diagnostics of actuators" function and confirm by pressing the "Q" button.
Exhaust manifold flap control valve (3-channel)
3. The display should show the following information:
- Diagnostics of actuators
- Exhaust manifold flap control valve
4. Exhaust manifold flap control valve (located behind the heat shield near the front of the exhaust pipe(front muffler) should click until the next actuator is selected by pressing "→". The valve clicks, but the malfunction still exists (the valve does not close.
5. Disconnect the tube from the vacuum unit on the valve in the exhaust manifold. Attach the additional tube. Blow through the tube throughout the diagnostic procedure (towards the intake pipe).
6. If the valve does not click, remove the heat shield.
7. Disconnect the 2-pin connector from the exhaust manifold flap control valve (arrow) and connect the VAG 1527 diode tester to the disconnected valve connector (figure 2.68). The light on the diode tester should come on.
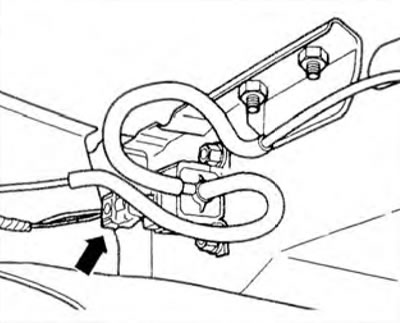
Figure 2.68. Disconnect the 2-pin connector from the exhaust manifold flap control valve (arrow) and connect the VAG 1527 diode tester to the disconnected valve connector
8. If the light comes on, turn off the ignition and replace the valve.
9. If the light does not come on, turn off the ignition and connect the VAG 1598/26 tester. Check the wire between socket 3 (red) of the tester and contact 2 of the connector for an open circuit (figure 2.69) Wire resistance: max 1.5 ohm.
10. Check the wire between socket 1 and the vehicle ground. Also check the wires of the 2-pin connector for short circuits. Contact 1 + contact 2 = resistance ∞ Ohms.
11. If the fault is not in the wire, replace the Motronic control unit.
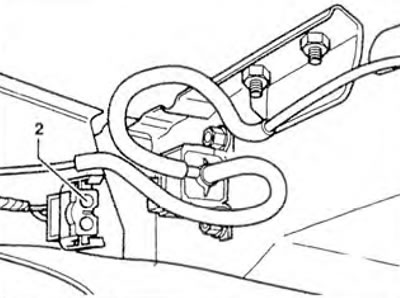
Figure 2.69. If the light does not come on, turn off the ignition and connect the VAG 1598/26 tester. Check the wire between socket 3 (red) of the tester and contact 2 of the connector for an open circuit.
Evaporative emission control system solenoid valve
12. Press "→". The display should show the following information:
- Diagnostics of actuators
- Evaporative emission control system solenoid valve
13. Solenoid valve of the gasoline vapor recovery system (activation of the carbon filter) located near the fuel tank. Once selected, the display should click until the next actuator is selected by pressing "→". The valve clicks, but the fault is still present (the valve does not close).
14. Disconnect the tube from the solenoid valve (from an activated carbon filter) and attach the additional tube. Blow through the tube throughout the diagnostic procedure (towards the intake pipe). The valve must open and close.
15. If the valve does not click, disconnect the 2-pin wiring connector from the solenoid valve and connect the VAG 1527 diode tester to the disconnected valve connector (figure 2.70). The light on the diode tester should come on.
16. If the light comes on, turn off the ignition and replace the valve.
17. If the light does not come on, turn off the ignition and connect the VAG 1598/26 tester. Check the wire between socket 17 (red) of the tester and contact 2 of the connector for an open circuit. Wire resistance: max 1.5 ohm.
18. Check the wire between socket 1 and the vehicle ground. Also check the wires of the 2-pin connector for short circuits. Contact 1 + contact 2 = resistance ∞ Ohms.
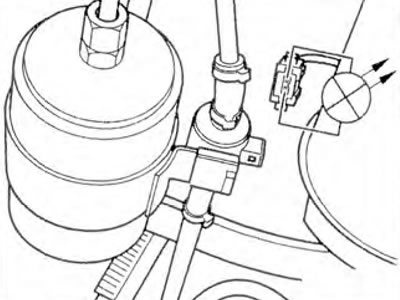
Figure 2.70 If the valve does not click, disconnect the 2-pin wiring connector from the solenoid valve and connect the VAG 1527 diode tester to the disconnected valve connector.
19. If the fault is not in the wire, replace the Motronic control unit.
20. Disconnect the VAG 1598/26 tester.
21. Press "→". The display should show the following information:
- Diagnostics of actuators
- Please start the engine
Functional check of the exhaust manifold flap control valve
22. Start the engine. The display should show the following information:
- Diagnostics of actuators
- Exhaust manifold flap control valve
23. The vacuum unit piston (arrow) should move in and out until the next actuator is selected by pressing "→" (figure 2.71). If the piston does not move, make sure the vacuum tube is connected correctly. Check the vacuum lines for leaks, ease of leakage, and the functionality of the vacuum unit.
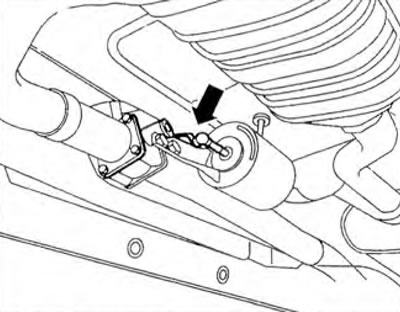
Figure 2.71. The vacuum unit piston (arrow) should move in and out until the next actuator is selected by pressing "→".
24. Press "→". The display should show the following information:
- LT HELP Diagnostics
- Dial function XX
25. Press "06" to select the "Complete Output" function and confirm by pressing the "Q" button.
26. Turn off the ignition.
Visitor comments