



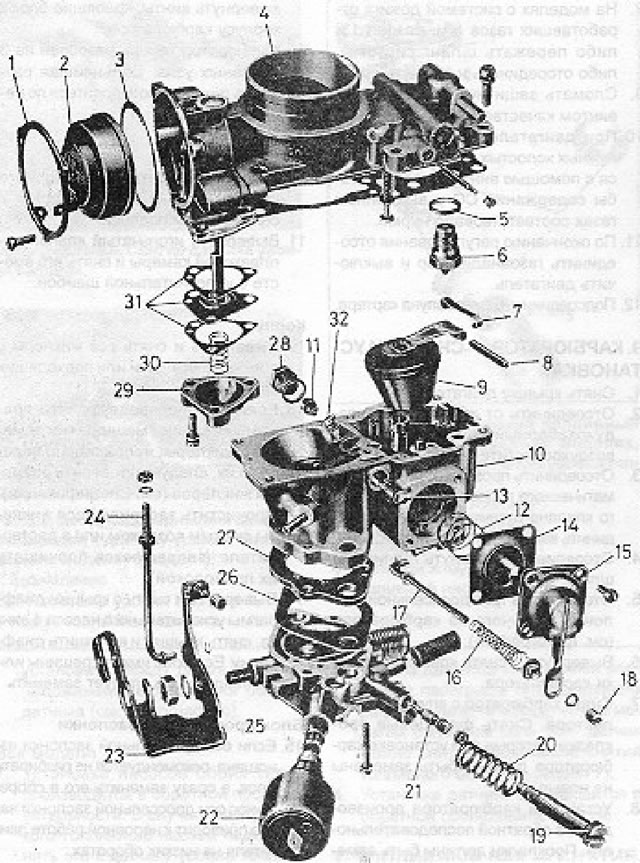
Figure 3.5. Disassembled carburetor: 1 - Retainer; 2 - Choke housing cover; 3 - Gasket; 4 - Top cover; 5 - Washer; 6 - Float chamber needle valve; 7 - Float axis spring; 8 - Float axis; 9 - Float; 10 - Main building; 11 - Main jet; 12 - Spring; 13 - Idle jet; 14 - Accelerator pump diaphragm; 15 - Diaphragm cover; 16 - Spring; 17 - Accelerator pump rod; 18 - Accelerator pump rod nut; 19 - Quantity screw; 20 - Spring; 21 - Quality screw; 22 - Air cut-off solenoid valve; 23 - Throttle lever; 24 - Connecting rod; 25 - Throttle body; 26 - Gasket; 27 - Isolator; 28 - Main jet plug; 29 - Air damper cover; 30 - Spring; 31 - Gaskets and adjusting washers; 32 - Air jet.
2. As a rule, in order to remove sediment from the float chamber and remove and blow out the jets, it is enough to remove the carburetor cover.
3. If complete disassembly of the carburetor is required, it must be removed from the engine as described in the previous section.
4. Gradually (half a turn at a time) remove the screws securing the carburetor cover.
5. Remove the cover and its gasket
6. Remove the spring clamp and pull out the float axis. Remove the float.
7. Pour out the remaining fuel from the float chamber and wipe it clean.
8. To remove the throttle body, turn the carburetor over and unscrew the screws securing the body to the carburetor body.
9. The carburetor is now disassembled into 3 main units. Further disassembly should be carried out as necessary.
Top cover
10. Remove the screws from the choke block cover retaining ring and remove the choke parts.
11. Unscrew the float chamber needle valve and remove it together with the sealing washer.
Frame
12. Unscrew and remove all jets using a screwdriver or suitable keys.
13. If you suspect that the previous owner of the car may have replaced the jets, selecting them incorrectly, you should check the sizes of the jets (see Specifications). Clean clogged jets with compressed air or solvent (it is forbidden to clean them with wire).
14. Unscrew and remove 4 screws from the accelerator pump diaphragm cover, remove the cover and pull out the diaphragm. If it is cracked or hardened, it should be replaced.
Throttle body
15. If the throttle shaft is worn, it is recommended not to disassemble the unit, but to immediately replace it as an assembly. A worn throttle shaft often causes rough engine operation at low revs.
Assembly
16. The carburetor is assembled in reverse order. You will need a repair kit containing the necessary gaskets and other parts that need to be replaced.
The text is copied from this portal [www.VWMANUAL.ru]
17. During the assembly of the carburetor, adjust it (see next section).
Visitor comments