
English Русский
Български
Беларускі
Український
Српски
Hrvatski
Română
Polski
Slovenský
Magyar
  |  Articles  |  Sitemap  |  Contacts  |    |
Car maintenance Ford Car maintenance Hyundai Car maintenance Chevrolet Car maintenance BMW Car maintenance Audi Car maintenance Opel Car maintenance AvtoVAZ
VWmanual.ru


Main   Passat   Golf   Polo   Touareg   Tiguan   Sharan   Transporter   Others  
LT 28 (1975-1991) LT 2D (1996-2003) Beetle (1960-1986) Caddy 3 (2003-2010)

Fuel pump (electric) — removal and installation (VW Lt 28)

  • Main
  • Volkswagen
  • LT 28
  • Power unit
  • Fuel and exhaust system
  • Fuel pump (electric) — removal and installation
            0


Contents: Models with chassis number up to 288…↓ Models with chassis number starting…↓ All models ↓

Models with chassis number up to 288 2506 977


1. Disconnect the negative cable from the battery.

2. Disconnect the electrical wiring from the pump.

3. Remember the location of the hoses, then disconnect them from the pump and plug them.

4. Loosen the pump mounting screws and remove it.

Models with chassis number starting from 286 2506 978


5. The fuel pump on these models is combined with the fuel level sensor in the tank.

6. Disconnect the wires and hoses from the pump and remove it from the fuel tank together with the fuel level sensor. This requires a special key (No. 2012) or a flat steel plate that can be installed between two opposite cutouts on the sensor rim (see photo).

[The original information is posted on the website: VWmanual]
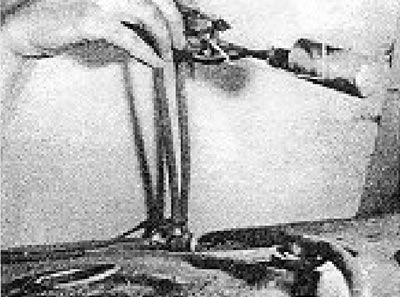
Photo 5.8. Removing the fuel level sensor.
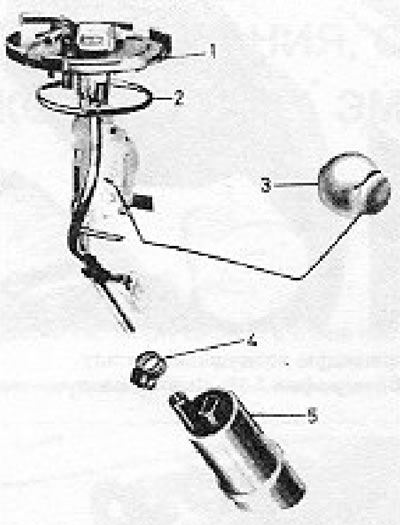
Photo 5.8. Removing the fuel level sensor.


Figure 3.2. Electric fuel pump on later models, combined with the fuel level sensor (Section 5): 1…

Figure 3.2. Electric fuel pump on later models, combined with the fuel level sensor (Section 5): 1 - Fuel level sensor; 2 - Sealing ring; 3 - Float; 4 - Screw clamp; 5 - Fuel pump.


All models


7. Installation of both types of pumps is carried out in reverse order. If the fuel pump is electric, connect it to the fuel level sensor using a new screw clamp. Check that the sensor O-ring is in good condition.

This article is available at russian, bulgarian, belarusian, ukrainian, serbian, croatian, romanian, polish, slovak, hungarian
The text has been checked: Kolesnikov Artem

Share information:

Previous articles
Fuel pump (mechanical) — removal and installation
Fuel filter — replacement
Air Cleaner — maintenance, removal and installation
Fuel system, exhaust system and emission control specifications
Next articles
Fuel level sensor — removal and installation
Fuel tank — removal, cleaning and installation
Carburetor — regulation of idle speed and mixture composition
Carburetor — removal and installation
Carburetor — disassembly and assembly
Carburetor — adjustment


Similar articles from other manuals for VW cars:
Fuel pump Passat B2 (1981-1988)
High pressure fuel pump Golf 3 (1991-1997)
Checking the fuel pump Polo 3 (1995-2003)
Electric sunroof control Touareg 1 (2002-2006)
High pressure fuel pump Tiguan 1 (2007-2015)
Electric Fuel Pump — General Information Sharan 1 (1995-2000)
Checking for voltage at the fuel pump Transporter T4 (1990-2003)
Link to this page in different formats


Visitor comments


No comments yet


How much will 25 + 50 =


Caddy 3 
  • General information
  • User manual
  • Daily care
  • Maintenance
  • Petrol engines 1.4 l
  • Engine repair
  • Cooling and lubrication system
  • Power and exhaust system
  • Petrol engines 1.6 l
  • Engine repair
  • Cooling and lubrication system
  • Power and exhaust system
  • Diesel engines
  • Engine repair
  • Cooling and lubrication system
  • Power and exhaust system
  • Transmission
  • Mechanical gearbox 0AH
  • Mechanical gearbox 0A4
  • Drive shafts
  • Chassis
  • Car suspension
  • Steering
  • Brake system
  • Body and wiring diagrams
  • Interior and exterior
  • Electrical circuits
Beetle 
  • General information
  • Maintenance
  • Power unit
  • Engine repair
  • Cooling and lubrication system
  • Supply system
  • Exhaust system
  • Transmission
  • Clutch
  • Car gearbox
  • Chassis
  • Front suspension
  • Rear suspension
  • Steering
  • Brake system
  • Wheels and tires
  • Body
  • Exterior
  • Electrical equipment
  • Equipment and devices
  • Power devices
  • Electrical circuits
LT 2D 
  • General information
  • User manual
  • Maintenance
  • Power unit
  • Petrol engines 2.3 l
  • Diesel engines 2.5 l
  • Diesel engines 2.8 l
  • Injection system (diesel 2.8 l)
  • Transmission
  • Clutch
  • Manual gearbox
  • Differential
  • Chassis
  • Car suspension
  • Steering system
  • Brake system
  • Body
  • Body elements
  • Heating system
  • Electrical equipment
  • Equipment and devices
  • Electrical circuits
LT 28 
  • General information
  • Maintenance
  • Power unit
  • Petrol engines 2.0L
  • Petrol engines 2.4L
  • Diesel engines
  • Cooling and heating
  • Fuel and exhaust system
  • Ignition system
  • Transmission
  • Clutch
  • Car gearbox
  • Cardan shaft
  • Rear axle
  • Chassis
  • Brake system
  • Car suspension
  • Steering system
  • Body
  • Body elements
  • Doors, locks and windows
  • Electrical equipment
  • Power devices
  • Equipment and devices
  • Electrical circuits
VWmanual.ru © 2016-2026 | Mobile version | News and articles | Sitemap: EN BG BY UA RS HR RO PL SK HU | Write message | Site search
Passat B2 • Passat B3 • Passat B4 • Passat B5 • Passat B6 • Golf 1, diesel • Golf 1, petrol • Golf 2, petrol • Golf 2 • Golf 3 • Golf 4 • Golf 5 • Polo 3 • Polo 4 • Touareg 1 • Tiguan 1 • Sharan 1 • Transporter T3 • Transporter T4 • LT 28 • LT 2D • Beetle • Caddy 3 •
Our website uses cookies to ensure functionality and convenience.