



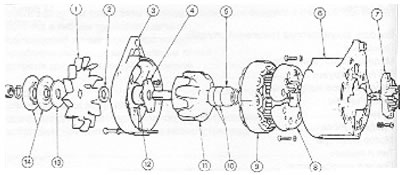
Figure 10.1. Detailed image of a Bosch type generator: 1 - Fan; 2 - Gasket; 3 - Drive end casing; 4 - Thrust plate; 5 - Bearing on the side where the removable rings are located;6 - Casing on the side where the removable rings are located; 7 - Brush box and regulator; 8 - Rectifier (diodes); 9 - Stator; 10 - Removable rings; 11 - Rotor; 12 - Drive end bearing; 13 - Gasket; 14 - Pulley.
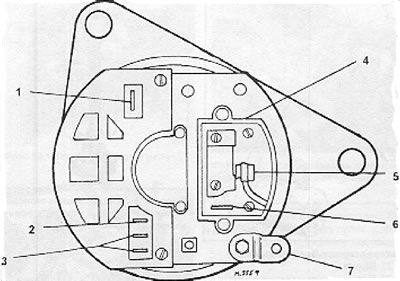
Figure 10.2. Rear view of the Motorola generator with the regulator removed, showing the connections: 1 - B+ for suppression capacitor; 2 - D+ for indicator;3 - B+; 4 - The voltage regulator is inserted here; 5 - D+ red wire, voltage regulator; 6 - DF green wire, voltage regulator; 7 - Ground wire.
1. Disconnect the battery cables.
2. Mark the wire connections on the back of the generator and disconnect the plug from the connector.
3. Loosen and remove the generator adjusting lever bolt, loosen the generator mounting bolts and move the generator toward the engine. Remove the drive belt from the pulley.
4. Remove the remaining mounting bolt and carefully remove the generator.
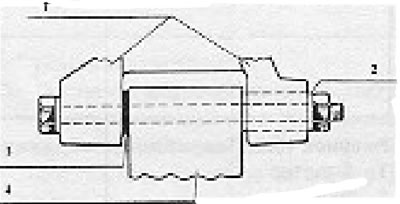
Figure 10.3. Generator mounting support bolt: 1 - Generator bracket; 2 - Sleeve; 3 - Washer; 4 - Generator end plate.
5. Be careful not to drop or hit the generator as this will cause irreparable damage.
6. Due to the fact that checking and servicing the generator requires specialized knowledge and equipment, it is recommended to entrust all work of this type to specialists. Due to this recommendation, the information provided is limited to checking and replacing brushes. If the generator is not charging, or you suspect it is faulty, you should check the following before seeking advice:
- Check the drive belt tension as described in Chapter 2;
- Check the battery as described in Section 2;
- Check all electrical connections for cleanliness and tightness.
7. Loosen and remove the two screws, spring and regular washers that secure the brush box to the rear of the casing. Remove the box.
8. Check that the carbon brushes are able to move freely in their guides, without any sign of sticking.
9. Measure the length of the brushes. If they are worn to the minimum allowable length or less, they should be replaced.
10. Hold the brush wire with pliers and unsolder it from the box. Lift and remove the two brushes.
11. Insert the new brushes and check that they can move freely in their guides. If they are bent or stuck, lightly polish them with a very fine file.
12. Solder the ends of the brush wires to the box.
13. When installing new brushes, be sure to also install new springs.
14. Installation of the brush box is carried out by performing the above steps in reverse order.
15. Some models are equipped with a Motorola alternator. The procedures for disassembling and disassembling it are the same as those described for the Bosch model.
16. Install the generator by performing the above steps in reverse order, but mark the position of the washer and sleeve on the mounting bolt. Tighten the drive belt as described in Chapter 2.
Visitor comments