
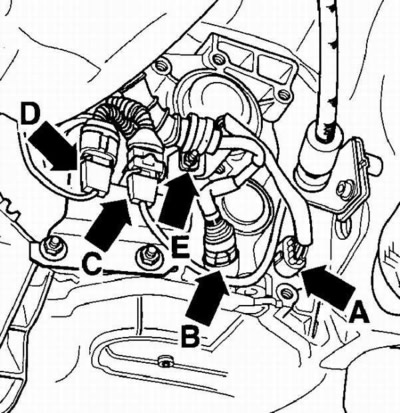
Location of electrical connectors (A, B, C, D) and staples (E), securing the wiring harness to the gearbox
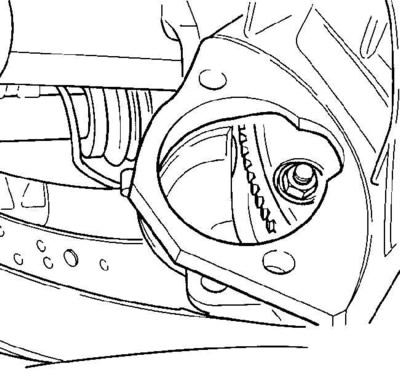
Torque converter mounting nut, visible through the starter mounting hole
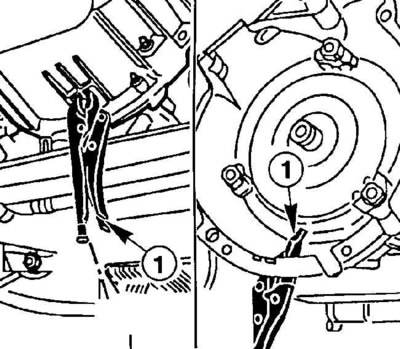
Using a special clamp (1) for fixing the torque converter on the gearbox input shaft
Warning: The removal and installation of a special automatic transmission is similar to the removal and installation of a manual transmission. This subsection contains operations that apply only to a special automatic transmission.
Removing
1. Support the engine using a hoist on the lugs attached to the cylinder head.
2. Mark and disconnect from a transmission electric sockets, see fig. Location of electrical connectors (A, B, C, D) and staples (E), that secures the wiring harness to the transmission.
3. Unscrew the bracket that secures the wiring harness to the gearbox, see fig. Location of electrical connectors (A, B, C, D) and staples (E), that secures the wiring harness to the transmission.
4. Disconnect the ATF electrical connectors from the power unit and use a soft wire to tie them to the body.
5. Using a wrench on the crankshaft pulley bolt, turn the engine crankshaft to such a position that one of the torque converter mounting nuts is accessible through the starter hole. Use a screwdriver or pry bar to secure the drive plate from turning by the teeth of the ring gear and unscrew the torque converter mounting bolt. Turn a cranked shaft of the engine and in the same way unscrew the remained two nuts, see fig. Torque converter mounting nut, visible through the starter mounting hole.
6. Set the selector lever to position P and, pulling up, disconnect the gearbox control cable from the shaft.
7. Remove the bolt securing the transmission control cable sheath and remove the cable.
8. Move the gearbox away from the engine while supporting the torque converter.
9. Move the torque converter along the input shaft to the gearbox housing and, using the clamps, fix the torque converter in this position, see fig. Using a special clamp (1) for fixing the torque converter on the input shaft of the gearbox.
10. Being careful, lower a transmission and take it from under the car.
Installation
Location and tightening torques of the bolts of the automatic transmission to the engine
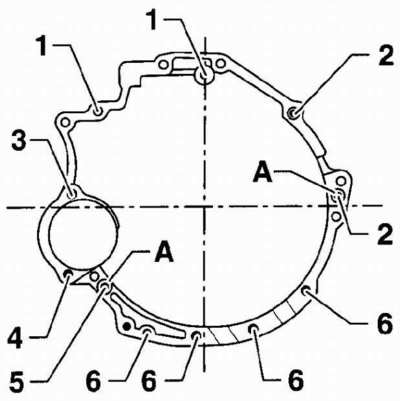
| Position | Bolt | Tightening torque |
| 1 | М12х75 | 65 Nm |
| 2 | М12х130 | 65 Nm |
| 3 | М12х45 | 45 Nm |
| 4 | М12х70 | 45 Nm |
| 5 | M10x60 | 45 Nm |
| 6 | М10х80 | 45 Nm |
| A | Guide bushings | |
1. Remove the clamp holding the torque converter to the transmission input shaft.
2. Screw the torque converter to the drive plate with three nuts and tighten the nuts to a torque of 80 Nm.
3. Screw in bolts of fastening of a transmission to the engine and tighten them the demanded moment, see fig. The location and tightening torques of the bolts securing the automatic transmission to the engine.
4. Check that the selector lever is in position P and connect the transmission control cable to the transmission shaft.
5. Fasten and, if necessary, adjust the transmission control cable.
6. Check the oil level in the gearbox and top up if necessary.
Visitor comments