
Removing
Turn on the ignition.
Operate the wiper for about 2 minutes and stop using the wiper switch. As a result, the cleaner will stop in the end position.
Switch off the ignition. Disconnect ground wire (-) battery.
Disconnect the multi-pin connector.
Unscrew and remove the wiper arm, having previously pried off the protective cap with a narrow screwdriver.
Loosen the wiper frame mounting bolt and pull it out complete with the electric motor.
Press the articulated rods from the crank.
Unscrew the electric motor from the wiper frame, having previously marked their relative position with a felt-tip pen.
Unscrew the crank from the axis of the electric motor.
Installation
If a new wiper motor is installed, set the motor to its original position before installing. To do this, connect the multi-pin plug and start the engine. Then turn off the electric motor with the wiper switch and thereby return to its original position. Disconnect the multi-pin plug.
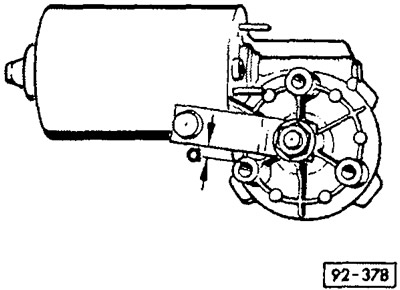
Vehicle models up to 9/93: Attach the crank and align so that dimension -a- is 5 mm. On vehicles manufactured from 10/93, the crank points in the other direction, set according to the marks made before removal.
Tighten crank to 22 Nm.
Bolt the motor to the wiper frame.
Fit the tie rods onto the crank.
Insert motor with wiper frame and tighten to 2 Nm at bracket and 7 Nm at fairing.
Connect the multi-pin plug and return the motor to its original position.
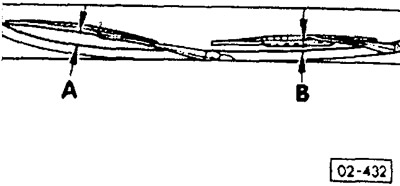
Put the wiper arms on the supports in accordance with the marks made before removal and tighten to 16 Nm. With a new adjustment of the initial position of the wiper blades, it is necessary to maintain the following dimensions: - A = 50 mm; H = 35 mm.
Put on protective caps.
Check the operation of the wiper system.
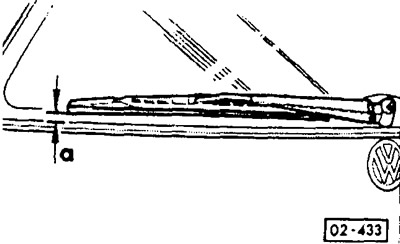
Initial position of the rear wiper: a = 20 mm.
Visitor comments