



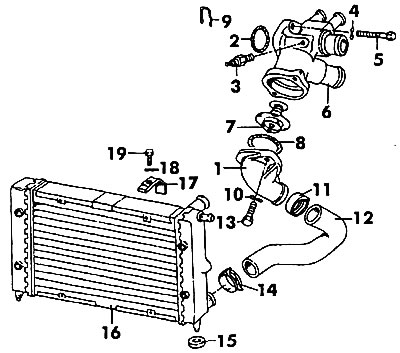
Figure 105. Thermostat: 1 - thermostat housing cover, 2 - gasket, 3 - temperature sensor, 4 - spring ring, 5 - bolt (M8x46), 6 - thermostat housing, 7 - thermostat, 8 - gasket, 9 - retainer, 10 - spring ring, 11 - clamp, 12 - lower pipe, 13 - bolt (M6x20), 14 - clamp, 15 - rubber support, 16 - radiator, 17 - bracket, 18 - spring ring, 19 - bolt (M6x18)
If it is necessary to remove the thermostat housing, disconnect all pipes and electrical wires leading to it and remove the rubber seal.
The thermostat cannot be repaired and must be replaced if faulty.
The thermostat's functionality is checked as follows:
- Place the thermostat on the wire in a container with cold water.
- Place a control thermometer in the same container.
- When heating the water, check if the thermostat valve starts to open at a temperature of about 80°C. The thermostat valve should open completely at a temperature of 102°C.
- During the test, the thermostat valve stem should move at least 7 mm. If the thermostat does not pass the described test, it must be replaced.
- When installing the thermostat, use a new gasket. Before attaching the hoses, check the condition of the clamps. Fill the system with coolant.
Visitor comments