
Front wheel brake (wheels 15 inches)
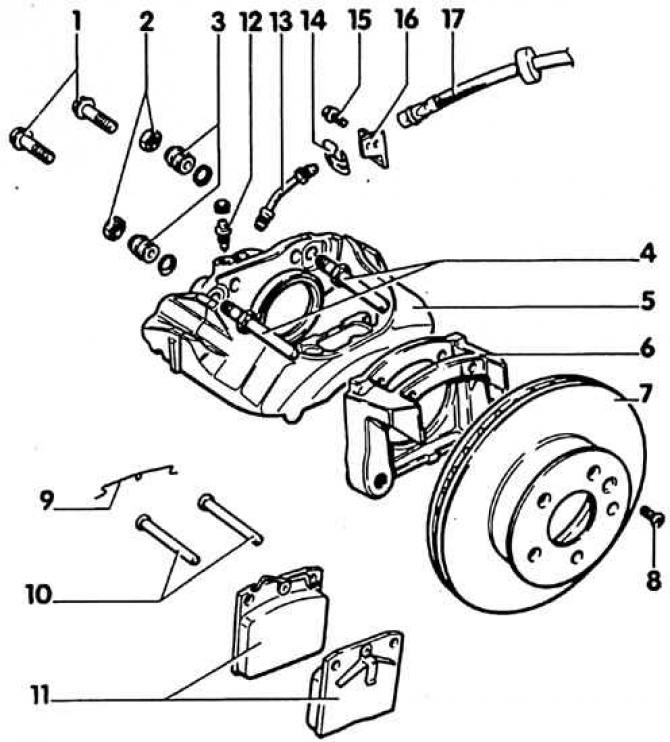
1. Screw, 270 Nm; 2. Screw, 70 Nm; 3. Protective cap; 4. Guide screws; 5. Brake housing (saddles); 6. Brake support; 7. Brake disc; 8. Screw, 5 Nm; 9. Retaining spring; 10. Locking pins; 11. Brake pads with overlays; 12. Air release screw; 13. Brake pipeline; 14. Clamp; 15. Screw, 10 Nm; 16. Brake hose bracket; 17. Brake hose
Removing
1. Loosen wheel bolts. The car is on wheels.
2. Mark the position of the wheel disk relative to the hub with paint, so that you can then install the balanced wheel in its original position.
3. Put the car on the goats (jack), remove the wheels.
Attention! If the brake pads are to be installed again, they must be marked before removal. Replacing the brake pads from the outside to the inside and vice versa, as well as from the right wheel to the left wheel, is not allowed. Replacement may result in incorrect braking effect. It is recommended to use brake pads approved only for this machine. Replace all disc brake pads at the same time, even if only one of them has just reached the wear limit.
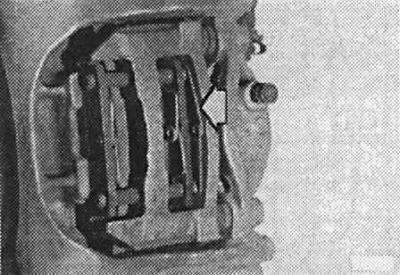
4. Insert a screwdriver under the retaining spring (arrow) and remove it from the lock pins of the pads.
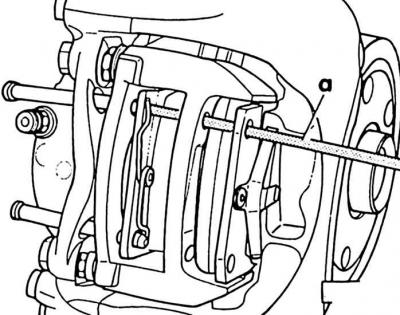
5. Knock out the locking pins with a hammer and a regular punch (A), commercially available, such as HAZET 748 Lgb-4.
6. Remove the brake pads with pliers, a screwdriver or a removable hook.
Installation
Attention! When the brake pads are removed, do not depress the brake pedal, otherwise the piston will be squeezed out of the cylinder body. If, by chance, the piston is nevertheless squeezed out, install it again, while dirt must not enter the hydraulic system. Then release the air from the brake system.
1. Clean the guide surface and the places where the pads are installed in the body shaft with a soft metal brush, or wipe it with a rag soaked in gasoline. Do not use solvents containing mineral oils or sharp tools.
2. Before installing the pads, it is necessary to check the brake disc with your fingers for the absence of grooves. Furrows can be sanded (at the service station), if the discs are still thick enough. It is necessary to grind both brake discs at once, paying attention to a sufficient margin of thickness for wear. If one brake disc is brought in, then the second one must also be brought in the same way.
3. Measure the thickness of the brake discs (see subsection 7.5).
4. Check that there are no cuts on the dust cap. If damaged, replace it, as dirt will quickly lead to depressurization of the brake mechanism (saddles), after which the brake mechanism will require removal and repair.
5. Press the piston into place with a press tool. This can also be done with a hardwood hammer handle. Pay special attention to ensure that the piston is not distorted and that the piston surface and dust cap are not damaged. Install the old brake lining on the other side of the brake disc so that the brake disc is not distorted when the piston is pressed in.
Attention! When pressing the piston from the brake cylinder into the expansion tank, the brake fluid is squeezed out. Observe the liquid in the tank, if necessary, suck out the excess with a rubber bulb.
6. For suction, use an air bleeder or a plastic bottle with a tip that only comes into contact with the brake fluid. Do not use drinking bottles! Brake fluid is poisonous and must never be sucked in by mouth through a hose. Use a rubber bulb. After replacing brake pads "max" on the expansion tank must not be exceeded, as the liquid expands when heated. Leaked brake fluid will drain and get on the brake master cylinder, damaging the paintwork and causing corrosion.
Attention! With a large loss of brake fluid, check the ease of movement of the piston. The piston should push in easily. If necessary, repeat the test: squeeze out the piston by slowly depressing the brake pedal, (assistant) and again press with a hammer handle. To check it is necessary to install another brake mechanism. Make sure that the piston does not come out all the way. If the piston stroke is heavy, repair the brake mechanism (saddle).
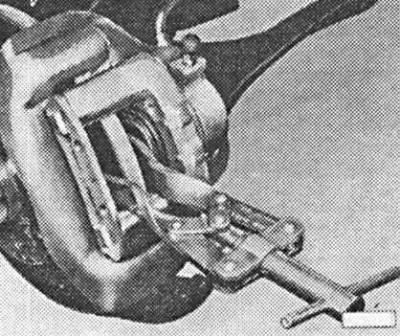
7. Install both brake pads into the brake caliper. Install the locking pins of the pads and press them in until they stop. Replace rusty and bent fingers.
Attention! When installing, make sure that the brake shoe spring is located under both locking pins.
8. Install the lock pin retainer spring.
9. Screw on the wheel, while paying attention to the coincidence of the disc and hub markings. Remove the machine from the stands and tighten the wheel bolt crosswise to 160 Nm.
Attention! Squeeze the brake pedal in place strongly and repeatedly until a noticeable resistance appears. This is the centering of the brake pads, which occupy a place corresponding to their working position.
10. Check the brake fluid in the expansion tank, top up if necessary "MAX".
11. Run in new brake pads carefully. To do this, repeatedly brake the car from about 80 km/h to 40 km/h with a slight effort on the brake pedal, allowing the brakes to cool between braking.
Attention! Earlier than after 200 km it is impossible, unnecessarily, to produce a sharp and complete braking.
Visitor comments