English Русский
Български
Беларускі
Український
Српски
Hrvatski
Română
Polski
Slovenský
Magyar
  |  Articles  |  Sitemap  |  Contacts  |    |
Car maintenance Ford Car maintenance Hyundai Car maintenance Chevrolet Car maintenance BMW Car maintenance Audi Car maintenance Opel Car maintenance AvtoVAZ
VWmanual.ru


Main   Passat   Golf   Polo   Touareg   Tiguan   Sharan   Transporter   Others  
Touareg 1 (2002-2006)

Replacing the crankshaft oil seal on the vibration damper side (VW Touareg 1)

  • Main
  • Touareg
  • Touareg 1
  • Power unit
  • Petrol engine 4.2L
  • Replacing the crankshaft oil seal on the vibration damper side
            0


Contents: Removal ↓ Installation ↓

Removal


Remove the noise insulation screen.

Remove the timing belt.

Unscrew the central bolt 2 from the toothed belt drive gear on the crankshaft 1 and remove the gear from the crankshaft connecting rod journal.

Then remove the oil seal using the T20143/1 hook.

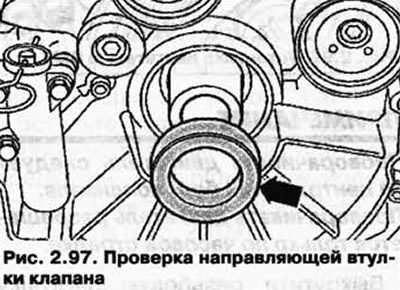
Remove the thrust ring from the crankshaft journal and mark the thrust ring on the end face (Fig. 2.97) with a waterproof marker.

Remove the thrust ring from the crankshaft journal and mark the thrust ring on the end face (Fig.…


Installation


Remove any remaining oil from the crankshaft journal and thrust ring using a clean cloth.

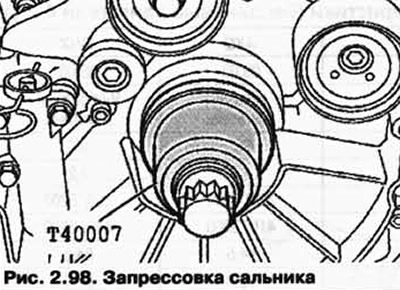
Press the new seal in until it stops using the T40007 mandrel (Fig. 2.98).

Press the new seal in until it stops using the T40007 mandrel (Fig. 2.98).


Turn the thrust ring and place it on the crankshaft journal so that the mark left by the felt-tip pen points towards the engine.


Install the belt drive gear onto the crankshaft and secure it with the new center bolt.

Tightening torque: 200 Nm + 1/2 turn (180°).

Install the timing belt.

Install the poly V-belt.

Install the front noise insulation screen.

The original can be seen on the portal: www.VWmanual.ru

This article is available at russian, bulgarian, belarusian, ukrainian, serbian, croatian, romanian, polish, slovak, hungarian
The text has been checked: Tarasov Ivan

Share information:

Previous articles
Checking the valve guides
Technical characteristics of the 4.2L gasoline engine
Next articles
Removal and installation the drive disc
Removal and installation the flange on the drive disk side
Removal, installation and tensioning of the timing belt
Checking the axial clearance of the camshafts
Replacing camshaft seals
Replacing Hall sensor seals


Similar articles from other manuals for VW cars:
Replacing the crankshaft seal on the flywheel side Passat B6 (2005-2010)
Replacing the piston seal Golf 1 (1974-1984, diesel)
Replacing incandescent lamps Polo 3 (1995-2003)
Driver's side view Tiguan 1 (2007-2015)
Replacing the camshaft seal Sharan 1 (1995-2000)
Removal and installation the flywheel, replacing the crankshaft… Transporter T3 (1979-1992)
Replacing the crankshaft oil seal Beetle (1960-1986)
Link to this page in different formats


Visitor comments


No comments yet


How much will 41 + 11 =


Touareg 1 
  • General information
  • Vehicle device
  • Controls and instruments
  • Seats and safety
  • Maintenance and management
  • Power unit
  • Engine checks
  • Petrol engine 3.2L
  • Petrol engine 4.2L
  • Diesel engine 5.0L
  • Cooling system
  • Lubrication system
  • Injection system
  • Exhaust system
  • Fuel supply system
  • Transmission
  • Automatic gearbox 09D
  • Mechanical gearbox 08D
  • Cardan shaft
  • Chassis
  • Wheels and tires
  • Front suspension
  • Rear suspension
  • Steering gear
  • Brake system
  • Body
  • Outdoor elements
  • Electrical equipment
  • Battery
  • Generator and starter
  • Instruments and wipers
VWmanual.ru © 2016-2026 | Mobile version | News and articles | Sitemap: EN BG BY UA RS HR RO PL SK HU | Write message | Site search
Passat B2 • Passat B3 • Passat B4 • Passat B5 • Passat B6 • Golf 1, diesel • Golf 1, petrol • Golf 2, petrol • Golf 2 • Golf 3 • Golf 4 • Golf 5 • Polo 3 • Polo 4 • Touareg 1 • Tiguan 1 • Sharan 1 • Transporter T3 • Transporter T4 • LT 28 • LT 2D • Beetle • Caddy 3 •
Our website uses cookies to ensure functionality and convenience.