
English Русский
Български
Беларускі
Український
Српски
Hrvatski
Română
Polski
Slovenský
Magyar
  |  Articles  |  Sitemap  |  Contacts  |    |
Car maintenance Ford Car maintenance Hyundai Car maintenance Chevrolet Car maintenance BMW Car maintenance Audi Car maintenance Opel Car maintenance AvtoVAZ
VWmanual.ru


Main   Passat   Golf   Polo   Touareg   Tiguan   Sharan   Transporter   Others  
Sharan 1 (1995-2000)

Engine mount (VW Sharan 1)

  • Main
  • Sharan
  • Sharan 1
  • Petrol engines
  • Engine repair 2.8 l (AAA)
  • Engine mount
            0


When replacing the engine mount, use Fig. 23-25. The engine should be jacked up to relieve the individual suspension elements.

Always observe the tightening torques of the engine mount mounting bolts. When purchasing suspension parts and mounts, remember that they are different for manual and automatic transmissions.

Engine mount adjustment is only required if the engine and gearbox have been removed and the rubber-metal mount has been unscrewed from the engine and its support beam. To properly install the engine, do the following:
  • loosen and then tighten the engine mount bolts by hand 5-6 turns;
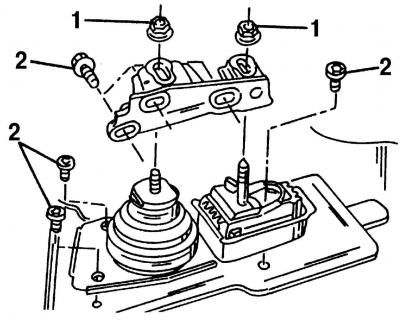
Fig. 24. Right engine mount disassembled. Tightening torques for suspension support mounting bolts:…

Fig. 24. Right engine mount disassembled. Tightening torques for suspension support mounting bolts: 1 = 55 Nm; 2 = 60 Nm

  • rock the engine back and forth to level it and tighten the bolts and nuts to the specified torque values (fig. 24 and 25).
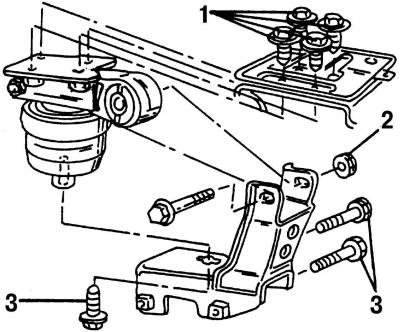
Fig. 25. Disassembled right engine mount on a vehicle with an automatic transmission. Tightening…

Fig. 25. Disassembled right engine mount on a vehicle with an automatic transmission. Tightening torques for suspension support mounting bolts: 1 = 55 Nm; 2 = 110 Nm; 3 = 60 Nm


View the original on the website VWmanual

This article is available at russian, bulgarian, belarusian, ukrainian, serbian, croatian, romanian, polish, slovak, hungarian
The text has been checked: Tarasov Ivan

Share information:

Previous articles
Additional operations on a car with air conditioning
Removal and installation the gearbox from the engine
Removal and installation the engine
VR6 Engine — Design Description
Next articles
General recommendations for engine disassembly and assembly
Removal the cylinder head
Disassembling the cylinder head
Cylinder head repair
Cylinder head assembly
Installing the cylinder head


Similar articles from other manuals for VW cars:
Starting the car engine Passat B3 (1988-1993)
Engine adjustment data Golf 1 (1974-1984, petrol)
Starting the engine from an auxiliary battery Polo 3 (1995-2003)
Removal and installation the fan mount (diesel engine) Touareg 1 (2002-2006)
Car engine number Tiguan 1 (2007-2015)
Engine-gearbox mount Transporter T4 (1990-2003)
Visual inspection of parts in the engine compartment and on the… Caddy 3 (2003-2010)
Link to this page in different formats


Visitor comments


No comments yet


How much will 37 + 35 =


Sharan 1 
  • General information
  • Introduction to guide
  • Maintenance
  • Petrol engines
  • Engine repair 2.8 l (AAA)
  • Engine repair 2.0 l (ADY)
  • Lubrication system
  • Cooling system
  • Fuel injection system
  • Ignition system
  • Diesel engines
  • Engine repair
  • Lubrication system
  • Cooling system
  • Supply system
  • Transmission
  • Clutch
  • Manual gearbox and shafts
  • Chassis
  • Steering
  • Car suspension
  • Brake system
  • Electrical equipment
  • Equipment and devices
  • Power devices
  • Electrical circuits
VWmanual.ru © 2016-2026 | Mobile version | News and articles | Sitemap: EN BG BY UA RS HR RO PL SK HU | Write message | Site search
Passat B2 • Passat B3 • Passat B4 • Passat B5 • Passat B6 • Golf 1, diesel • Golf 1, petrol • Golf 2, petrol • Golf 2 • Golf 3 • Golf 4 • Golf 5 • Polo 3 • Polo 4 • Touareg 1 • Tiguan 1 • Sharan 1 • Transporter T3 • Transporter T4 • LT 28 • LT 2D • Beetle • Caddy 3 •
Our website uses cookies to ensure functionality and convenience.